OPEN-SOURCE SCRIPT
Black Diamond - Order Block Zones
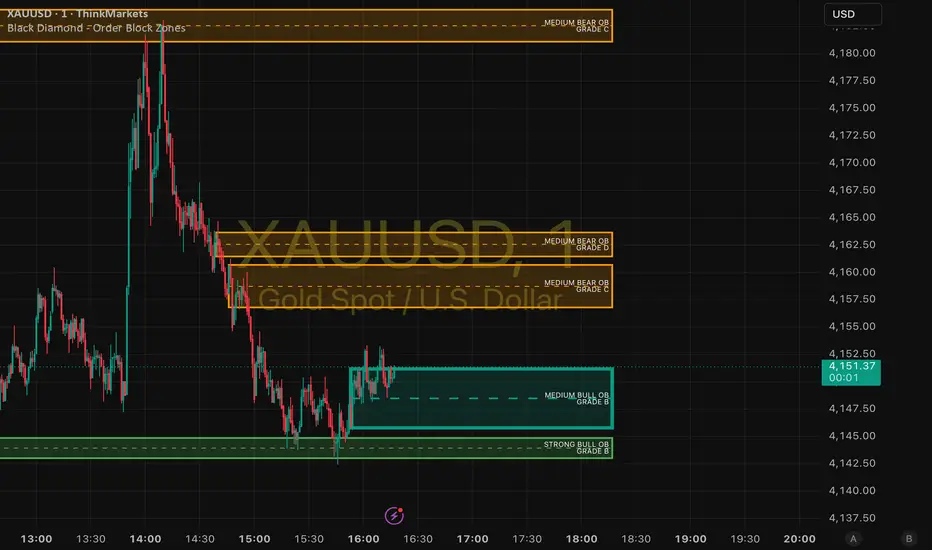
OVERVIEW
Black Diamond Order Block Elite V5 is an advanced institutional order block indicator designed to identify high-probability bullish and bearish order blocks using genuine market structure breaks (BOS), order flow, and smart order block detection.
Unlike many order block indicators that simply mark random bullish and bearish candles, Black Diamond Order Block Elite V5 identifies the final opposing candle before a confirmed Break of Structure, helping traders focus on areas where institutions are most likely to have entered the market.
The indicator automatically grades order blocks based on quality, filters out lower-priority zones, and highlights the strongest nearby areas for potential reactions.
Suitable for Gold, Forex, Indices and Cryptocurrency markets.
KEY FEATURES
True Institutional Order Block Detection
Identifies the final opposing candle before a confirmed Break of Structure (BOS).
Bullish Order Blocks
Last bearish candle before bullish BOS
Bearish Order Blocks
Last bullish candle before bearish BOS
Strength Classification
Each order block is automatically classified as:
Strong
Medium
Weak
Based on:
Candle body size
Volume participation
Break strength
Momentum
Smart Quality Grading
Every zone receives a quality grade:
A+ Grade
Exceptional quality
Highest probability
A Grade
High quality
B Grade
Good quality
C Grade
Average quality
D Grade
Low quality
This allows traders to quickly identify the strongest institutional zones.
Consequent Encroachment (CE)
Displays the 50% level of every order block.
Many institutional traders use the CE level as a preferred entry area.
Zone Merging
Overlapping order blocks are automatically merged into cleaner institutional zones.
Benefits:
Less chart clutter
Easier decision making
Stronger areas of confluence
Nearest Zone Filtering
Only the most relevant nearby zones are displayed.
This helps keep charts clean and focused on actionable trading opportunities.
Mitigation Tracking
The indicator can identify when a zone has already been revisited and mitigated.
Useful for determining whether liquidity may already have been consumed.
Broken Zone Removal
Optional feature that automatically removes invalidated zones once price decisively breaks through them.
Chart Locked Zones
All order block zones remain attached to the chart and move naturally with price action.
HOW TO USE
Bullish Order Blocks
Look for:
Strong Bull OB
Grade A+ or Grade A
When price retraces into the zone:
Watch for rejection candles
Watch for bullish CHOCH
Watch for bullish BOS
Watch for liquidity sweeps
Watch for Fair Value Gaps
These can provide high-probability buying opportunities.
Bearish Order Blocks
Look for:
Strong Bear OB
Grade A+ or Grade A
When price retraces into the zone:
Watch for rejection candles
Watch for bearish CHOCH
Watch for bearish BOS
Watch for liquidity sweeps
Watch for Fair Value Gaps
These can provide high-probability selling opportunities.
UNDERSTANDING THE GRADES
A+ Grade
Highest quality institutional zone.
Often provides the strongest reactions.
Best used for:
Primary setups
Highest conviction trades
A Grade
Very strong zone.
Excellent probability.
Suitable for:
Scalping
Day trading
Swing trading
B Grade
Good quality zone.
Additional confirmation recommended.
C Grade
Average quality zone.
Use alongside additional confluence.
D Grade
Low quality zone.
Generally best avoided unless supported by strong additional confirmations.
HIGH PROBABILITY CONFLUENCE
The strongest setups occur when:
✓ Strong Order Block
✓ Grade A+ or Grade A
✓ Liquidity Sweep
✓ CHOCH
✓ BOS
✓ Fair Value Gap
✓ Session High or Session Low
✓ Rejection Candle
The more confirmations present, the higher the probability of a successful reaction.
RECOMMENDED MARKETS
Designed for:
XAUUSD (Gold)
XAGUSD (Silver)
EURUSD
GBPUSD
USDJPY
NAS100
US30
SPX500
Major Cryptocurrencies
RECOMMENDED TIMEFRAMES
Scalping
1 Minute
3 Minute
5 Minute
Day Trading
15 Minute
30 Minute
Swing Trading
1 Hour
4 Hour
SETTINGS GUIDE
Maximum Zones
Controls the maximum number of order blocks displayed.
Recommended:
20–40 for clean charts
50–80 for detailed analysis
Extend Zones Right
Controls how far zones project into future price action.
Recommended:
120–250 bars
Delete Broken Zones
Recommended:
ON
Removes zones once they become invalid.
Mark Mitigated Zones
Recommended:
ON
Allows traders to identify previously tested zones.
RISK DISCLAIMER
This indicator is provided for educational and informational purposes only.
Nothing contained within this indicator, accompanying documentation, training material, videos, social media content or community discussions should be considered financial advice, investment advice or a recommendation to buy or sell any financial instrument.
Trading Forex, Commodities, Indices, Stocks and Cryptocurrencies involves significant risk and may not be suitable for all investors.
Past performance is not indicative of future results.
The creator of this indicator accepts no responsibility for any losses, damages or financial decisions made through the use of this indicator.
Always conduct your own analysis and use proper risk management before entering any trade.
Never risk money you cannot afford to lose.
By using this indicator, you acknowledge and accept full responsibility for your own trading decisions.
Black Diamond Order Block Elite V5 is an advanced institutional order block indicator designed to identify high-probability bullish and bearish order blocks using genuine market structure breaks (BOS), order flow, and smart order block detection.
Unlike many order block indicators that simply mark random bullish and bearish candles, Black Diamond Order Block Elite V5 identifies the final opposing candle before a confirmed Break of Structure, helping traders focus on areas where institutions are most likely to have entered the market.
The indicator automatically grades order blocks based on quality, filters out lower-priority zones, and highlights the strongest nearby areas for potential reactions.
Suitable for Gold, Forex, Indices and Cryptocurrency markets.
KEY FEATURES
True Institutional Order Block Detection
Identifies the final opposing candle before a confirmed Break of Structure (BOS).
Bullish Order Blocks
Last bearish candle before bullish BOS
Bearish Order Blocks
Last bullish candle before bearish BOS
Strength Classification
Each order block is automatically classified as:
Strong
Medium
Weak
Based on:
Candle body size
Volume participation
Break strength
Momentum
Smart Quality Grading
Every zone receives a quality grade:
A+ Grade
Exceptional quality
Highest probability
A Grade
High quality
B Grade
Good quality
C Grade
Average quality
D Grade
Low quality
This allows traders to quickly identify the strongest institutional zones.
Consequent Encroachment (CE)
Displays the 50% level of every order block.
Many institutional traders use the CE level as a preferred entry area.
Zone Merging
Overlapping order blocks are automatically merged into cleaner institutional zones.
Benefits:
Less chart clutter
Easier decision making
Stronger areas of confluence
Nearest Zone Filtering
Only the most relevant nearby zones are displayed.
This helps keep charts clean and focused on actionable trading opportunities.
Mitigation Tracking
The indicator can identify when a zone has already been revisited and mitigated.
Useful for determining whether liquidity may already have been consumed.
Broken Zone Removal
Optional feature that automatically removes invalidated zones once price decisively breaks through them.
Chart Locked Zones
All order block zones remain attached to the chart and move naturally with price action.
HOW TO USE
Bullish Order Blocks
Look for:
Strong Bull OB
Grade A+ or Grade A
When price retraces into the zone:
Watch for rejection candles
Watch for bullish CHOCH
Watch for bullish BOS
Watch for liquidity sweeps
Watch for Fair Value Gaps
These can provide high-probability buying opportunities.
Bearish Order Blocks
Look for:
Strong Bear OB
Grade A+ or Grade A
When price retraces into the zone:
Watch for rejection candles
Watch for bearish CHOCH
Watch for bearish BOS
Watch for liquidity sweeps
Watch for Fair Value Gaps
These can provide high-probability selling opportunities.
UNDERSTANDING THE GRADES
A+ Grade
Highest quality institutional zone.
Often provides the strongest reactions.
Best used for:
Primary setups
Highest conviction trades
A Grade
Very strong zone.
Excellent probability.
Suitable for:
Scalping
Day trading
Swing trading
B Grade
Good quality zone.
Additional confirmation recommended.
C Grade
Average quality zone.
Use alongside additional confluence.
D Grade
Low quality zone.
Generally best avoided unless supported by strong additional confirmations.
HIGH PROBABILITY CONFLUENCE
The strongest setups occur when:
✓ Strong Order Block
✓ Grade A+ or Grade A
✓ Liquidity Sweep
✓ CHOCH
✓ BOS
✓ Fair Value Gap
✓ Session High or Session Low
✓ Rejection Candle
The more confirmations present, the higher the probability of a successful reaction.
RECOMMENDED MARKETS
Designed for:
XAUUSD (Gold)
XAGUSD (Silver)
EURUSD
GBPUSD
USDJPY
NAS100
US30
SPX500
Major Cryptocurrencies
RECOMMENDED TIMEFRAMES
Scalping
1 Minute
3 Minute
5 Minute
Day Trading
15 Minute
30 Minute
Swing Trading
1 Hour
4 Hour
SETTINGS GUIDE
Maximum Zones
Controls the maximum number of order blocks displayed.
Recommended:
20–40 for clean charts
50–80 for detailed analysis
Extend Zones Right
Controls how far zones project into future price action.
Recommended:
120–250 bars
Delete Broken Zones
Recommended:
ON
Removes zones once they become invalid.
Mark Mitigated Zones
Recommended:
ON
Allows traders to identify previously tested zones.
RISK DISCLAIMER
This indicator is provided for educational and informational purposes only.
Nothing contained within this indicator, accompanying documentation, training material, videos, social media content or community discussions should be considered financial advice, investment advice or a recommendation to buy or sell any financial instrument.
Trading Forex, Commodities, Indices, Stocks and Cryptocurrencies involves significant risk and may not be suitable for all investors.
Past performance is not indicative of future results.
The creator of this indicator accepts no responsibility for any losses, damages or financial decisions made through the use of this indicator.
Always conduct your own analysis and use proper risk management before entering any trade.
Never risk money you cannot afford to lose.
By using this indicator, you acknowledge and accept full responsibility for your own trading decisions.
Script open-source
Nello spirito di TradingView, l'autore di questo script lo ha reso open source, in modo che i trader possano esaminarne e verificarne la funzionalità. Complimenti all'autore! Sebbene sia possibile utilizzarlo gratuitamente, ricordiamo che la ripubblicazione del codice è soggetta al nostro Regolamento.

Declinazione di responsabilità
Le informazioni e le pubblicazioni non sono intese come, e non costituiscono, consulenza o raccomandazioni finanziarie, di investimento, di trading o di altro tipo fornite o approvate da TradingView. Per ulteriori informazioni, consultare i Termini di utilizzo.
Script open-source
Nello spirito di TradingView, l'autore di questo script lo ha reso open source, in modo che i trader possano esaminarne e verificarne la funzionalità. Complimenti all'autore! Sebbene sia possibile utilizzarlo gratuitamente, ricordiamo che la ripubblicazione del codice è soggetta al nostro Regolamento.
Declinazione di responsabilità
Le informazioni e le pubblicazioni non sono intese come, e non costituiscono, consulenza o raccomandazioni finanziarie, di investimento, di trading o di altro tipo fornite o approvate da TradingView. Per ulteriori informazioni, consultare i Termini di utilizzo.