OPEN-SOURCE SCRIPT
Aggiornato Precision Sniper [WillyAlgoTrader]
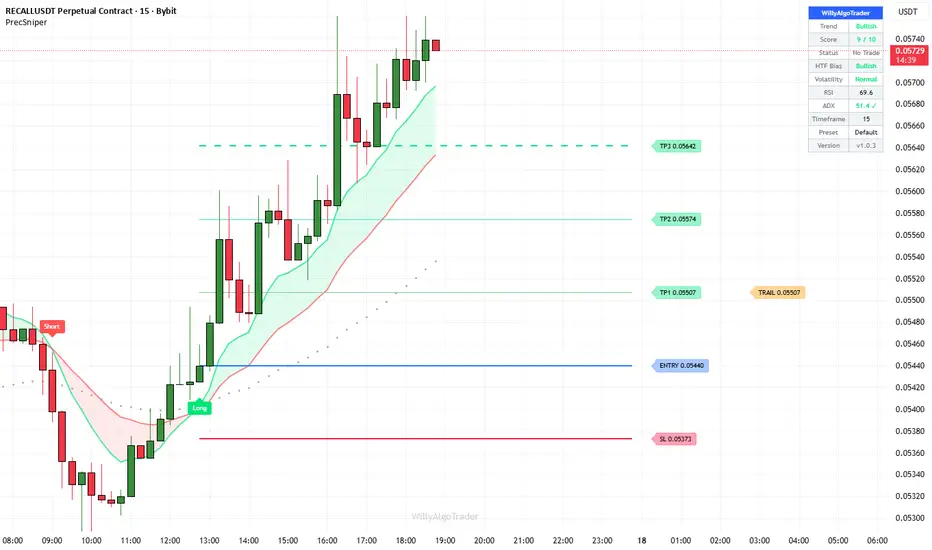
🎯 Precision Sniper is an overlay indicator that generates entry signals only when a 10-factor confluence scoring engine reaches a configurable threshold — combining EMA alignment, RSI momentum, MACD direction, VWAP position, volume confirmation, ADX trend strength, DI directional pressure, and higher-timeframe bias into a single composite score (0–10). Every signal comes with automatic TP/SL placement using either ATR-based or structure-based stops, plus a progressive trailing stop system that ratchets the stop to breakeven after TP1 and to TP1 level after TP2.
The core principle: instead of using a single crossover or oscillator reading to trigger a signal, this indicator requires multiple independent market dimensions to agree simultaneously. An EMA crossover alone can produce false signals in choppy markets. RSI confirmation alone can be early or late. Volume alone doesn't tell you direction. But when EMA alignment + RSI momentum + MACD direction + VWAP position + volume + ADX + DI + HTF trend all point the same way — and the composite score exceeds your threshold — the probability of a genuine directional move is significantly higher than any single factor alone.
🧩 WHY THESE COMPONENTS WORK TOGETHER
Each factor in the scoring engine measures a different market dimension:
— EMA Fast/Slow crossover → detects the momentum shift that initiates the signal (trigger)
— EMA Trend → confirms the macro direction (structural filter)
— RSI → confirms momentum is in the non-extreme zone (avoids overbought entries)
— MACD histogram + MACD vs signal → confirms momentum is accelerating, not decelerating (2 factors)
— VWAP position → confirms price is on the right side of institutional fair value
— Volume → confirms market participation (not a low-liquidity wick)
— ADX + DI → confirms the market is trending AND directional pressure aligns (not ranging)
— HTF EMA bias → confirms the higher-timeframe trend agrees with the entry direction
These factors are deliberately orthogonal: EMA alignment can occur without volume, MACD can be bullish without RSI confirming, price can be above VWAP while ADX shows no trend. The scoring engine counts how many factors agree — only when enough dimensions align does the signal pass.
The entry signal feeds into the risk management system: structure-based SL provides a structurally meaningful stop (recent swing low/high), the R:R-based TPs create consistent reward targets, and the progressive trailing stop automatically manages the trade after entry — ratcheting protection as each target is hit. Without the trailing system, a signal that hits TP1 can still reverse to SL for a full loss. With it, after TP1 the worst case is breakeven.
🔍 WHAT MAKES IT ORIGINAL
1️⃣ 10-factor confluence scoring engine (0–10 scale).
Every bar, both a bullish and bearish score are computed from 10 independent factors:
Bullish score calculation:
— 📐 EMA Fast > EMA Slow → +1.0 (short-term momentum is upward)
— 📏 Close > EMA Trend → +1.0 (price is above macro trend)
— 📊 RSI > 50 AND RSI < 75 → +1.0 (momentum is bullish but not overbought)
— 📈 MACD Histogram > 0 → +1.0 (momentum is positive)
— 📈 MACD Line > Signal Line → +1.0 (MACD has bullish crossover)
— ⚖️ Close > VWAP → +1.0 (price above institutional fair value)
— 📊 Volume > SMA(20) × 1.2 → +1.0 (above-average participation)
— 💪 ADX > 20 AND +DI > −DI → +1.0 (trending market with bullish pressure)
— 🌐 HTF EMA Fast > HTF EMA Slow → +1.5 (higher timeframe confirms direction)
— ✅ Close > EMA Fast → +0.5 (price is above the fast MA — minor confirmation)
Maximum bullish score: 10.0. Bearish score uses symmetric conditions (< instead of >, −DI > +DI, etc.). The HTF factor carries 1.5× weight because higher-timeframe alignment is the single strongest predictor of signal quality. The close > EMA Fast factor carries 0.5× because it's partially redundant with the crossover — it adds a minor confirmation that price didn't just touch the crossover but is clearly above it.
A signal fires when: EMA crossover occurs + price is on the correct side of both EMAs + RSI is not extreme + composite score ≥ Min Confluence Score (default 5 out of 10).
2️⃣ Structure-based stop loss with ATR fallback.
When enabled (default on), the stop loss is placed at the most structurally meaningful level:
For long trades:
— structureStop = recent swing low (over configurable lookback, default 10 bars) − 0.2× ATR padding
— atrStop = entry − ATR × SL multiplier
— finalStop = max(structureStop, atrStop) — the HIGHER (tighter) of the two
This "pick the tighter stop" logic ensures the SL is always at a meaningful structural level but never further than the ATR-based maximum. A minimum distance of 0.5× ATR is enforced to prevent unrealistically tight stops when the swing low is very close to entry.
For short trades: symmetric logic with min() instead of max(), swing high + padding.
When structure SL is disabled, the stop uses pure ATR: SL = entry ± ATR × multiplier.
3️⃣ Progressive trailing stop system.
After entry, the stop ratchets progressively as targets are hit:
— Initial state: SL at structure/ATR level
— After TP1 hit: SL moves to entry price (breakeven) — worst case is now 0 loss
— After TP2 hit: SL moves to TP1 level — worst case is now TP1 profit locked
— After TP3 hit: SL moves to TP2 level — TP2 profit locked, runner continues
The trailing stop line updates dynamically on the chart (orange dotted line with label). The SL hit check uses the pre-update trail value to prevent same-bar conflicts: if TP1 and the trail are both touched on the same candle, the TP1 hit processes first, then the trail is checked against its PRE-move value.
This progressive system means that once a trade reaches TP1, it can only end in breakeven or profit — never a loss. After TP2, the minimum outcome is TP1 profit locked.
4️⃣ Four presets with parameter scaling.
Each preset adjusts two key parameters:
— Conservative: min score floor 7/10, SL floor 2.0× ATR — requires strong consensus, wider stop
— Default: uses your manual settings
— Aggressive: min score ceiling 3/10, manual SL — accepts lighter consensus
— Scalping: min score ceiling 4/10, SL ceiling 1.0× ATR — lower bar, tighter stop
The preset modifies the effective score threshold and SL multiplier — the underlying 10 factors don't change, only how many must agree and how wide the stop is.
5️⃣ Volatility regime detection.
The dashboard displays the current volatility regime: volRatio = ATR(14) / SMA(ATR, 42). High (ratio > 1.3) = volatility above average — consider wider stops. Low (ratio < 0.7) = volatility compressed — watch for breakout. Normal = standard conditions. This provides at-a-glance context for how the current environment affects your settings.
6️⃣ EMA ribbon with macro trend overlay.
Three EMAs create a visual trend system:
— EMA Fast (default 9) = short-term momentum direction
— EMA Slow (default 21) = medium-term trend
— EMA Trend (default 55) = macro trend filter (shown as dot-style line)
The fast/slow ribbon fills green when fast > slow (bullish momentum) and red when fast < slow. Signals only fire when the EMA crossover occurs AND price confirms by closing on the correct side of both EMAs.
7️⃣ RSI extreme avoidance.
The signal engine requires RSI to be in a non-extreme zone: bullish signals require RSI > 50 AND < 75 (not overbought). Bearish signals require RSI < 50 AND > 25 (not oversold). This prevents the most common failure mode of momentum-based entries: buying into an already overbought market or selling into an oversold bounce.
8️⃣ Direction lock — one signal per trend leg.
After a buy signal fires, the next signal can only be a sell (and vice versa). This prevents signal clustering during strong trends where the confluence score might cross the threshold multiple times. If both buy and sell trigger on the same bar (rare edge case), buy takes priority (mutual exclusion).
⚙️ HOW IT WORKS — CALCULATION FLOW
Step 1 — Core indicators: EMA Fast(9), EMA Slow(21), EMA Trend(55), RSI(13), MACD(12/26/9), VWAP(hlc3), Volume SMA(20), ADX/DI(14), HTF EMAs via request.security with [1] + lookahead_on.
Step 2 — Confluence scoring: 10 factors evaluated independently for both bullish and bearish directions. Each factor adds its weight (1.0, 1.5, or 0.5) to the composite score. Max score = 10.0 per direction.
Step 3 — Signal trigger: EMA crossover (fast crosses slow) + price above/below both EMAs + RSI not extreme + composite score ≥ threshold + direction lock → confirmed signal on barstate.isconfirmed.
Step 4 — SL calculation: Structure mode: recent swing low/high ± 0.2× ATR padding, then pick the tighter of structure vs ATR stop. Minimum distance enforced at 0.5× ATR. Risk = |entry − SL|.
Step 5 — TP placement: TP1 = entry ± risk × tp1RR, TP2 = entry ± risk × tp2RR, TP3 = entry ± risk × tp3RR.
Step 6 — Trade monitoring: Each bar: check TP1/TP2/TP3 hits → ratchet trailing stop. Check SL hit against pre-ratchet trail value. Update visual lines and labels.
📖 HOW TO USE
🎯 Quick start:
1. Add the indicator — the EMA ribbon appears showing current trend
2. Select a preset (Conservative for swing, Scalping for 1–5M)
3. Wait for a "Long" or "Short" label — check the dashboard for score
4. Entry, SL, TP1, TP2, TP3 lines appear automatically
5. After TP1 → orange trailing stop line moves to breakeven
6. After TP2 → trail moves to TP1 level. After TP3 → trail moves to TP2.
👁️ Reading the chart:
— 🟢 Green EMA ribbon fill = bullish momentum (fast > slow)
— 🔴 Red EMA ribbon fill = bearish momentum
— ⚫ Dot-style line = EMA Trend (55) — macro direction filter
— 🟢 "Long" label below bar = confirmed buy signal
— 🔴 "Short" label above bar = confirmed sell signal
— 🔵 Blue solid line = entry price
— 🔴 Red solid line = stop loss
— 🟢 Green dashed lines = TP1, TP2, TP3
— 🟠 Orange dotted line = trailing stop (updates after each TP hit)
📊 Dashboard fields:
— Trend: current EMA alignment (Bullish / Bearish / Neutral)
— Score: confluence score (e.g., "7.5 / 10")
— Status: trade state (Active / TP1 ✓ — Trail / TP2 ✓ — Trail / No Trade)
— HTF Bias: higher-timeframe trend (Bullish / Bearish / Neutral)
— Volatility: regime (High / Normal / Low)
— RSI, ADX: current values
— Timeframe, preset, version
🔧 Tuning guide:
— Too many signals: increase Min Score (6–8), use Conservative preset, set HTF filter to a higher TF
— Too few signals: decrease Min Score (3–4), use Aggressive preset
— Stops too tight: increase SL ATR Multiplier (2.0–2.5), increase Swing Lookback (12–20)
— Stops too wide: decrease SL ATR Multiplier (1.0), enable Structure-Based SL
— Scalping 1–5M: Scalping preset, EMA Fast 5/Slow 13/Trend 34, TP1 0.75/TP2 1.5/TP3 2.5
— Swing 4H–1D: Conservative preset, EMA Fast 12/Slow 26/Trend 100, TP3 5.0+
⚙️ KEY SETTINGS REFERENCE
⚙️ Main:
— HTF Trend Filter (default current TF): higher timeframe for bias. Leave empty = disabled.
— Preset (default Default): Conservative / Default / Aggressive / Scalping
🎯 Entry Engine:
— EMA Fast (default 9) / Slow (default 21) / Trend (default 55)
— Min Confluence Score (default 5): minimum score out of 10 to trigger signal
— RSI Length (default 13)
🛡️ Risk Management:
— ATR Length (default 14) / SL ATR Multiplier (default 1.5)
— TP1/TP2/TP3 R:R (default 1.0 / 2.0 / 3.0)
— Trailing Stop (default On): ratchets SL to BE after TP1, to TP1 after TP2
— Structure-Based SL (default On): recent swing low/high as stop anchor
— Swing Lookback (default 10): bars for structure SL detection
🎨 Visual:
— EMA ribbon, TP/SL lines, trailing stop line, background tint (all toggleable)
— Configurable signal label size (Tiny–Huge)
— Auto / Dark / Light theme
🔔 Alerts
— 🟢 BUY / 🔴 SELL — ticker, price, SL, TP1, TP2, TP3, score, timeframe
— 🎯 TP1 HIT / TP2 HIT / 🏆 TP3 HIT — trade progress
— 🛑 SL HIT — stopped out
All support plain text and JSON webhook format. Bar-close confirmed.
⚠️ IMPORTANT NOTES
— 🚫 No repainting. All signals require barstate.isconfirmed. HTF data uses [1] + lookahead_on for non-repainting values. TP/SL hits are checked only on bars after the entry bar (canCheckTPSL = bar_index > entryBar). A warmup period (max of EMA Trend length and 50 bars) prevents signals during insufficient data.
— 📐 The confluence score is not a win-rate predictor. A score of 8/10 means eight market dimensions agree on direction — it measures consensus quality. Higher scores correlate with stronger setups but do not guarantee outcomes.
— ⚖️ Structure-based SL picks the tighter of structure vs ATR stop — not the wider one. This means your actual risk per trade may be less than SL ATR Multiplier × ATR. Check the SL label on each trade for the actual stop level.
— 🔒 The trailing stop uses pre-update values for SL hit detection. If TP1 is hit and the trail moves to breakeven on the same bar, the SL check uses the old trail value — preventing false same-bar stop-outs.
— 📊 VWAP factor auto-falls back to close on instruments where ta.vwap returns na. Volume factor auto-passes (returns true) on instruments without volume data.
— 🔄 If buy and sell trigger simultaneously (extremely rare edge case), buy takes priority and the sell is suppressed.
— 🛠️ This is a signal and risk management tool, not an automated trading bot. It scores confluence, generates signals, places targets, and trails stops — trade decisions remain yours.
— 🌐 Works on all markets and timeframes. All factors auto-adapt to available data.
The core principle: instead of using a single crossover or oscillator reading to trigger a signal, this indicator requires multiple independent market dimensions to agree simultaneously. An EMA crossover alone can produce false signals in choppy markets. RSI confirmation alone can be early or late. Volume alone doesn't tell you direction. But when EMA alignment + RSI momentum + MACD direction + VWAP position + volume + ADX + DI + HTF trend all point the same way — and the composite score exceeds your threshold — the probability of a genuine directional move is significantly higher than any single factor alone.
🧩 WHY THESE COMPONENTS WORK TOGETHER
Each factor in the scoring engine measures a different market dimension:
— EMA Fast/Slow crossover → detects the momentum shift that initiates the signal (trigger)
— EMA Trend → confirms the macro direction (structural filter)
— RSI → confirms momentum is in the non-extreme zone (avoids overbought entries)
— MACD histogram + MACD vs signal → confirms momentum is accelerating, not decelerating (2 factors)
— VWAP position → confirms price is on the right side of institutional fair value
— Volume → confirms market participation (not a low-liquidity wick)
— ADX + DI → confirms the market is trending AND directional pressure aligns (not ranging)
— HTF EMA bias → confirms the higher-timeframe trend agrees with the entry direction
These factors are deliberately orthogonal: EMA alignment can occur without volume, MACD can be bullish without RSI confirming, price can be above VWAP while ADX shows no trend. The scoring engine counts how many factors agree — only when enough dimensions align does the signal pass.
The entry signal feeds into the risk management system: structure-based SL provides a structurally meaningful stop (recent swing low/high), the R:R-based TPs create consistent reward targets, and the progressive trailing stop automatically manages the trade after entry — ratcheting protection as each target is hit. Without the trailing system, a signal that hits TP1 can still reverse to SL for a full loss. With it, after TP1 the worst case is breakeven.
🔍 WHAT MAKES IT ORIGINAL
1️⃣ 10-factor confluence scoring engine (0–10 scale).
Every bar, both a bullish and bearish score are computed from 10 independent factors:
Bullish score calculation:
— 📐 EMA Fast > EMA Slow → +1.0 (short-term momentum is upward)
— 📏 Close > EMA Trend → +1.0 (price is above macro trend)
— 📊 RSI > 50 AND RSI < 75 → +1.0 (momentum is bullish but not overbought)
— 📈 MACD Histogram > 0 → +1.0 (momentum is positive)
— 📈 MACD Line > Signal Line → +1.0 (MACD has bullish crossover)
— ⚖️ Close > VWAP → +1.0 (price above institutional fair value)
— 📊 Volume > SMA(20) × 1.2 → +1.0 (above-average participation)
— 💪 ADX > 20 AND +DI > −DI → +1.0 (trending market with bullish pressure)
— 🌐 HTF EMA Fast > HTF EMA Slow → +1.5 (higher timeframe confirms direction)
— ✅ Close > EMA Fast → +0.5 (price is above the fast MA — minor confirmation)
Maximum bullish score: 10.0. Bearish score uses symmetric conditions (< instead of >, −DI > +DI, etc.). The HTF factor carries 1.5× weight because higher-timeframe alignment is the single strongest predictor of signal quality. The close > EMA Fast factor carries 0.5× because it's partially redundant with the crossover — it adds a minor confirmation that price didn't just touch the crossover but is clearly above it.
A signal fires when: EMA crossover occurs + price is on the correct side of both EMAs + RSI is not extreme + composite score ≥ Min Confluence Score (default 5 out of 10).
2️⃣ Structure-based stop loss with ATR fallback.
When enabled (default on), the stop loss is placed at the most structurally meaningful level:
For long trades:
— structureStop = recent swing low (over configurable lookback, default 10 bars) − 0.2× ATR padding
— atrStop = entry − ATR × SL multiplier
— finalStop = max(structureStop, atrStop) — the HIGHER (tighter) of the two
This "pick the tighter stop" logic ensures the SL is always at a meaningful structural level but never further than the ATR-based maximum. A minimum distance of 0.5× ATR is enforced to prevent unrealistically tight stops when the swing low is very close to entry.
For short trades: symmetric logic with min() instead of max(), swing high + padding.
When structure SL is disabled, the stop uses pure ATR: SL = entry ± ATR × multiplier.
3️⃣ Progressive trailing stop system.
After entry, the stop ratchets progressively as targets are hit:
— Initial state: SL at structure/ATR level
— After TP1 hit: SL moves to entry price (breakeven) — worst case is now 0 loss
— After TP2 hit: SL moves to TP1 level — worst case is now TP1 profit locked
— After TP3 hit: SL moves to TP2 level — TP2 profit locked, runner continues
The trailing stop line updates dynamically on the chart (orange dotted line with label). The SL hit check uses the pre-update trail value to prevent same-bar conflicts: if TP1 and the trail are both touched on the same candle, the TP1 hit processes first, then the trail is checked against its PRE-move value.
This progressive system means that once a trade reaches TP1, it can only end in breakeven or profit — never a loss. After TP2, the minimum outcome is TP1 profit locked.
4️⃣ Four presets with parameter scaling.
Each preset adjusts two key parameters:
— Conservative: min score floor 7/10, SL floor 2.0× ATR — requires strong consensus, wider stop
— Default: uses your manual settings
— Aggressive: min score ceiling 3/10, manual SL — accepts lighter consensus
— Scalping: min score ceiling 4/10, SL ceiling 1.0× ATR — lower bar, tighter stop
The preset modifies the effective score threshold and SL multiplier — the underlying 10 factors don't change, only how many must agree and how wide the stop is.
5️⃣ Volatility regime detection.
The dashboard displays the current volatility regime: volRatio = ATR(14) / SMA(ATR, 42). High (ratio > 1.3) = volatility above average — consider wider stops. Low (ratio < 0.7) = volatility compressed — watch for breakout. Normal = standard conditions. This provides at-a-glance context for how the current environment affects your settings.
6️⃣ EMA ribbon with macro trend overlay.
Three EMAs create a visual trend system:
— EMA Fast (default 9) = short-term momentum direction
— EMA Slow (default 21) = medium-term trend
— EMA Trend (default 55) = macro trend filter (shown as dot-style line)
The fast/slow ribbon fills green when fast > slow (bullish momentum) and red when fast < slow. Signals only fire when the EMA crossover occurs AND price confirms by closing on the correct side of both EMAs.
7️⃣ RSI extreme avoidance.
The signal engine requires RSI to be in a non-extreme zone: bullish signals require RSI > 50 AND < 75 (not overbought). Bearish signals require RSI < 50 AND > 25 (not oversold). This prevents the most common failure mode of momentum-based entries: buying into an already overbought market or selling into an oversold bounce.
8️⃣ Direction lock — one signal per trend leg.
After a buy signal fires, the next signal can only be a sell (and vice versa). This prevents signal clustering during strong trends where the confluence score might cross the threshold multiple times. If both buy and sell trigger on the same bar (rare edge case), buy takes priority (mutual exclusion).
⚙️ HOW IT WORKS — CALCULATION FLOW
Step 1 — Core indicators: EMA Fast(9), EMA Slow(21), EMA Trend(55), RSI(13), MACD(12/26/9), VWAP(hlc3), Volume SMA(20), ADX/DI(14), HTF EMAs via request.security with [1] + lookahead_on.
Step 2 — Confluence scoring: 10 factors evaluated independently for both bullish and bearish directions. Each factor adds its weight (1.0, 1.5, or 0.5) to the composite score. Max score = 10.0 per direction.
Step 3 — Signal trigger: EMA crossover (fast crosses slow) + price above/below both EMAs + RSI not extreme + composite score ≥ threshold + direction lock → confirmed signal on barstate.isconfirmed.
Step 4 — SL calculation: Structure mode: recent swing low/high ± 0.2× ATR padding, then pick the tighter of structure vs ATR stop. Minimum distance enforced at 0.5× ATR. Risk = |entry − SL|.
Step 5 — TP placement: TP1 = entry ± risk × tp1RR, TP2 = entry ± risk × tp2RR, TP3 = entry ± risk × tp3RR.
Step 6 — Trade monitoring: Each bar: check TP1/TP2/TP3 hits → ratchet trailing stop. Check SL hit against pre-ratchet trail value. Update visual lines and labels.
📖 HOW TO USE
🎯 Quick start:
1. Add the indicator — the EMA ribbon appears showing current trend
2. Select a preset (Conservative for swing, Scalping for 1–5M)
3. Wait for a "Long" or "Short" label — check the dashboard for score
4. Entry, SL, TP1, TP2, TP3 lines appear automatically
5. After TP1 → orange trailing stop line moves to breakeven
6. After TP2 → trail moves to TP1 level. After TP3 → trail moves to TP2.
👁️ Reading the chart:
— 🟢 Green EMA ribbon fill = bullish momentum (fast > slow)
— 🔴 Red EMA ribbon fill = bearish momentum
— ⚫ Dot-style line = EMA Trend (55) — macro direction filter
— 🟢 "Long" label below bar = confirmed buy signal
— 🔴 "Short" label above bar = confirmed sell signal
— 🔵 Blue solid line = entry price
— 🔴 Red solid line = stop loss
— 🟢 Green dashed lines = TP1, TP2, TP3
— 🟠 Orange dotted line = trailing stop (updates after each TP hit)
📊 Dashboard fields:
— Trend: current EMA alignment (Bullish / Bearish / Neutral)
— Score: confluence score (e.g., "7.5 / 10")
— Status: trade state (Active / TP1 ✓ — Trail / TP2 ✓ — Trail / No Trade)
— HTF Bias: higher-timeframe trend (Bullish / Bearish / Neutral)
— Volatility: regime (High / Normal / Low)
— RSI, ADX: current values
— Timeframe, preset, version
🔧 Tuning guide:
— Too many signals: increase Min Score (6–8), use Conservative preset, set HTF filter to a higher TF
— Too few signals: decrease Min Score (3–4), use Aggressive preset
— Stops too tight: increase SL ATR Multiplier (2.0–2.5), increase Swing Lookback (12–20)
— Stops too wide: decrease SL ATR Multiplier (1.0), enable Structure-Based SL
— Scalping 1–5M: Scalping preset, EMA Fast 5/Slow 13/Trend 34, TP1 0.75/TP2 1.5/TP3 2.5
— Swing 4H–1D: Conservative preset, EMA Fast 12/Slow 26/Trend 100, TP3 5.0+
⚙️ KEY SETTINGS REFERENCE
⚙️ Main:
— HTF Trend Filter (default current TF): higher timeframe for bias. Leave empty = disabled.
— Preset (default Default): Conservative / Default / Aggressive / Scalping
🎯 Entry Engine:
— EMA Fast (default 9) / Slow (default 21) / Trend (default 55)
— Min Confluence Score (default 5): minimum score out of 10 to trigger signal
— RSI Length (default 13)
🛡️ Risk Management:
— ATR Length (default 14) / SL ATR Multiplier (default 1.5)
— TP1/TP2/TP3 R:R (default 1.0 / 2.0 / 3.0)
— Trailing Stop (default On): ratchets SL to BE after TP1, to TP1 after TP2
— Structure-Based SL (default On): recent swing low/high as stop anchor
— Swing Lookback (default 10): bars for structure SL detection
🎨 Visual:
— EMA ribbon, TP/SL lines, trailing stop line, background tint (all toggleable)
— Configurable signal label size (Tiny–Huge)
— Auto / Dark / Light theme
🔔 Alerts
— 🟢 BUY / 🔴 SELL — ticker, price, SL, TP1, TP2, TP3, score, timeframe
— 🎯 TP1 HIT / TP2 HIT / 🏆 TP3 HIT — trade progress
— 🛑 SL HIT — stopped out
All support plain text and JSON webhook format. Bar-close confirmed.
⚠️ IMPORTANT NOTES
— 🚫 No repainting. All signals require barstate.isconfirmed. HTF data uses [1] + lookahead_on for non-repainting values. TP/SL hits are checked only on bars after the entry bar (canCheckTPSL = bar_index > entryBar). A warmup period (max of EMA Trend length and 50 bars) prevents signals during insufficient data.
— 📐 The confluence score is not a win-rate predictor. A score of 8/10 means eight market dimensions agree on direction — it measures consensus quality. Higher scores correlate with stronger setups but do not guarantee outcomes.
— ⚖️ Structure-based SL picks the tighter of structure vs ATR stop — not the wider one. This means your actual risk per trade may be less than SL ATR Multiplier × ATR. Check the SL label on each trade for the actual stop level.
— 🔒 The trailing stop uses pre-update values for SL hit detection. If TP1 is hit and the trail moves to breakeven on the same bar, the SL check uses the old trail value — preventing false same-bar stop-outs.
— 📊 VWAP factor auto-falls back to close on instruments where ta.vwap returns na. Volume factor auto-passes (returns true) on instruments without volume data.
— 🔄 If buy and sell trigger simultaneously (extremely rare edge case), buy takes priority and the sell is suppressed.
— 🛠️ This is a signal and risk management tool, not an automated trading bot. It scores confluence, generates signals, places targets, and trails stops — trade decisions remain yours.
— 🌐 Works on all markets and timeframes. All factors auto-adapt to available data.
Note di rilascio
🧠 Auto-Preset by TimeframeNew "Auto" mode automatically selects the best preset for your current timeframe:
— ≤ 5 min → Scalping (fast EMAs, tight stops, low score threshold)
— 6–60 min → Default (balanced settings)
— 1H–4H → Aggressive (responsive entries)
— 4H+ → Swing (wide stops, deep trend EMAs)
Dashboard shows the resolved preset: "Auto → Scalping", "Auto → Swing", etc. Just set it and forget — the indicator configures itself.
📊 Built-in Backtest Tracker
New dashboard section "📈 Backtest" tracks every completed trade in real time:
— Trades: total count with wins/losses breakdown (e.g., "12 (8W / 4L)")
— Win Rate: percentage of trades that hit TP1 before SL
— Avg R: average risk-multiple return per trade — shows how many R's each trade delivers on average
— Profit Factor: gross wins / gross losses — above 1.5 is strong, below 1.0 is losing
— Total R: cumulative R earned across all tracked trades
A trade closes when SL is hit or a new opposing signal fires. R is calculated based on the best TP reached: TP3 hit = tp3Mult R, TP2 = tp2Mult R, TP1 = tp1Mult R, no TP = −1R. If closed by opposing signal before any TP, the actual P/L in R terms is estimated from the exit price.
Toggle with "Show Backtest Stats" in Dashboard settings.
🎯 Extended Presets — Swing & Crypto 24/7
Two new presets added:
— Swing: EMA 13/34/89, RSI 21, ATR 20, SL 2.5×, Score 6 — optimized for 4H–Daily charts with wider stops and deeper trend confirmation
— Crypto 24/7: EMA 9/21/55, RSI 14, ATR 20, SL 2.0×, Score 5 — no session bias, wider stops for 24/7 markets, balanced sensitivity
⚙️ Full Profile Presets
Presets now override ALL core parameters — not just score and SL multiplier:
— EMA Fast / Slow / Trend lengths
— RSI length
— ATR length
— Min Confluence Score
— SL ATR Multiplier
Each preset is a complete tuning profile. Select "Custom" to use all manual settings as-is.
Complete preset table:
— Scalping: EMA 5/13/34, RSI 8, ATR 10, Score 4, SL 0.8×
— Aggressive: EMA 8/18/50, RSI 11, ATR 12, Score 3, SL 1.2×
— Default: EMA 9/21/55, RSI 13, ATR 14, Score 5, SL 1.5×
— Conservative: EMA 12/26/89, RSI 14, ATR 14, Score 7, SL 2.0×
— Swing: EMA 13/34/89, RSI 21, ATR 20, Score 6, SL 2.5×
— Crypto 24/7: EMA 9/21/55, RSI 14, ATR 20, Score 5, SL 2.0×
🏆 Signal Quality Grades
Signals now display a quality grade based on confluence score:
— A+ (score ≥ 8.0): highest confidence — most factors aligned
— A (score ≥ 6.5): strong setup
— B (score ≥ 5.0): acceptable quality
— C (score < 5.0): marginal — only if score passes minimum threshold
Labels show "Long A+" / "Short B" etc. Toggle with "Show Signal Grade" in Visual settings. Alerts include the grade in both text and JSON format.
🔧 Minor Improvements
— Configurable label offset for TP/SL (default 20 bars right of entry) — keeps labels from overlapping with price action
— Dashboard text colors adapted for light theme — uses darker saturated variants (dark green, dark red) instead of neon colors that wash out on white backgrounds
— Alerts now include grade and resolved preset in JSON payload
Note di rilascio
🆕 New Features🎚 Signal Grade Filter
You can now filter signals by their quality grade directly from the settings:
🟢 All — show every valid signal (A+, A, B)
🟡 A+ and A — only high-quality setups (score ≥ 6.5)
🔥 A+ Only — premium signals only (score ≥ 8.0)
Perfect for comparing aggressive vs. selective approaches on the same chart. Pro tip: run the backtest tracker on each mode to see which grade level gives you the best edge on your instrument. 📊
🚫 Hide C-Grade Signals Toggle
A dedicated checkbox to filter out weak signals (score < 5.0) regardless of your preset. Especially useful with Aggressive/Scalping presets where low-quality signals could previously sneak through. Enabled by default for cleaner charts. ✨
📋 Dashboard Enhancement
New Grade Filter row in the dashboard so you always see which filtering mode is active at a glance. Color-coded: green for A+ Only, yellow for A+ and A, neutral for All. 🎨
🛠 Critical Bug Fixes
🐛 Backtest Tracker: Honest Trailing Stop Accounting
This one's important. The previous version was overestimating your profits when trailing stop was enabled. Here's the deal:
When price hits TP3 and the trail moves to TP2, then price reverses and hits the trail — you actually exited at TP2 (+2R), not TP3 (+3R). The old code was crediting the full TP3. Same issue for TP2→TP1 and TP1→breakeven.
✅ Now fixed: With trailing ON, the tracker correctly reports the realized R based on where the trail was actually parked. Your Profit Factor and Avg R numbers are now the real deal. 💯
🐛 Double-Counted Trade Closures
When a stop-loss and an opposing signal happened on the same bar, the tracker could partially double-process the trade and overwrite the realized R. ✅ Fixed: closure cases are now mutually exclusive (SL priority), ensuring every trade is counted exactly once with the correct P&L. 🎯
🐛 Blocked Re-Entries After Stop-Outs
Previously, if a long trade got stopped out and a fresh bullish signal appeared 10 bars later, the indicator would ignore it because the direction-lock logic was never released. This was silently costing valid signals in trending markets with pullbacks.
✅ Fixed: The direction lock now resets when a trade closes by stop-loss. Clean stop-out → fresh signal → you're back in the game. 🔄
📈 What This Means for You
➖ More trustworthy backtest numbers — if your PF was 2.5 before, the real number was probably lower. Now you see the truth, which means better decision-making. 🎯
Better signal hygiene — the grade filter lets you quickly A/B test quality thresholds without touching other settings.
➖ No more missed entries — trending markets with multiple stop-outs and re-entries now work as they should. 📊
➖ Same core engine — all the confluence scoring, HTF bias, auto-preset, and risk management you already know. Nothing about the entry logic itself changed. 🛡
Note di rilascio
🚀 UPDATE v1.2.4 — GRANULAR ALERT CONDITIONS═════════════════════════════════════════════════════════════
This release adds dedicated alert conditions for every signal type,
so you can subscribe to exactly what you want in TradingView's
"Create Alert" dialog — without custom messages or external filtering.
─────────────────────────────────────────────────────────────
WHAT'S NEW
─────────────────────────────────────────────────────────────
▸ DIRECTION-SPECIFIC ALERTS
Create alerts for BUY only or SELL only instead of getting
both directions in a single combined alert.
▸ GRADE-FILTERED ALERT VARIANTS
Each direction comes with three quality tiers:
• Buy/Sell Signal (A+ only) → score ≥ 8.0
• Buy/Sell Signal (A+ and A) → score ≥ 6.5
• Buy/Sell Signal (A+ and A and B) → score ≥ 5.0
These apply their own threshold independently of the in-script
"Signal Grade Filter" input — so you can keep the chart on "All"
visually but only get push alerts for A+ setups.
▸ TP/SL EVENTS AS INDIVIDUAL CONDITIONS
TP1, TP2, TP3, and SL hits are now exposed as separate alert
conditions — useful for partial-close automation or webhook
routing where each event needs its own alert.
▸ "ANY SIGNAL" COMBINED CONDITION
Kept for users who want a single alert covering both directions.
─────────────────────────────────────────────────────────────
FULL LIST OF NEW ALERT CONDITIONS
─────────────────────────────────────────────────────────────
🟢 Buy Signal
🔴 Sell Signal
🟢 Buy Signal (A+ only)
🔴 Sell Signal (A+ only)
🟢 Buy Signal (A+ and A)
🔴 Sell Signal (A+ and A)
🟢 Buy Signal (A+ and A and B)
🔴 Sell Signal (A+ and A and B)
🎯 TP1 Hit
🎯 TP2 Hit
🏆 TP3 Hit
🛑 SL Hit
⚡ Any Signal (Buy or Sell)
─────────────────────────────────────────────────────────────
BACKWARDS COMPATIBILITY
─────────────────────────────────────────────────────────────
The legacy alert() calls used by the "Any alert() function call"
option in TradingView are FULLY PRESERVED. If you've already set
up alerts that way (including JSON webhooks via the "Webhook JSON
Format" toggle), nothing breaks — they keep working as before.
─────────────────────────────────────────────────────────────
HOW TO USE
─────────────────────────────────────────────────────────────
1. Right-click the chart → Add alert (or click the alarm icon)
2. Condition → Precision Sniper [WillyAlgoTrader]
3. Pick the specific signal type from the dropdown
(e.g. "🔴 Sell Signal (A+ only)")
4. Configure delivery (popup / email / webhook / mobile push)
5. Save
─────────────────────────────────────────────────────────────
TIPS
─────────────────────────────────────────────────────────────
▸ Default messages use TradingView placeholders ({{ticker}},
{{close}}, {{interval}}) — you can fully rewrite them in the
alert dialog to match your webhook format.
▸ Cleanest workflow: leave the chart's "Signal Grade Filter" on
"All" to see every setup visually, then use the grade-filtered
alert conditions to only get notified about the quality level
you actually trade.
Note di rilascio
Precision Sniper — Release Notes v1.2.4 → v1.4.0Major update covering the scoring engine, risk management, and a new volatility filter. Signals may differ from previous versions — please review the notes below and your settings after updating.
🎯 SCORING ENGINE
— Fixed a duplicated condition in the confluence score: "MACD above signal line" was mathematically identical to "MACD histogram above zero", so one factor was counted twice. It has been replaced with an independent factor — histogram acceleration (momentum expanding). The score is now built from 10 truly independent factors.
— Adaptive score scale. On symbols without volume data, the volume factor is excluded; on non-intraday timeframes (D and above), the VWAP factor is excluded, since session VWAP is not meaningful there. The maximum score shrinks accordingly (10 → 9 → 8) and the dashboard shows the actual scale (e.g. "7.5 / 9").
— Grades are now relative to the actual maximum: A+ ≥ 80%, A ≥ 65%, B ≥ 50% of max. On regular intraday symbols with volume this equals the previous absolute thresholds (8.0 / 6.5 / 5.0), so nothing changes there. The Min Confluence Score threshold is scaled proportionally as well.
🛡️ RISK MANAGEMENT
— Structure-Based SL reworked. The stop is now placed BEYOND the recent swing (the wider of the ATR stop vs the structure level), instead of potentially sitting inside the structure. Capped at 1.5× the ATR stop distance, with the existing 0.5× ATR minimum distance preserved.
— New option: "Full Exit at TP3" (enabled by default). The trade now completes when TP3 is reached — status shows "TP3 ✓ — Closed" and the stats tracker records it immediately. Disable it to keep the previous "runner" behavior where the position keeps trailing after TP3.
— New: High Volatility Filter. The volatility regime (shown in the dashboard) is now used by the logic, with three modes:
• Off — regime is ignored (previous behavior)
• Skip Signals (default) — new entries are blocked while the regime is High
• Widen SL — entries are allowed, but the ATR stop distance is multiplied by a configurable factor; TP levels scale with the widened risk, so all R:R ratios are preserved
The High-regime threshold is configurable (default 1.3 = ATR 30% above its average). The dashboard marks the active filter: "High ⛔" (skipping) or "High ⚠" (widening). The filter affects new entries only, never trades that are already open.
⚙️ PRESETS & VALIDATION
— Auto preset remapped so that strictness grows with the timeframe: ≤5m → Scalping, ≤1H → Default, 1H–4H → Conservative (was Aggressive), 4H+ → Swing.
— Input validation on load: TP multipliers must satisfy TP1 < TP2 < TP3, and the HTF Trend Filter must be equal to or higher than the chart timeframe. Invalid combinations now produce a clear error instead of silently breaking the logic.
🔔 ALERTS
— Entry alerts now include the volatility regime: webhook JSON payloads contain a new "vol" field ("High" / "Normal" / "Low"), and text alerts end with a "| Vol: ..." segment. All other fields and formats are unchanged. If your bot uses a strict JSON schema, please add the new field.
📊 DASHBOARD
— Score row displays the adaptive maximum.
— Volatility row shows the filter state when active.
🧹 PERFORMANCE & CODE QUALITY
— HTF data is now fetched with a single request instead of two — lighter on resources.
— Internal loops replaced with built-in functions, memory footprint reduced, dead code removed, alert builders and dashboard rendering de-duplicated. No behavior changes from this part.
⚠️ IMPORTANT NOTES AFTER UPDATING
Signals will differ from v1.2.x due to the scoring fix and the Auto-preset change — this is expected and intended.
Two defaults changed: "Full Exit at TP3" is ON and "High Volatility Filter" is set to "Skip Signals". Set both to their off states if you prefer behavior closer to the previous version.
The built-in stats tracker remains an informational estimate based on bar highs/lows — it does not account for intrabar sequence, gaps, commissions, or slippage. Always do your own testing.
Note di rilascio
Precision Sniper [WillyAlgoTrader] — v2.1.0✅IMPORTANT — MIGRATION
• Recreate all TradingView alerts after updating: payloads and condition names changed.
• Webhook receivers must be updated to JSON schema v2 (batched events[] with event_id / trade_id).
• Evidence score is renormalized. v1 scores and "Minimum score" values are NOT comparable. Presets carry their own values; re-tune Custom.
• HTF: empty now means OFF. In v1 an empty HTF meant "current timeframe" and awarded 1.5 points on every crossover. The HTF must be strictly higher than the chart.
• Costs default to zero. Enter commission / spread / slippage to see net R.
✅EXECUTION MODEL (new)
• Entry at the confirmed close of the crossover bar, rounded to tick.
• Exits on OHLC with the OLD stop checked first, before any target on the same bar.
• Gap through the stop fills at the open (min(open, stop) for longs, max for shorts).
• Stop steps (TP1 → entry, TP2 → TP1, TP3 → TP2) take effect on the NEXT bar. Renamed from "trailing" to "step stop": it is not a continuous trail, and an entry-price stop is not net breakeven after costs.
• Stop + target on the same bar: stop wins, trade is flagged "ambiguous" and counted.
• Opposite signal closes the open trade at the actual close price; the new trade opens on the same bar.
• Optional entry/statistics window: an open position closes at the first confirmed close at/after the end date.
• All state changes happen on confirmed bars only.
✅RISK, STOP GEOMETRY, COSTS
• Tick-exact stop and targets; the alert carries the exact model prices.
• Geometry validation: minimum initial risk in ticks, stop on the correct side, increasing targets, optional "require positive prices". Invalid geometry is a rejection reason, not a silent fallback.
• Structure stop as in v1 (wider of ATR stop and window low/high ± 0.2 ATR, capped at 1.5× ATR stop). New "Skip entry" policy when the cap would apply; stop origin recorded per trade. The v1 0.5×ATR floor is replaced by the minimum-risk-ticks check.
• Partial exits: close X% of the original position at TP1 and/or TP2 (defaults 0 = whole-position model). TP3 can close the rest or hold it.
• Cost model: commission per side (%), round-trip spread (ticks), adverse slippage per side (ticks). Entry cost on the full position, exit cost per filled fraction. Warning when estimated round-trip cost exceeds a set fraction of initial R.
• High-volatility filter kept (Off / Skip Signals / Widen SL).
✅ENTRY ENGINE
• Mandatory conditions (EMA crossover, price beyond both EMAs) are gates and no longer add points.
• Optional evidence: trend EMA, RSI band, MACD histogram sign, MACD acceleration, ADX with DI direction (1 each), volume spike (1, if the symbol has volume), session VWAP side (1, intraday with volume), soft HTF bias (1.5). Max = 5 to 8.5 depending on available data.
• Minimum score is a ratio of the actual max. Grades: A+ ≥ 80%, A ≥ 65%, B ≥ 50%. "Hide C grade" raises the required ratio to 0.5 regardless of preset.
• HTF modes: Off / Soft score / Hard filter. Bias from the last CLOSED HTF bar; the dashboard shows when it closed.
• Session VWAP mode: Auto (off for Crypto 24/7) / On / Off.
• Candidate lifecycle: one candidate per crossover, optional extra confirmation bars (0 = v1 behaviour), cancellation on opposite crossover, loss of momentum, timeout or date window. Exactly one final rejection reason per candidate (12 categories) shown in Diagnostics.
• New gate: maximum distance to fast EMA in ATR (0 = off).
• Data readiness gate: no entries until all indicators, volume, VWAP and HTF are ready; configurable warmup multiplier.
• Same-direction rule: a signal in the direction of an open trade is rejected; after any exit both directions are allowed.
• Price source limited to Close / HL2 / HLC3 / OHLC4. External sources are intentionally unsupported.
✅DASHBOARD AND VISUALS
• Sectioned dashboard: Market, Signal, Trade, Sizing (when enabled), Stats, Diagnostics. Each section has its own toggle.
• Trend-tinted header, section separators, zebra rows, frame, a tooltip on every row.
• Gauges for evidence vs required score and for win rate; recent-form strip of the last 10 closed trades (▰ win · ▱ loss · ▫ break-even).
• Trade section collapses to one row when flat and shows the last closed trade.
• Positions Top / Middle / Bottom × Left / Right for dashboard and journal; text size, transparency, theme Auto / Dark / Light.
• Trade levels drawn in time coordinates (stay valid far from the last bar): entry, initial SL, TP1–TP3, effective step stop. Touched targets marked ✓, closed trades marked [closed].
• Exit markers with reason and net R; entry markers with grade.
✅ALERTS
• One batched alert() per confirmed bar containing every event of that bar.
• JSON schema v2: schema_version, script_version, instance, ticker, tf, execution_model, and per event: event_id, trade_id, event_type (entry, tp1_hit, tp2_hit, tp3_hit, stop_changed, exit, candidate_cancelled), direction, bar time, entry, level price, initial/new stop, targets, remaining fraction, position closed, exit reason, realized net R, score, grade, ambiguous flag. Text mode: one line per event.
• Per-event toggles: entry, targets, stop changes, full exits, candidate cancellations. Instance tag for several configurations on one symbol.
• alertcondition set: Buy / Sell, A+ only, A+ and A, B or better, TP1 / TP2 / TP3, Stop Hit, Position Closed, Stop Changed, Candidate Cancelled, Any Signal.
✅SAFETY CHECKS ON LOAD
• Runtime errors for: tick below 1e-8, non-standard chart types, non-time-based charts, EMA lengths not Fast < Slow < Trend, non-increasing TP multipliers, partial fractions ≥ 100%, start after end, HTF not strictly higher, invalid session days, dashboard and journal in the same corner.
✅REMOVED OR REPLACED
• input.source for arbitrary sources → fixed price-source list.
• HTF "empty = current timeframe" → empty = Off; equal timeframe rejected.
• v1 backtest heuristics (R from TP multipliers, estimated reversal P/L) → fill-based accounting with costs and partials.
• 0.5×ATR stop floor → minimum-risk-ticks validation.
• lastDirection same-direction lock → "already open" rule.
• v1 alert JSON (action / event keys) → schema v2 batches.
• Dashboard rows RSI / ADX / Grade Filter → evidence gauge, Diagnostics factor rows, Profile row.
✅DISCLAIMER
Prices are model prices, not broker fills. Statistics reset on any input change. Not financial advice.
Script open-source
Nello spirito di TradingView, l'autore di questo script lo ha reso open source, in modo che i trader possano esaminarne e verificarne la funzionalità. Complimenti all'autore! Sebbene sia possibile utilizzarlo gratuitamente, ricordiamo che la ripubblicazione del codice è soggetta al nostro Regolamento.

10 years in trading. For all inquiries, contact me on my Telegram channel: t.me/WillyAlgoTrader or Instagram: @willytraderbtc
Declinazione di responsabilità
Le informazioni e le pubblicazioni non sono intese come, e non costituiscono, consulenza o raccomandazioni finanziarie, di investimento, di trading o di altro tipo fornite o approvate da TradingView. Per ulteriori informazioni, consultare i Termini di utilizzo.
Script open-source
Nello spirito di TradingView, l'autore di questo script lo ha reso open source, in modo che i trader possano esaminarne e verificarne la funzionalità. Complimenti all'autore! Sebbene sia possibile utilizzarlo gratuitamente, ricordiamo che la ripubblicazione del codice è soggetta al nostro Regolamento.
10 years in trading. For all inquiries, contact me on my Telegram channel: t.me/WillyAlgoTrader or Instagram: @willytraderbtc
Declinazione di responsabilità
Le informazioni e le pubblicazioni non sono intese come, e non costituiscono, consulenza o raccomandazioni finanziarie, di investimento, di trading o di altro tipo fornite o approvate da TradingView. Per ulteriori informazioni, consultare i Termini di utilizzo.