Profile Master [SimpleAlgo]
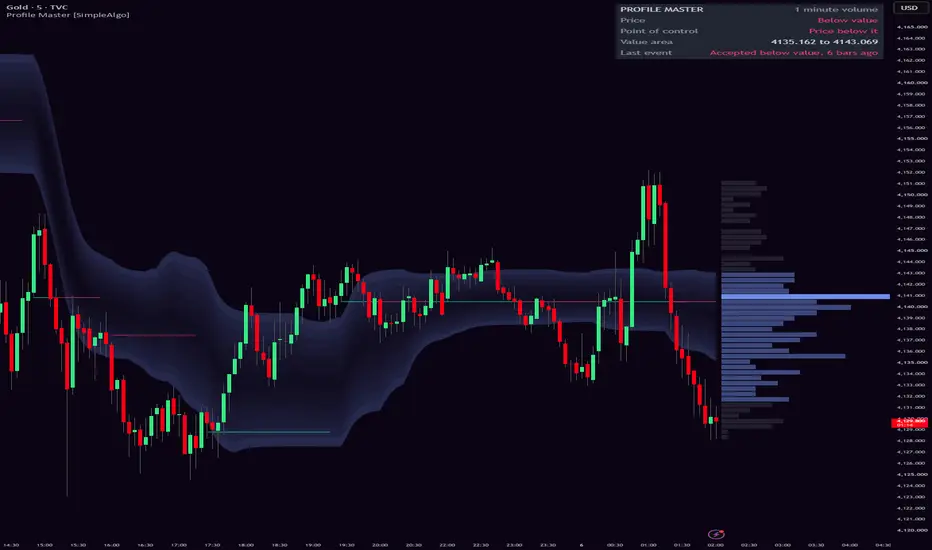
█ Introducing Profile Master
A volume profile answers one question: where has the market been doing business? The standard ways of showing it, a histogram pinned to the side of the chart or a stack of session boxes, answer it for one moment. You get the levels, but you never see how value moved while price moved.
Profile Master draws the profile as a cloud that travels with the chart. The cloud is the value area: the range that holds 70% of the volume in the cluster the market is doing business in, built from the last 90 bars. The thin line inside it is the point of control, the price where the most volume changed hands. Both are rebuilt on every bar from lower timeframe volume at price, and older bars fade out of the profile gradually instead of dropping off a cliff, so the cloud bends with the market instead of jumping.

There are no labels on the chart. Price inside the cloud, outside it, or leaving it and coming back is the whole read, and the panel in the corner says it in words. The four things worth knowing about (price accepted above value, accepted below it, back into value from above, back into value from below) are alerts, and can be marked on the chart with small dots if you want them.

⚪ The cloud
The value area is drawn as fourteen slices of one colour, faint in the middle and densest at the edges. The edges are the levels you trade against, so they're the part you should see. The middle of the cloud is where price lives most of the time and needs no emphasis. While value is on the move from one cluster to another the whole cloud fades, and it comes back to full strength once it has arrived. A faint trail is value in transit. A bright cloud is value at rest.
⚪ The point of control
The busiest price is drawn as horizontal level segments, mint while price is holding above it and pink while it's holding below. When the busiest price moves, the line restarts at the new level instead of drawing a staircase, and short-lived levels are left out. What's left is a handful of prices that mattered.
⚪ What's different
Most rolling profiles treat every bar in the window the same until the bar leaves, and then the value area jumps. Profile Master weights bars by age, so a session leaves the profile over many bars and the value area drifts. The cloud describes the cluster the market is trading in: when a second cluster builds away from the first, the cloud stays with the busier one until the new one takes over, then travels there over a number of bars. It never stretches across both. The profile is built from where volume traded inside each bar, not from the bar's range. The control has stability rules so it doesn't flicker between two busy areas. And the events only count when price did the moving, never when the cloud drifted over to meet a sitting market.
█ HOW IT WORKS
⚪ 1. Volume at price
For every bar on your chart the script reads the closes and volumes of a lower timeframe. The timeframe is picked automatically: 1-minute bars on charts up to 15 minutes, 5-minute bars up to 1 hour, 15-minute up to 4 hours, 1-hour up to daily, 4-hour above that. You can also set it by hand.
Pine Script®
Each lower timeframe close is sorted into one of eight price levels inside the bar, and its volume is added there.
Pine Script®
So a 1-hour candle isn't one block of volume smeared across its range. It's twelve 5-minute prints, each at the price where it happened. If no lower timeframe data is available for a bar (and on a 1-minute chart, where there's nothing lower to read), the bar's volume is spread across its range with the body weighted three to one over the wicks.
Two guards keep bad data out. A print further than three ATRs from the bar's body is treated as a bad tick rather than a trade, and is counted at the edge of that range, so one broken print from a data feed can't stretch the whole profile:
Pine Script®
And a single print carrying many times the volume of the bar's typical print is capped at ten times the bar's median print. On stocks and cash indices that's the closing auction, which lands a block of the day's volume on one price in one minute. It still shows as a busy row, but it can't own the profile:
Pine Script®
⚪ 2. The fading window
The profile is built from the last 90 bars, but they don't count equally. Each bar is weighted by its age:
Pine Script®
The newest bar is at full weight, a bar halfway through the window counts for about a third, and the oldest bars count for almost nothing. This is the part that makes the cloud a cloud. In a plain rolling profile the value area can jump a hundred ticks the moment one big session leaves the window. Here, a session leaves slowly, so the value area drifts.

⚪ 3. The grid
The price range covered by the window is split into 48 rows, and the volume of every bar in the window is stacked into those rows at its weight. The range comes from where volume actually sat, not from the full extent of every wick, so one spike doesn't coarsen the resolution of the whole profile.
⚪ 4. The point of control
The busiest row is read off a copy of the profile smoothed across three rows, so a busy area beats a single busy row:
Pine Script®
The control is sticky. The row that held it keeps it unless another area carries clearly more volume, about a quarter more:
Pine Script®
Without this, the control flips between two clusters on every bar and the line turns into confetti.
⚪ 5. The value area
The cloud is the value area of the cluster the control sits in, not of everything in the window. First the cluster is found by walking out from the control in both directions while the profile stays busy. It ends where the next two rows average less than 15% of what the busiest row carries:
Pine Script®
Then, starting at the control, the area grows one row at a time toward whichever side carries more volume in the next two rows, the way the classic profile does, until it holds 70% of the cluster's volume:
Pine Script®
Why the cluster rule matters: after a fast move, the window holds two clusters with thin trading between them, the old one fading and the new one building. A plain 70% area has to reach across the thin stretch to the other cluster, and the cloud turns into a tall slab, or dives toward old prices while the market is trading somewhere else. Here the cloud stays with the cluster that holds the control until the other one takes it over, and then it travels there. The right-edge profile still shows both.
The edges then get a little hysteresis: an edge stays where it was while it's still inside the band between the 66% and 74% areas, and moves when it falls outside that band. That stops the edges from twitching when the volume split sits right at the threshold.
⚪ 6. From rows to cloud
The raw edges go through a 5-bar median, which deletes one and two bar jumps. Then each edge is allowed to move only so far in a single bar: half an ATR by default, or a tenth of what's left of a long trip, whichever is more.
Pine Script®
Ordinary drift is well under the limit and passes through untouched. A relocation of value, when the control moves to a new cluster and the whole value area is rebuilt around it, would otherwise draw a wall. With the limit it draws a slope that starts quickly and eases into the new level, and the cloud looks like it flows there, because it does. A short smoothing (4 bars by default) rounds the corners:
Pine Script®
While the drawn edges are still more than half an ATR from where they're going, the cloud fades in proportion to the distance left, and returns to full strength as it arrives:
Pine Script®
So the trail the cloud leaves while it travels between two clusters is faint, and the cloud is bright only where value actually sits.
The space between the two edges is split into fourteen slices and each slice is filled at its own transparency, faint at the centre and densest at the edges.
⚪ 7. The control line
The drawn level is held until the busiest row has moved a full row away, so grid drift doesn't nudge the line:
Pine Script®
Only horizontal segments are drawn, with a one-bar gap where the level changes, and any level that didn't last five bars is left out. The last five bars are drawn live, so the right end of the line is provisional until those bars close. The colour follows which side of the control price is holding, and needs two closes to flip.
When value relocates, the control gets there first, because it's a level and not a curve, and the cloud follows it over the next bars. A control segment sitting just outside the cloud is value on its way.

⚪ 8. Events
Price is inside, above or below the cloud. A change counts after two closes on the new side, and only if price did the moving. Over the confirming bars, price has to have travelled at least as far as the edge it crossed moved toward it:
Pine Script®
If the cloud moved to meet price, or moved away from it, the state changes quietly: nothing fires, nothing is marked, and the panel's Last event row says what happened instead (Value caught up to price, Value moved below price, Value moved above price). While a change is still being confirmed, the Price row says so too (Above value, close 1 of 2), and on the live bar that would complete it, it says the change confirms on close.
Four events come out of this: Accepted above value, Accepted below value, Back into value from above, Back into value from below. They show in the panel and the alert list, and as tiny marks on the chart if you turn that on.
⚪ 9. The profile at the right edge
A small histogram of the current window is drawn past the last bar: value rows in the cloud colour, the control row lit, everything else grey. It's the classic picture of the same data, for the people who want to see the rows, and it's where a second cluster shows up before the cloud moves to it.
⚪ Repainting
Every bar of the cloud is built only from the bars before it, so the historical cloud doesn't change. The cloud and the control update on the live bar like any moving average does. Events are decided on closed bars and never move afterwards.
█ HOW TO USE IT
⚪ Read the cloud first
Inside the cloud, the market is doing business where it has been doing business. Expect rotation between the edges and around the control. Outside it, the market is away from value, and one of two things happens: it gets accepted there, a new cluster builds, the cloud travels to it; or it gets rejected and price comes back in. While that's being decided, the right-edge profile shows the new cluster growing in grey.

⚪ The edges are the levels
The top of the cloud is where buyers have been paying up and the bottom is where sellers have been letting go. Price coming down to the bottom edge from inside is a pullback to the cheap end of value. Price pushing through the top edge and holding there is a market that has decided value is higher.
⚪ The control is the fulcrum
The busiest price is where the two sides agreed the most. Mint segments mean price is holding above it, pink means below. A long pink segment under a rising market usually isn't a problem. A pink segment forming while price sits right on top of it, after a long run, is worth a second look.
⚪ Acceptance and rotation
Accepted above value (or below): price closed outside the cloud, stayed there, and got there under its own steam. This is the start of a move away from value. The cloud will follow if the move holds.
Back into value from above (or below): price was out, and it came back and stayed. This is the old market profile idea: when a market re-enters value and holds, it tends to rotate across the whole value area to the other side. Tends. It's a tendency, not a rule, and it works best after a failed attempt to leave, not during a trend that has already moved the cloud.

⚪ Timeframes
On 5 and 15-minute charts the window is a few hours and the cloud behaves like a session profile that never resets. On 1 and 4-hour charts it covers days, and the cloud is where swing traders find their levels. On daily charts it's a rolling four month profile with 1-hour volume inside it.
⚪ If you're new to profiles
Three sentences. The cloud is where most of the recent trading happened; inside it the market is fair and chops between the edges, outside it the market is moving and you don't fight it. The line is the price everyone agreed on the most; mint means buyers are in charge of it, pink means sellers. Two things are worth waiting for: price leaves the cloud and stays out, which means a move is starting, or price pokes out and comes back in, which means the move failed and price tends to travel back across the cloud.
None of this predicts where price goes. The cloud is a map of where volume has been, not where it's going, and an event isn't a buy or sell signal. Use it with your own analysis and manage your risk.
█ SETTINGS
⚪ Profile
⚪ Events
⚪ Look
█ ALERTS
Set them to "Once per bar close". Events are only ever confirmed on a closed bar.
█ NOTES AND LIMITS

█ DISCLAIMER
This script is for education and information. It isn't financial advice, a recommendation to buy or sell anything, or a promise about what any market will do. Past behaviour of a market, a method or an indicator doesn't guarantee future results, and nothing on this chart replaces your own judgement. Trading involves risk and you are responsible for your decisions.
A volume profile answers one question: where has the market been doing business? The standard ways of showing it, a histogram pinned to the side of the chart or a stack of session boxes, answer it for one moment. You get the levels, but you never see how value moved while price moved.
Profile Master draws the profile as a cloud that travels with the chart. The cloud is the value area: the range that holds 70% of the volume in the cluster the market is doing business in, built from the last 90 bars. The thin line inside it is the point of control, the price where the most volume changed hands. Both are rebuilt on every bar from lower timeframe volume at price, and older bars fade out of the profile gradually instead of dropping off a cliff, so the cloud bends with the market instead of jumping.
There are no labels on the chart. Price inside the cloud, outside it, or leaving it and coming back is the whole read, and the panel in the corner says it in words. The four things worth knowing about (price accepted above value, accepted below it, back into value from above, back into value from below) are alerts, and can be marked on the chart with small dots if you want them.
⚪ The cloud
The value area is drawn as fourteen slices of one colour, faint in the middle and densest at the edges. The edges are the levels you trade against, so they're the part you should see. The middle of the cloud is where price lives most of the time and needs no emphasis. While value is on the move from one cluster to another the whole cloud fades, and it comes back to full strength once it has arrived. A faint trail is value in transit. A bright cloud is value at rest.
⚪ The point of control
The busiest price is drawn as horizontal level segments, mint while price is holding above it and pink while it's holding below. When the busiest price moves, the line restarts at the new level instead of drawing a staircase, and short-lived levels are left out. What's left is a handful of prices that mattered.
⚪ What's different
Most rolling profiles treat every bar in the window the same until the bar leaves, and then the value area jumps. Profile Master weights bars by age, so a session leaves the profile over many bars and the value area drifts. The cloud describes the cluster the market is trading in: when a second cluster builds away from the first, the cloud stays with the busier one until the new one takes over, then travels there over a number of bars. It never stretches across both. The profile is built from where volume traded inside each bar, not from the bar's range. The control has stability rules so it doesn't flicker between two busy areas. And the events only count when price did the moving, never when the cloud drifted over to meet a sitting market.
█ HOW IT WORKS
⚪ 1. Volume at price
For every bar on your chart the script reads the closes and volumes of a lower timeframe. The timeframe is picked automatically: 1-minute bars on charts up to 15 minutes, 5-minute bars up to 1 hour, 15-minute up to 4 hours, 1-hour up to daily, 4-hour above that. You can also set it by hand.
Each lower timeframe close is sorted into one of eight price levels inside the bar, and its volume is added there.
So a 1-hour candle isn't one block of volume smeared across its range. It's twelve 5-minute prints, each at the price where it happened. If no lower timeframe data is available for a bar (and on a 1-minute chart, where there's nothing lower to read), the bar's volume is spread across its range with the body weighted three to one over the wicks.
Two guards keep bad data out. A print further than three ATRs from the bar's body is treated as a bad tick rather than a trade, and is counted at the edge of that range, so one broken print from a data feed can't stretch the whole profile:
And a single print carrying many times the volume of the bar's typical print is capped at ten times the bar's median print. On stocks and cash indices that's the closing auction, which lands a block of the day's volume on one price in one minute. It still shows as a busy row, but it can't own the profile:
⚪ 2. The fading window
The profile is built from the last 90 bars, but they don't count equally. Each bar is weighted by its age:
The newest bar is at full weight, a bar halfway through the window counts for about a third, and the oldest bars count for almost nothing. This is the part that makes the cloud a cloud. In a plain rolling profile the value area can jump a hundred ticks the moment one big session leaves the window. Here, a session leaves slowly, so the value area drifts.
⚪ 3. The grid
The price range covered by the window is split into 48 rows, and the volume of every bar in the window is stacked into those rows at its weight. The range comes from where volume actually sat, not from the full extent of every wick, so one spike doesn't coarsen the resolution of the whole profile.
⚪ 4. The point of control
The busiest row is read off a copy of the profile smoothed across three rows, so a busy area beats a single busy row:
The control is sticky. The row that held it keeps it unless another area carries clearly more volume, about a quarter more:
Without this, the control flips between two clusters on every bar and the line turns into confetti.
⚪ 5. The value area
The cloud is the value area of the cluster the control sits in, not of everything in the window. First the cluster is found by walking out from the control in both directions while the profile stays busy. It ends where the next two rows average less than 15% of what the busiest row carries:
Then, starting at the control, the area grows one row at a time toward whichever side carries more volume in the next two rows, the way the classic profile does, until it holds 70% of the cluster's volume:
Why the cluster rule matters: after a fast move, the window holds two clusters with thin trading between them, the old one fading and the new one building. A plain 70% area has to reach across the thin stretch to the other cluster, and the cloud turns into a tall slab, or dives toward old prices while the market is trading somewhere else. Here the cloud stays with the cluster that holds the control until the other one takes it over, and then it travels there. The right-edge profile still shows both.
The edges then get a little hysteresis: an edge stays where it was while it's still inside the band between the 66% and 74% areas, and moves when it falls outside that band. That stops the edges from twitching when the volume split sits right at the threshold.
⚪ 6. From rows to cloud
The raw edges go through a 5-bar median, which deletes one and two bar jumps. Then each edge is allowed to move only so far in a single bar: half an ATR by default, or a tenth of what's left of a long trip, whichever is more.
Ordinary drift is well under the limit and passes through untouched. A relocation of value, when the control moves to a new cluster and the whole value area is rebuilt around it, would otherwise draw a wall. With the limit it draws a slope that starts quickly and eases into the new level, and the cloud looks like it flows there, because it does. A short smoothing (4 bars by default) rounds the corners:
While the drawn edges are still more than half an ATR from where they're going, the cloud fades in proportion to the distance left, and returns to full strength as it arrives:
So the trail the cloud leaves while it travels between two clusters is faint, and the cloud is bright only where value actually sits.
The space between the two edges is split into fourteen slices and each slice is filled at its own transparency, faint at the centre and densest at the edges.
⚪ 7. The control line
The drawn level is held until the busiest row has moved a full row away, so grid drift doesn't nudge the line:
Only horizontal segments are drawn, with a one-bar gap where the level changes, and any level that didn't last five bars is left out. The last five bars are drawn live, so the right end of the line is provisional until those bars close. The colour follows which side of the control price is holding, and needs two closes to flip.
When value relocates, the control gets there first, because it's a level and not a curve, and the cloud follows it over the next bars. A control segment sitting just outside the cloud is value on its way.
⚪ 8. Events
Price is inside, above or below the cloud. A change counts after two closes on the new side, and only if price did the moving. Over the confirming bars, price has to have travelled at least as far as the edge it crossed moved toward it:
If the cloud moved to meet price, or moved away from it, the state changes quietly: nothing fires, nothing is marked, and the panel's Last event row says what happened instead (Value caught up to price, Value moved below price, Value moved above price). While a change is still being confirmed, the Price row says so too (Above value, close 1 of 2), and on the live bar that would complete it, it says the change confirms on close.
Four events come out of this: Accepted above value, Accepted below value, Back into value from above, Back into value from below. They show in the panel and the alert list, and as tiny marks on the chart if you turn that on.
⚪ 9. The profile at the right edge
A small histogram of the current window is drawn past the last bar: value rows in the cloud colour, the control row lit, everything else grey. It's the classic picture of the same data, for the people who want to see the rows, and it's where a second cluster shows up before the cloud moves to it.
⚪ Repainting
Every bar of the cloud is built only from the bars before it, so the historical cloud doesn't change. The cloud and the control update on the live bar like any moving average does. Events are decided on closed bars and never move afterwards.
█ HOW TO USE IT
⚪ Read the cloud first
Inside the cloud, the market is doing business where it has been doing business. Expect rotation between the edges and around the control. Outside it, the market is away from value, and one of two things happens: it gets accepted there, a new cluster builds, the cloud travels to it; or it gets rejected and price comes back in. While that's being decided, the right-edge profile shows the new cluster growing in grey.
⚪ The edges are the levels
The top of the cloud is where buyers have been paying up and the bottom is where sellers have been letting go. Price coming down to the bottom edge from inside is a pullback to the cheap end of value. Price pushing through the top edge and holding there is a market that has decided value is higher.
⚪ The control is the fulcrum
The busiest price is where the two sides agreed the most. Mint segments mean price is holding above it, pink means below. A long pink segment under a rising market usually isn't a problem. A pink segment forming while price sits right on top of it, after a long run, is worth a second look.
⚪ Acceptance and rotation
Accepted above value (or below): price closed outside the cloud, stayed there, and got there under its own steam. This is the start of a move away from value. The cloud will follow if the move holds.
Back into value from above (or below): price was out, and it came back and stayed. This is the old market profile idea: when a market re-enters value and holds, it tends to rotate across the whole value area to the other side. Tends. It's a tendency, not a rule, and it works best after a failed attempt to leave, not during a trend that has already moved the cloud.
⚪ Timeframes
On 5 and 15-minute charts the window is a few hours and the cloud behaves like a session profile that never resets. On 1 and 4-hour charts it covers days, and the cloud is where swing traders find their levels. On daily charts it's a rolling four month profile with 1-hour volume inside it.
⚪ If you're new to profiles
Three sentences. The cloud is where most of the recent trading happened; inside it the market is fair and chops between the edges, outside it the market is moving and you don't fight it. The line is the price everyone agreed on the most; mint means buyers are in charge of it, pink means sellers. Two things are worth waiting for: price leaves the cloud and stays out, which means a move is starting, or price pokes out and comes back in, which means the move failed and price tends to travel back across the cloud.
None of this predicts where price goes. The cloud is a map of where volume has been, not where it's going, and an event isn't a buy or sell signal. Use it with your own analysis and manage your risk.
█ SETTINGS
⚪ Profile
- Window (bars): how many bars of volume go into the profile. 90 by default. Longer gives a slower, wider cloud; shorter hugs recent trading.
- Fade older bars: weights bars by age as described above. Turn it off for a plain rolling profile where every bar in the window counts the same.
- Value area %: the share of the cluster's volume the cloud has to contain. 70 by default, which is the convention. 60 gives a tighter core, 80 a wider one.
- Rows: the price resolution of the profile. 48 by default.
- Lower timeframe volume: reads where volume traded inside each bar. Off, each bar's volume is spread across its range.
- Lower timeframe: Auto picks the timeframe for your chart. Set it by hand if you prefer coarser or finer prints.
- Cloud smoothing: the smoothing applied to the edges after the median. 4 by default. Higher is rounder and later.
- Cloud speed limit: the furthest an edge can move in one bar, in ATRs. 0.5 by default. Over long distances it also covers at least a tenth of what's left each bar. This is what turns a relocation of value into a slope instead of a wall. Raise it if you'd rather the cloud move faster.
- History (bars): how far back the cloud is drawn, 2,000 bars by default. The profile is rebuilt on every bar and this keeps the script quick on long charts.
⚪ Events
- Bars to confirm: closes needed on the other side of the cloud before an event counts. 2 by default.
- Mark events on the chart: small dots where price comes back into value and small triangles where it's accepted outside. Off by default to keep the chart clean. The panel and alerts report them either way.
⚪ Look
- Theme: Neon, Classic, Aurora, Ice, or Custom with your own cloud, up and down colours.
- Cloud strength: 1 to 5. Lighter or heavier fill for your screen and background.
- Point of control line: show or hide the control segments.
- Profile at the right edge and its width in bars.
- Panel: position and size.
█ ALERTS
- Accepted above value, Accepted below value.
- Back into value from above, Back into value from below.
Set them to "Once per bar close". Events are only ever confirmed on a closed bar.
█ NOTES AND LIMITS
- Volume is whatever your data feed gives you. On forex and CFDs that's tick volume, the count of price changes, not contracts. The profile still works because tick volume clusters where trading is busy, but it isn't the same thing as futures or stock volume.
- On symbols with no volume at all the profile is built from time at price, one count per lower timeframe bar, and the panel says so.
- TradingView limits how far back lower timeframe data goes. Deep in the history the script falls back to spreading each bar's volume across its range, so the oldest part of the cloud is a little coarser than the recent part.
- Value can move to meet price. When price sits at one level for long enough, the cloud will arrive there. That's the profile doing its job, not price doing anything, and it's why the events require price to have travelled.
- After a gap or a fast move the cloud stays at the old levels for a while, then travels to the new ones at the speed limit. In that window the panel will say price is above or below value, and it's right: value hasn't migrated yet. When it arrives, the panel says so (Value caught up to price).
- In a steady trend with no pauses the cloud gets tall, because the trading really is spread over the whole move with no thin stretch to end the cluster. Tall cloud, no cluster, is itself a read: nobody has agreed on a price yet.
- The value area is 70% of the cluster the control sits in, not 70% of everything in the window. When the window holds two clusters it's narrower than a classic profile's area would be, on purpose. The right-edge profile shows the whole window.
- In a tight range the cloud gets thin, because value is tight. It widens again as soon as the market starts rotating over a wider range.
- A cluster that only lasts a few hours can take the control for a while and then give it back. The cloud travels up to it and comes back, leaving a faint spike. That's a failed migration of value, and it's worth noticing: the market tried a new level and rejected it.
- Rotation back through value works best in balanced markets. In a strong trend price can hold outside the cloud for a long time while the cloud chases it.
█ DISCLAIMER
This script is for education and information. It isn't financial advice, a recommendation to buy or sell anything, or a promise about what any market will do. Past behaviour of a market, a method or an indicator doesn't guarantee future results, and nothing on this chart replaces your own judgement. Trading involves risk and you are responsible for your decisions.

Access our exclusive invite-only scripts: simplealgo.io
Join our discord: discord.gg/simplealgo
Join our discord: discord.gg/simplealgo
Declinazione di responsabilità
Le informazioni e le pubblicazioni non sono intese come, e non costituiscono, consulenza o raccomandazioni finanziarie, di investimento, di trading o di altro tipo fornite o approvate da TradingView. Per ulteriori informazioni, consultare i Termini di utilizzo.
Access our exclusive invite-only scripts: simplealgo.io
Join our discord: discord.gg/simplealgo
Join our discord: discord.gg/simplealgo
Declinazione di responsabilità
Le informazioni e le pubblicazioni non sono intese come, e non costituiscono, consulenza o raccomandazioni finanziarie, di investimento, di trading o di altro tipo fornite o approvate da TradingView. Per ulteriori informazioni, consultare i Termini di utilizzo.