OB + Supply & Demand (SMC)
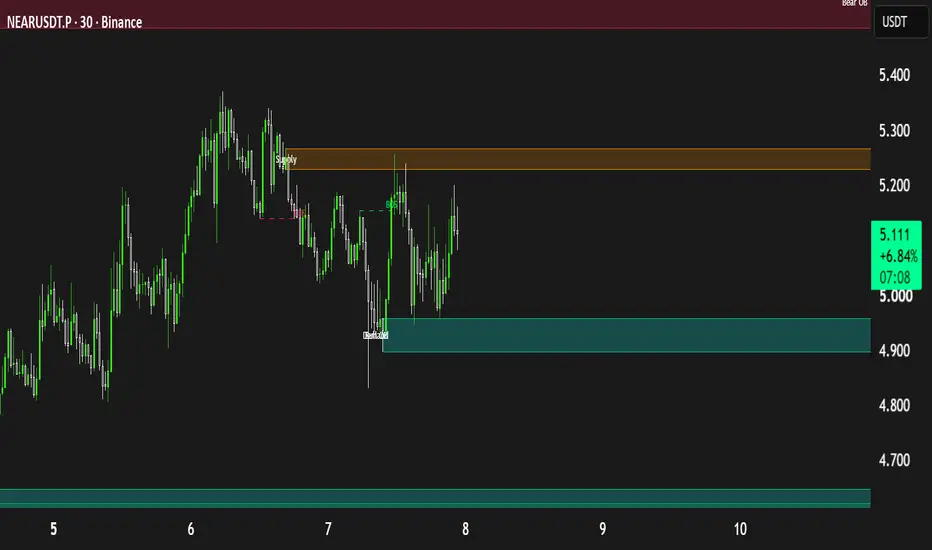
OVERVIEW
This indicator marks Order Blocks (OB) and Supply/Demand zones, but only after price confirms them with a Break of Structure (BOS). A zone is drawn only when a candle BODY closes beyond the most recent swing high/low. Wicks do not count.
HOW ZONES ARE DEFINED
- Bullish OB: a bearish candle that sweeps the previous candle's low, is followed by a bullish Fair Value Gap (FVG) with the next candle, and sits in the discount half of the range.
- Bearish OB: the mirror. A bullish candle that sweeps the previous candle's high, with a bearish FVG, in the premium half.
- Demand: a bearish candle between two bullish candles, creating a bullish FVG, in discount.
- Supply: a bullish candle between two bearish candles, creating a bearish FVG, in premium.
Premium/Discount: highest high and lowest low over a lookback (default 50 bars). The equilibrium is set by the Fib level (default 0.5).
HOW THE BOS CONFIRMATION WORKS
When a candidate forms, the script stores the latest swing high (bullish zones) or swing low (bearish zones). The zone is drawn only when a candle closes beyond that level. The box starts at the original zone candle and a dashed BOS line marks the broken swing. If price closes through the zone first, or no break comes within the "Max Bars To Wait" setting, the candidate is discarded.
WHY IT IS DIFFERENT
It combines liquidity sweep, FVG, premium/discount and a body-close BOS filter in one process. This removes many unconfirmed zones that simpler OB indicators show.
HOW TO USE
- Zones extend to the right until mitigated (price closes through them; wick option available). Mitigated zones turn grey or can be deleted.
- Use Swing Length to control which swings count as structure. Smaller values give more internal-structure signals, larger values give fewer major ones.
- Alerts fire when a zone is confirmed by BOS.
LIMITATIONS
- Zones are drawn on the bar where the BOS confirms, but their boxes start at the earlier zone candle. On history they look as if they were visible earlier than they would have been in real time.
- Swing points need "Swing Length" bars on the right to confirm, so structure is always slightly delayed.
- In strong trends or low volatility, few zones may pass all the filters. Settings suit different timeframes and markets and need adjusting.
- This is a charting tool, not a strategy. It makes no claim about profitability and is not financial advice.
INPUTS
Show toggles, zone range (full candle or body), premium/discount filter and lookback, mitigation type, swing length, max wait bars, colors, labels.
This indicator marks Order Blocks (OB) and Supply/Demand zones, but only after price confirms them with a Break of Structure (BOS). A zone is drawn only when a candle BODY closes beyond the most recent swing high/low. Wicks do not count.
HOW ZONES ARE DEFINED
- Bullish OB: a bearish candle that sweeps the previous candle's low, is followed by a bullish Fair Value Gap (FVG) with the next candle, and sits in the discount half of the range.
- Bearish OB: the mirror. A bullish candle that sweeps the previous candle's high, with a bearish FVG, in the premium half.
- Demand: a bearish candle between two bullish candles, creating a bullish FVG, in discount.
- Supply: a bullish candle between two bearish candles, creating a bearish FVG, in premium.
Premium/Discount: highest high and lowest low over a lookback (default 50 bars). The equilibrium is set by the Fib level (default 0.5).
HOW THE BOS CONFIRMATION WORKS
When a candidate forms, the script stores the latest swing high (bullish zones) or swing low (bearish zones). The zone is drawn only when a candle closes beyond that level. The box starts at the original zone candle and a dashed BOS line marks the broken swing. If price closes through the zone first, or no break comes within the "Max Bars To Wait" setting, the candidate is discarded.
WHY IT IS DIFFERENT
It combines liquidity sweep, FVG, premium/discount and a body-close BOS filter in one process. This removes many unconfirmed zones that simpler OB indicators show.
HOW TO USE
- Zones extend to the right until mitigated (price closes through them; wick option available). Mitigated zones turn grey or can be deleted.
- Use Swing Length to control which swings count as structure. Smaller values give more internal-structure signals, larger values give fewer major ones.
- Alerts fire when a zone is confirmed by BOS.
LIMITATIONS
- Zones are drawn on the bar where the BOS confirms, but their boxes start at the earlier zone candle. On history they look as if they were visible earlier than they would have been in real time.
- Swing points need "Swing Length" bars on the right to confirm, so structure is always slightly delayed.
- In strong trends or low volatility, few zones may pass all the filters. Settings suit different timeframes and markets and need adjusting.
- This is a charting tool, not a strategy. It makes no claim about profitability and is not financial advice.
INPUTS
Show toggles, zone range (full candle or body), premium/discount filter and lookback, mitigation type, swing length, max wait bars, colors, labels.

Declinazione di responsabilità
Le informazioni e le pubblicazioni non sono intese come, e non costituiscono, consulenza o raccomandazioni finanziarie, di investimento, di trading o di altro tipo fornite o approvate da TradingView. Per ulteriori informazioni, consultare i Termini di utilizzo.
Declinazione di responsabilità
Le informazioni e le pubblicazioni non sono intese come, e non costituiscono, consulenza o raccomandazioni finanziarie, di investimento, di trading o di altro tipo fornite o approvate da TradingView. Per ulteriori informazioni, consultare i Termini di utilizzo.