

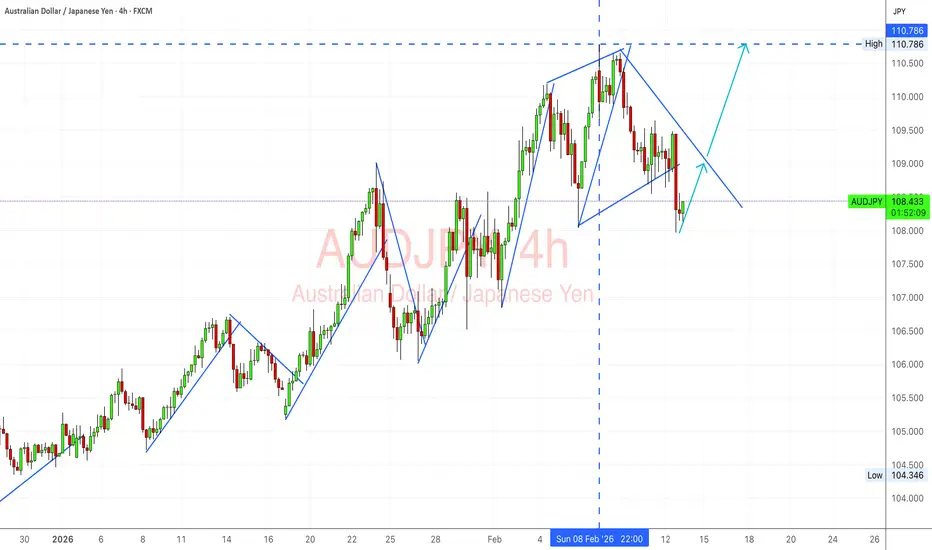
AUDJPY has pulled back from the highs into a clearly defined demand band after a rejection near the top resistance zone. The broader structure still leans upward, but the pair is now sitting at a decision point where carry support and risk sentiment have to step back in. From a macro angle, this is less about Australia alone and more about global risk appetite and yield spreads — and right now, price is testing whether that foundation is still solid.
Current Bias
Short-term bullish rebound attempt from support, medium-term bullish while higher-low structure holds.
Price is correcting inside an overall rising structure rather than breaking trend — so bias favors recovery moves as long as support holds.
Key Fundamental Drivers
AUD side:
Sensitive to global growth expectations and China-linked demand signals
Correlates with commodity sentiment and equity risk tone
RBA policy still relatively firm compared to ultra-loose Japan stance
JPY side:
Still structurally low yield despite gradual normalization signals
Strength mainly comes from risk-off flows and falling global yields
Acts as a funding currency in carry trades like AUDJPY
Core driver remains yield spread + risk sentiment, not domestic data alone.
Macro Context
Interest rate expectations still show a wide gap between Australia and Japan. Even if the RBA is no longer aggressively tightening, Australian yields remain far above Japanese yields, which keeps the carry framework alive.
Global growth signals are mixed but not collapsing. When equity indices stabilize and volatility compresses, AUDJPY typically benefits.
Commodity flows matter here more than in many FX pairs. Firm metals and energy pricing tend to support AUD sentiment indirectly.
Geopolitical themes and policy uncertainty continue to inject volatility — and that mostly expresses itself through JPY strength spikes, not steady trends.
Primary Risk to the Trend
Main downside risk is a renewed risk-off wave:
equity selloff
bond yield drop
geopolitical shock
That combination strengthens JPY quickly and pressures AUDJPY regardless of Australian data.
A secondary risk is a sharp shift in Bank of Japan policy tone that markets interpret as faster tightening.
Most Critical Upcoming News/Event
Watch:
BoJ communication and yield developments
RBA guidance and Australian inflation data
US inflation and rate expectations, because they steer global yields and risk appetite
US yield moves often ripple directly into yen crosses.
Leader/Lagger Dynamics
AUDJPY is a risk-sensitive leader among yen crosses.
It often:
moves early with shifts in equity sentiment
leads NZDJPY and sometimes CADJPY in risk-on phases
follows US yields and stock index direction
If AUDJPY rebounds cleanly, it tends to confirm broader carry recovery. If it fails at support, it warns that risk appetite is weakening again.
Key Levels
Support Levels:
108.00–107.85 demand zone
107.00 secondary structure support
Resistance Levels:
109.50 near-term supply
110.70–110.80 major high resistance zone
Stop Loss (SL):
Below 107.80 support structure
Take Profit (TP):
TP1: 109.50
TP2: 110.70
TP3: Extension toward fresh highs if carry momentum returns
Summary: Bias and Watchpoints
Bias favors a bullish rebound from the support band as long as the higher-low structure holds. The trade is fundamentally supported by the Australia–Japan yield gap and carry dynamics, with global risk sentiment acting as the trigger variable. The biggest risk is a fresh risk-off move or falling global yields that strengthen JPY broadly. BoJ tone, RBA signals, and US yield data are the key catalysts to watch. AUDJPY behaves like a leader in risk-on yen crosses, so its reaction here can help confirm whether carry trades are stabilizing or rolling over again.
Current Bias
Short-term bullish rebound attempt from support, medium-term bullish while higher-low structure holds.
Price is correcting inside an overall rising structure rather than breaking trend — so bias favors recovery moves as long as support holds.
Key Fundamental Drivers
AUD side:
Sensitive to global growth expectations and China-linked demand signals
Correlates with commodity sentiment and equity risk tone
RBA policy still relatively firm compared to ultra-loose Japan stance
JPY side:
Still structurally low yield despite gradual normalization signals
Strength mainly comes from risk-off flows and falling global yields
Acts as a funding currency in carry trades like AUDJPY
Core driver remains yield spread + risk sentiment, not domestic data alone.
Macro Context
Interest rate expectations still show a wide gap between Australia and Japan. Even if the RBA is no longer aggressively tightening, Australian yields remain far above Japanese yields, which keeps the carry framework alive.
Global growth signals are mixed but not collapsing. When equity indices stabilize and volatility compresses, AUDJPY typically benefits.
Commodity flows matter here more than in many FX pairs. Firm metals and energy pricing tend to support AUD sentiment indirectly.
Geopolitical themes and policy uncertainty continue to inject volatility — and that mostly expresses itself through JPY strength spikes, not steady trends.
Primary Risk to the Trend
Main downside risk is a renewed risk-off wave:
equity selloff
bond yield drop
geopolitical shock
That combination strengthens JPY quickly and pressures AUDJPY regardless of Australian data.
A secondary risk is a sharp shift in Bank of Japan policy tone that markets interpret as faster tightening.
Most Critical Upcoming News/Event
Watch:
BoJ communication and yield developments
RBA guidance and Australian inflation data
US inflation and rate expectations, because they steer global yields and risk appetite
US yield moves often ripple directly into yen crosses.
Leader/Lagger Dynamics
AUDJPY is a risk-sensitive leader among yen crosses.
It often:
moves early with shifts in equity sentiment
leads NZDJPY and sometimes CADJPY in risk-on phases
follows US yields and stock index direction
If AUDJPY rebounds cleanly, it tends to confirm broader carry recovery. If it fails at support, it warns that risk appetite is weakening again.
Key Levels
Support Levels:
108.00–107.85 demand zone
107.00 secondary structure support
Resistance Levels:
109.50 near-term supply
110.70–110.80 major high resistance zone
Stop Loss (SL):
Below 107.80 support structure
Take Profit (TP):
TP1: 109.50
TP2: 110.70
TP3: Extension toward fresh highs if carry momentum returns
Summary: Bias and Watchpoints
Bias favors a bullish rebound from the support band as long as the higher-low structure holds. The trade is fundamentally supported by the Australia–Japan yield gap and carry dynamics, with global risk sentiment acting as the trigger variable. The biggest risk is a fresh risk-off move or falling global yields that strengthen JPY broadly. BoJ tone, RBA signals, and US yield data are the key catalysts to watch. AUDJPY behaves like a leader in risk-on yen crosses, so its reaction here can help confirm whether carry trades are stabilizing or rolling over again.
ノート
トレード稼働中
トレード終了: 利益確定目標に到達

📊 Forex Signals | Free Daily Alerts
✅ 85% Accuracy | 1–2 Signals/Day
💰 Profitable Trades Sent Daily – No Cost
📲 Join Us on Telegram
t.me/ultreos_forex
🎯 Upgrade to VIP:
ultreosforex.com/
✅ 85% Accuracy | 1–2 Signals/Day
💰 Profitable Trades Sent Daily – No Cost
📲 Join Us on Telegram
t.me/ultreos_forex
🎯 Upgrade to VIP:
ultreosforex.com/
関連の投稿
免責事項
これらの情報および投稿は、TradingViewが提供または承認する金融、投資、取引、またはその他の種類の助言もしくは推奨であることを意図したものではなく、またこれらに該当するものでもありません。詳細は利用規約をご覧ください。
📊 Forex Signals | Free Daily Alerts
✅ 85% Accuracy | 1–2 Signals/Day
💰 Profitable Trades Sent Daily – No Cost
📲 Join Us on Telegram
t.me/ultreos_forex
🎯 Upgrade to VIP:
ultreosforex.com/
✅ 85% Accuracy | 1–2 Signals/Day
💰 Profitable Trades Sent Daily – No Cost
📲 Join Us on Telegram
t.me/ultreos_forex
🎯 Upgrade to VIP:
ultreosforex.com/
関連の投稿
免責事項
これらの情報および投稿は、TradingViewが提供または承認する金融、投資、取引、またはその他の種類の助言もしくは推奨であることを意図したものではなく、またこれらに該当するものでもありません。詳細は利用規約をご覧ください。