

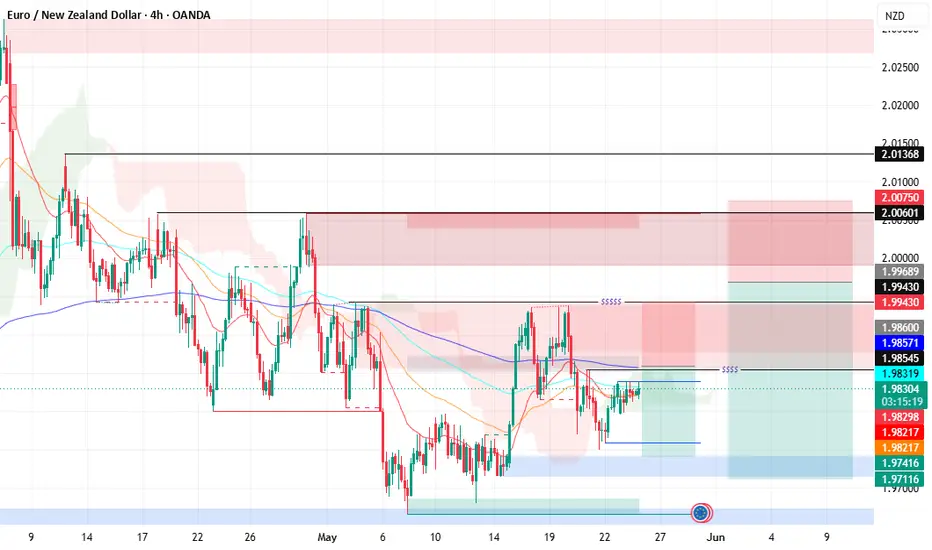
EUR/NZD has rallied ~250 pips from the May spike low at 1.9700 back into a dual-layer supply structure. Two sequenced short setups are active simultaneously.
⚡ SETUP 1 — Small Position (Near-term)
Entry: 1.9843–1.9943 | SL: 1.9990 | TP: 1.9822
R:R: ~2.0R | Captures the near-term $$$$$ cluster rejection
🔻 SETUP 2 — Big Position (Macro)
Entry: 1.9943–2.0050 | SL: 2.0117 | TP1: 1.9741 | TP2: 1.9711
R:R: ~4.2R | Full measured move back to spike origin demand zone
The macro supply zone at 1.9943–2.0050 is the exact origin of May's explosive breakdown. Price retesting it from below — with the $$$$$ liquidity cluster at the lower boundary — creates a high-probability institutional sell zone. Setup 1 exploits the near-term rejection while Setup 2 targets the full retracement to the 1.9711–1.9741 demand zone.
Confluences:
$$$$$ liquidity cluster at 1.9943 = Setup 1 trigger
Macro supply zone at 1.9943–2.0050 = prior breakdown origin
NZD broad strength across watchlist (NZDUSD, NZDCHF all relevant)
Clean measured move — rally from demand, short back to demand
Sequencing: Close Setup 1 at 1.9822 → use bearish confirmation to size into Setup 2 on any push into the full supply zone.
Invalidation: Setup 1 → 4H close above 1.9990. Setup 2 → 4H close above 2.0117.
⚡ SETUP 1 — Small Position (Near-term)
Entry: 1.9843–1.9943 | SL: 1.9990 | TP: 1.9822
R:R: ~2.0R | Captures the near-term $$$$$ cluster rejection
🔻 SETUP 2 — Big Position (Macro)
Entry: 1.9943–2.0050 | SL: 2.0117 | TP1: 1.9741 | TP2: 1.9711
R:R: ~4.2R | Full measured move back to spike origin demand zone
The macro supply zone at 1.9943–2.0050 is the exact origin of May's explosive breakdown. Price retesting it from below — with the $$$$$ liquidity cluster at the lower boundary — creates a high-probability institutional sell zone. Setup 1 exploits the near-term rejection while Setup 2 targets the full retracement to the 1.9711–1.9741 demand zone.
Confluences:
$$$$$ liquidity cluster at 1.9943 = Setup 1 trigger
Macro supply zone at 1.9943–2.0050 = prior breakdown origin
NZD broad strength across watchlist (NZDUSD, NZDCHF all relevant)
Clean measured move — rally from demand, short back to demand
Sequencing: Close Setup 1 at 1.9822 → use bearish confirmation to size into Setup 2 on any push into the full supply zone.
Invalidation: Setup 1 → 4H close above 1.9990. Setup 2 → 4H close above 2.0117.

関連の投稿
免責事項
これらの情報および投稿は、TradingViewが提供または承認する金融、投資、取引、またはその他の種類の助言もしくは推奨であることを意図したものではなく、またこれらに該当するものでもありません。詳細は利用規約をご覧ください。
関連の投稿
免責事項
これらの情報および投稿は、TradingViewが提供または承認する金融、投資、取引、またはその他の種類の助言もしくは推奨であることを意図したものではなく、またこれらに該当するものでもありません。詳細は利用規約をご覧ください。