
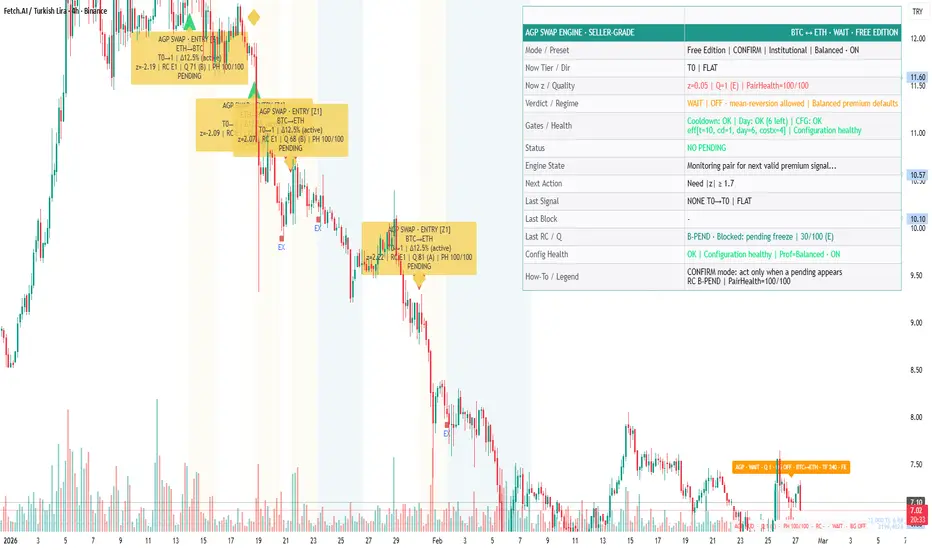
Building a Rotation “Scoreboard” — Using Health Checks, Config Health, and Selectivity to Avoid Fake Edges
A lot of pair tools look impressive because they can always show you “something.” The problem is that always showing you something is not the same as showing you something tradable.
AG Pro Swap Engine - Pair Rotation (Z-Score) [Free Edition] is interesting because it treats rotation like an engine with guardrails:
- Z-score style dislocation is the input layer.
- Quality filters, health checks, and cooldown rules are the constraint layer.
- State-based output is the decision layer.
- HUD/panel visibility is the accountability layer.
In other words: it aims to produce a “rotation scoreboard,” not just a line plot.
1) Start with the truth: pair rotation fails for predictable reasons
If you’ve traded pairs long enough, you’ve likely seen these failure modes:
- The spread expands because the market is trending, not reverting.
- The relationship breaks because the assets are no longer in the same regime.
- The signal density is high, but execution costs erase the edge.
- The trader over-rotates because the tool never says “wait.”
A decision-support engine should acknowledge these realities, not hide them.
2) Dislocation as input: what Z-score style logic is (and what it isn’t)
Z-score style normalization is a way to describe “how unusual” the current relative move is versus the pair’s recent behavior. It is not a guarantee of mean reversion, and it is not a promise that extremes revert quickly.
Use it for:
- Identifying relative stretch/compression
- Comparing conditions over time
- Finding moments where the pair relationship is unusually imbalanced
Do not use it as:
- A standalone entry trigger
- A performance promise
- A substitute for execution discipline
3) The constraint layer: why the engine adds filters and checks
The script description emphasizes selectivity and clarity. That selectivity is expressed via:
- Quality filtering: avoid marginal setups that look “interesting” but are statistically weak.
- Pair health logic: avoid environments where the pair relationship is unstable.
- Cooldown behavior: reduce flip-flopping and churn.
- Cost-related controls: reinforce that rotation decisions have friction.
This matters because pair logic can produce “valid-looking” Z-score extremes in regimes where it’s structurally unreliable (correlation breakdowns, narrative dominance, sudden regime shifts). The constraint layer doesn’t eliminate risk, but it does reduce obvious error frequency.
4) The accountability layer: configuration health and state visibility
In live trading, a surprising amount of “bad performance” is actually “bad configuration.” The more options a tool has, the more ways it can be misconfigured:
- Wrong pair selection
- Inappropriate engine timeframe for the instrument’s volatility
- Too many signals enabled
- Visual clutter hides the real state
- Cooldown disabled unintentionally
By exposing configuration health information and explicit states, the tool helps you debug your own setup. That alone is an underrated edge — because you can separate “market didn’t cooperate” from “I accidentally ran nonsense settings.”
5) A practical rotation scoreboard workflow (step-by-step)
Step 1 — Pair selection with intention
Pick a pair where relative behavior makes sense. If you can’t explain why the pair relationship should exist, you’re probably just mining noise.
Step 2 — Choose engine timeframe as a stability dial
Higher engine timeframe generally = fewer transitions, more stability.
Lower engine timeframe generally = more responsiveness, more transitions.
Step 3 — Pick a trade profile / behavior preset
Use presets as “personality templates.” The right preset is the one that:
- Produces understandable states
- Avoids constant flipping
- Fits your execution speed and attention
Step 4 — Use the HUD/panel as your decision board
Each time you consider rotating:
- Read the engine state.
- Read health/quality flags.
- Respect cooldown.
- If blocked, accept the block and move on.
- If eligible, plan execution with explicit invalidation.
Step 5 — Keep the chart clean
If your chart is too busy, you will start ignoring the tool. Reduce visual noise:
- Hide non-essential panels/labels
- Keep only the elements you actually use during decisions
6) When I would explicitly NOT use pair rotation logic
- During major news events or sudden liquidity vacuums
- When one asset is structurally repricing (narrative regime)
- When volatility spikes beyond the normal range of the pair’s history
- When correlation is clearly unstable
- When your execution venue is too costly for frequent rotation
The point is not “never rotate.” The point is to treat rotation as a conditional tool, not a default action.
Limitations:
This indicator is a chart-based analytical aid. It does not know your portfolio, sizing, fees, slippage, liquidity, latency, taxes, or account constraints. Pair rotation logic may underperform during strong trend persistence, correlation breakdowns, or structurally unstable market phases. Use it as part of a broader process.
Risk disclosure:
Educational and analytical use only. Not financial advice. Always use independent judgment and risk management.
A lot of pair tools look impressive because they can always show you “something.” The problem is that always showing you something is not the same as showing you something tradable.
AG Pro Swap Engine - Pair Rotation (Z-Score) [Free Edition] is interesting because it treats rotation like an engine with guardrails:
- Z-score style dislocation is the input layer.
- Quality filters, health checks, and cooldown rules are the constraint layer.
- State-based output is the decision layer.
- HUD/panel visibility is the accountability layer.
In other words: it aims to produce a “rotation scoreboard,” not just a line plot.
1) Start with the truth: pair rotation fails for predictable reasons
If you’ve traded pairs long enough, you’ve likely seen these failure modes:
- The spread expands because the market is trending, not reverting.
- The relationship breaks because the assets are no longer in the same regime.
- The signal density is high, but execution costs erase the edge.
- The trader over-rotates because the tool never says “wait.”
A decision-support engine should acknowledge these realities, not hide them.
2) Dislocation as input: what Z-score style logic is (and what it isn’t)
Z-score style normalization is a way to describe “how unusual” the current relative move is versus the pair’s recent behavior. It is not a guarantee of mean reversion, and it is not a promise that extremes revert quickly.
Use it for:
- Identifying relative stretch/compression
- Comparing conditions over time
- Finding moments where the pair relationship is unusually imbalanced
Do not use it as:
- A standalone entry trigger
- A performance promise
- A substitute for execution discipline
3) The constraint layer: why the engine adds filters and checks
The script description emphasizes selectivity and clarity. That selectivity is expressed via:
- Quality filtering: avoid marginal setups that look “interesting” but are statistically weak.
- Pair health logic: avoid environments where the pair relationship is unstable.
- Cooldown behavior: reduce flip-flopping and churn.
- Cost-related controls: reinforce that rotation decisions have friction.
This matters because pair logic can produce “valid-looking” Z-score extremes in regimes where it’s structurally unreliable (correlation breakdowns, narrative dominance, sudden regime shifts). The constraint layer doesn’t eliminate risk, but it does reduce obvious error frequency.
4) The accountability layer: configuration health and state visibility
In live trading, a surprising amount of “bad performance” is actually “bad configuration.” The more options a tool has, the more ways it can be misconfigured:
- Wrong pair selection
- Inappropriate engine timeframe for the instrument’s volatility
- Too many signals enabled
- Visual clutter hides the real state
- Cooldown disabled unintentionally
By exposing configuration health information and explicit states, the tool helps you debug your own setup. That alone is an underrated edge — because you can separate “market didn’t cooperate” from “I accidentally ran nonsense settings.”
5) A practical rotation scoreboard workflow (step-by-step)
Step 1 — Pair selection with intention
Pick a pair where relative behavior makes sense. If you can’t explain why the pair relationship should exist, you’re probably just mining noise.
Step 2 — Choose engine timeframe as a stability dial
Higher engine timeframe generally = fewer transitions, more stability.
Lower engine timeframe generally = more responsiveness, more transitions.
Step 3 — Pick a trade profile / behavior preset
Use presets as “personality templates.” The right preset is the one that:
- Produces understandable states
- Avoids constant flipping
- Fits your execution speed and attention
Step 4 — Use the HUD/panel as your decision board
Each time you consider rotating:
- Read the engine state.
- Read health/quality flags.
- Respect cooldown.
- If blocked, accept the block and move on.
- If eligible, plan execution with explicit invalidation.
Step 5 — Keep the chart clean
If your chart is too busy, you will start ignoring the tool. Reduce visual noise:
- Hide non-essential panels/labels
- Keep only the elements you actually use during decisions
6) When I would explicitly NOT use pair rotation logic
- During major news events or sudden liquidity vacuums
- When one asset is structurally repricing (narrative regime)
- When volatility spikes beyond the normal range of the pair’s history
- When correlation is clearly unstable
- When your execution venue is too costly for frequent rotation
The point is not “never rotate.” The point is to treat rotation as a conditional tool, not a default action.
Limitations:
This indicator is a chart-based analytical aid. It does not know your portfolio, sizing, fees, slippage, liquidity, latency, taxes, or account constraints. Pair rotation logic may underperform during strong trend persistence, correlation breakdowns, or structurally unstable market phases. Use it as part of a broader process.
Risk disclosure:
Educational and analytical use only. Not financial advice. Always use independent judgment and risk management.

Public-free scripts + invite-only AGPro workflows for market analysis, liquidity context, risk planning and execution review.
Rules-based. No hype. No guesswork.
Library & access: agprolabs.com/
Telegram: t.me/agprolabs
Rules-based. No hype. No guesswork.
Library & access: agprolabs.com/
Telegram: t.me/agprolabs
免責事項
これらの情報および投稿は、TradingViewが提供または承認する金融、投資、取引、またはその他の種類の助言もしくは推奨であることを意図したものではなく、またこれらに該当するものでもありません。詳細は利用規約をご覧ください。
Public-free scripts + invite-only AGPro workflows for market analysis, liquidity context, risk planning and execution review.
Rules-based. No hype. No guesswork.
Library & access: agprolabs.com/
Telegram: t.me/agprolabs
Rules-based. No hype. No guesswork.
Library & access: agprolabs.com/
Telegram: t.me/agprolabs
免責事項
これらの情報および投稿は、TradingViewが提供または承認する金融、投資、取引、またはその他の種類の助言もしくは推奨であることを意図したものではなく、またこれらに該当するものでもありません。詳細は利用規約をご覧ください。