
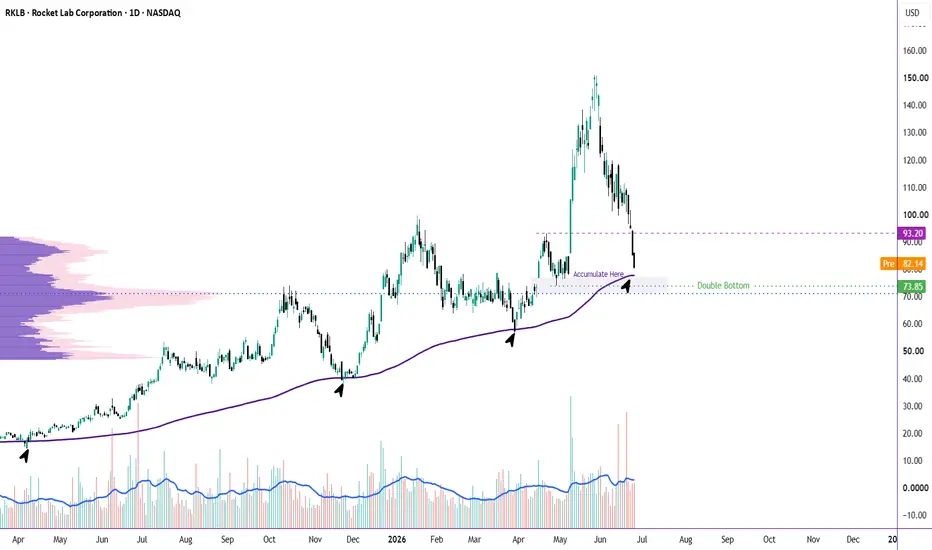
Technical Setup:
After an extended rally, RKLB is pulling back toward a historically significant support zone between $73–77 — where the Daily EMA 200 converges with one of the most powerful confluence areas on the chart:
Point of Control (POC) — highest volume traded zone
Double Bottom structure
Prior swing low
Daily EMA 200 dynamic support
Historically, every time RKLB has revisited the EMA 200 on the daily timeframe, it has been a launching pad for the next major bullish leg — and there is no reason to expect this time to be different given the strengthening fundamental backdrop.
Most likely scenario: A controlled dip into the $74–77 zone → accumulation → reversal and continuation of the uptrend.
🎯 Target: Retest of prior highs and beyond
🛑 Invalidation: Daily close below $73 — a decisive break here would signal the broader uptrend is compromised and warrants a full exit
After an extended rally, RKLB is pulling back toward a historically significant support zone between $73–77 — where the Daily EMA 200 converges with one of the most powerful confluence areas on the chart:
Point of Control (POC) — highest volume traded zone
Double Bottom structure
Prior swing low
Daily EMA 200 dynamic support
Historically, every time RKLB has revisited the EMA 200 on the daily timeframe, it has been a launching pad for the next major bullish leg — and there is no reason to expect this time to be different given the strengthening fundamental backdrop.
Most likely scenario: A controlled dip into the $74–77 zone → accumulation → reversal and continuation of the uptrend.
🎯 Target: Retest of prior highs and beyond
🛑 Invalidation: Daily close below $73 — a decisive break here would signal the broader uptrend is compromised and warrants a full exit
トレード稼働中
RKLB bounced back.トレード終了: 利益確定目標に到達
RKLB couldn't sustain the move
📊 Charts → 🏗️ Structure → 🎯 Probability =📖 Chart Story
⏳ Patience → 🚀Success
⏳ Patience → 🚀Success
免責事項
これらの情報および投稿は、TradingViewが提供または承認する金融、投資、取引、またはその他の種類の助言もしくは推奨であることを意図したものではなく、またこれらに該当するものでもありません。詳細は利用規約をご覧ください。
📊 Charts → 🏗️ Structure → 🎯 Probability =📖 Chart Story
⏳ Patience → 🚀Success
⏳ Patience → 🚀Success
免責事項
これらの情報および投稿は、TradingViewが提供または承認する金融、投資、取引、またはその他の種類の助言もしくは推奨であることを意図したものではなく、またこれらに該当するものでもありません。詳細は利用規約をご覧ください。