
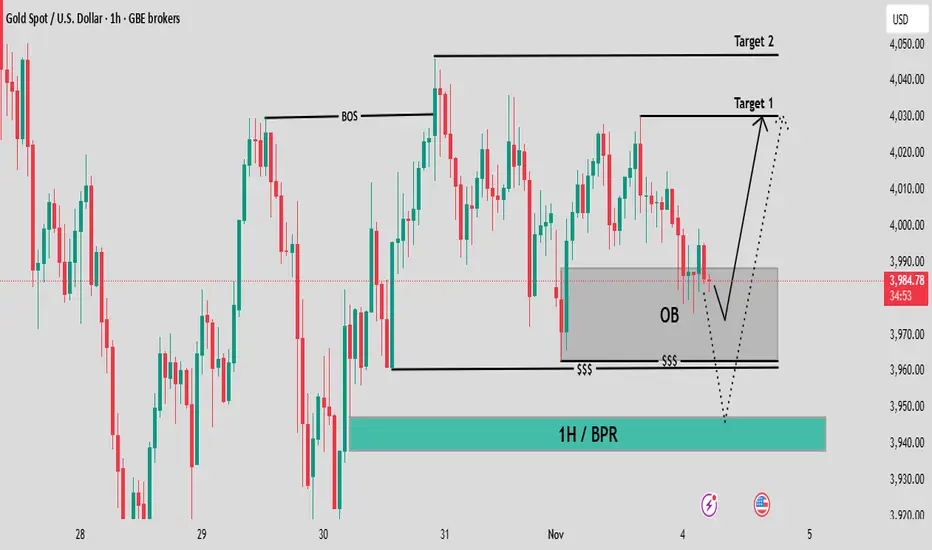
A potential trading setup based on concepts from Smart Money Concepts (SMC) or similar institutional methodologies.
Asset and Timeframe: XAU/USD (Gold Spot / US Dollar) on a 1-Hour (1H) timeframe.
Current Price: The price is hovering around $3,983.55.
Market Structure:
There's a recent Break of Structure (BOS), suggesting an upward bias or a shift in momentum to the bullish side.
The price is currently pulling back into a key zone.
Key Zones/Concepts:
OB (Order Block): The shaded gray area is identified as an Order Block. This is a zone where significant institutional buying/selling previously occurred, and the price is expected to react to it.
$$$ (Liquidity/Equal Lows): The three dollar signs indicate an area of liquidity or equal lows below the current price action. These are often targeted for a stop-hunt or liquidity grab before a significant move.
1H / BPR (Balance Price Range): The lower green box is labeled as a 1H / BPR. A Balance Price Range is a more refined area of support/demand, suggesting an even stronger reaction zone if the initial OB fails.
Projected Trade Scenarios: The dotted lines outline two primary possibilities:
Bullish Scenario (Solid Line): A bounce from the OB (Order Block) to hit Target 1 ($4,030.00).
Bearish/Liquidity Grab Scenario (Dotted Line): A drop below the OB to sweep the $$$ (Liquidity), potentially testing the 1H / BPR before a sharp reversal back up to Target 1 or even Target 2 ($4,050.00).
Asset and Timeframe: XAU/USD (Gold Spot / US Dollar) on a 1-Hour (1H) timeframe.
Current Price: The price is hovering around $3,983.55.
Market Structure:
There's a recent Break of Structure (BOS), suggesting an upward bias or a shift in momentum to the bullish side.
The price is currently pulling back into a key zone.
Key Zones/Concepts:
OB (Order Block): The shaded gray area is identified as an Order Block. This is a zone where significant institutional buying/selling previously occurred, and the price is expected to react to it.
$$$ (Liquidity/Equal Lows): The three dollar signs indicate an area of liquidity or equal lows below the current price action. These are often targeted for a stop-hunt or liquidity grab before a significant move.
1H / BPR (Balance Price Range): The lower green box is labeled as a 1H / BPR. A Balance Price Range is a more refined area of support/demand, suggesting an even stronger reaction zone if the initial OB fails.
Projected Trade Scenarios: The dotted lines outline two primary possibilities:
Bullish Scenario (Solid Line): A bounce from the OB (Order Block) to hit Target 1 ($4,030.00).
Bearish/Liquidity Grab Scenario (Dotted Line): A drop below the OB to sweep the $$$ (Liquidity), potentially testing the 1H / BPR before a sharp reversal back up to Target 1 or even Target 2 ($4,050.00).
トレード稼働中

📊 Professional Forex & Gold Analyst | Trading pure price action and high-probability market structure. Daily 4–5 quality trade setups with disciplined risk management. Join: t.me/+NJDp2aIM3QphYWNk| Contact: @fx_martin9
免責事項
これらの情報および投稿は、TradingViewが提供または承認する金融、投資、取引、またはその他の種類の助言もしくは推奨であることを意図したものではなく、またこれらに該当するものでもありません。詳細は利用規約をご覧ください。
📊 Professional Forex & Gold Analyst | Trading pure price action and high-probability market structure. Daily 4–5 quality trade setups with disciplined risk management. Join: t.me/+NJDp2aIM3QphYWNk| Contact: @fx_martin9
免責事項
これらの情報および投稿は、TradingViewが提供または承認する金融、投資、取引、またはその他の種類の助言もしくは推奨であることを意図したものではなく、またこれらに該当するものでもありません。詳細は利用規約をご覧ください。