
Market Context (Intraday)
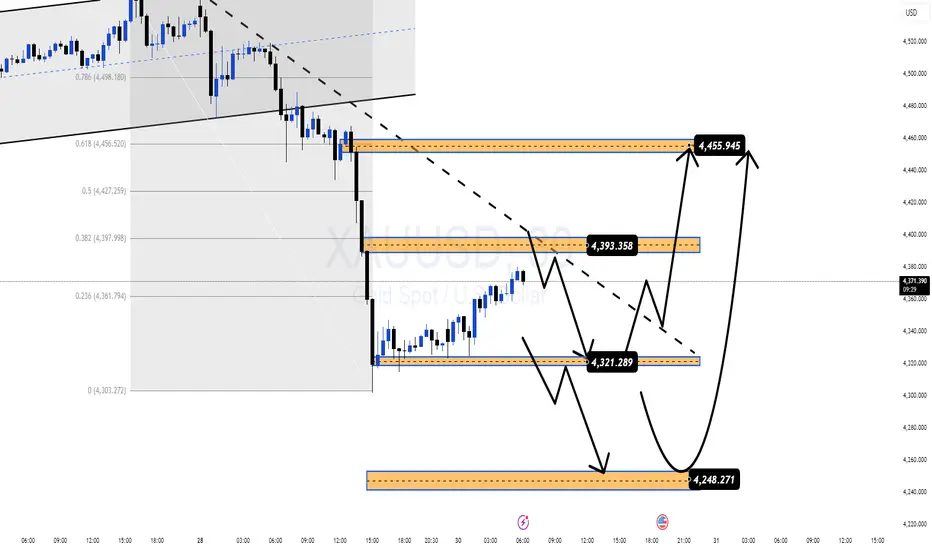
Gold has just completed a sharp sell-off, breaking below the previous structure and sweeping sell-side liquidity. The strong bearish displacement suggests a stop-hunt and rebalancing phase, not a clean trend continuation yet. Current price action shows consolidation after liquidity absorption.
Technical Structure
Market is trading below the descending trendline, keeping short-term pressure bearish.
A clear liquidity sweep occurred below 4,321, followed by a weak rebound.
Price is now reacting inside a key rebalancing zone, where both buyers and sellers may reposition.
Key Levels to Watch
Sell Reaction Zone: 4,455 – 4,460
→ Strong supply + trendline resistance. Expect rejection if price rallies here.
Mid Resistance / Decision Zone: 4,390 – 4,395
→ Intraday flip zone. Failure here keeps bearish bias intact.
Buy Zone (Liquidity): 4,245 – 4,255
→ Major demand + sell-side liquidity. Area to watch for potential bullish reaction.
Scenarios
Bearish Scenario:
If price fails below 4,390, expect continuation toward 4,320 → 4,250 to complete liquidity collection.
Bullish Recovery Scenario:
A strong reaction from 4,245–4,255 followed by acceptance above 4,395 could open a recovery move toward 4,455+.
Macro Notes
With year-end positioning and lower liquidity conditions, price is likely to be driven by liquidity hunts rather than clean trends. Avoid chasing moves; focus on reactions at key zones.
Bias
Neutral to bearish intraday, until price shows a clear acceptance above resistance.
Gold has just completed a sharp sell-off, breaking below the previous structure and sweeping sell-side liquidity. The strong bearish displacement suggests a stop-hunt and rebalancing phase, not a clean trend continuation yet. Current price action shows consolidation after liquidity absorption.
Technical Structure
Market is trading below the descending trendline, keeping short-term pressure bearish.
A clear liquidity sweep occurred below 4,321, followed by a weak rebound.
Price is now reacting inside a key rebalancing zone, where both buyers and sellers may reposition.
Key Levels to Watch
Sell Reaction Zone: 4,455 – 4,460
→ Strong supply + trendline resistance. Expect rejection if price rallies here.
Mid Resistance / Decision Zone: 4,390 – 4,395
→ Intraday flip zone. Failure here keeps bearish bias intact.
Buy Zone (Liquidity): 4,245 – 4,255
→ Major demand + sell-side liquidity. Area to watch for potential bullish reaction.
Scenarios
Bearish Scenario:
If price fails below 4,390, expect continuation toward 4,320 → 4,250 to complete liquidity collection.
Bullish Recovery Scenario:
A strong reaction from 4,245–4,255 followed by acceptance above 4,395 could open a recovery move toward 4,455+.
Macro Notes
With year-end positioning and lower liquidity conditions, price is likely to be driven by liquidity hunts rather than clean trends. Avoid chasing moves; focus on reactions at key zones.
Bias
Neutral to bearish intraday, until price shows a clear acceptance above resistance.

⚜️Trade with Money Market Flow, logic, Price action
🔥Live Market Updates-Realtime Trading Plans & Signal
t.me/+sBwjxIJbdoFmNjk1
⚜️Risk Reward 1.3 to 2.5...
⚜️Daily 8 to 16 Signals VIP
MMFLOW gives you precision entries & BIGWIN profits
🔥Live Market Updates-Realtime Trading Plans & Signal
t.me/+sBwjxIJbdoFmNjk1
⚜️Risk Reward 1.3 to 2.5...
⚜️Daily 8 to 16 Signals VIP
MMFLOW gives you precision entries & BIGWIN profits
免責事項
これらの情報および投稿は、TradingViewが提供または承認する金融、投資、取引、またはその他の種類の助言もしくは推奨であることを意図したものではなく、またこれらに該当するものでもありません。詳細は利用規約をご覧ください。
⚜️Trade with Money Market Flow, logic, Price action
🔥Live Market Updates-Realtime Trading Plans & Signal
t.me/+sBwjxIJbdoFmNjk1
⚜️Risk Reward 1.3 to 2.5...
⚜️Daily 8 to 16 Signals VIP
MMFLOW gives you precision entries & BIGWIN profits
🔥Live Market Updates-Realtime Trading Plans & Signal
t.me/+sBwjxIJbdoFmNjk1
⚜️Risk Reward 1.3 to 2.5...
⚜️Daily 8 to 16 Signals VIP
MMFLOW gives you precision entries & BIGWIN profits
免責事項
これらの情報および投稿は、TradingViewが提供または承認する金融、投資、取引、またはその他の種類の助言もしくは推奨であることを意図したものではなく、またこれらに該当するものでもありません。詳細は利用規約をご覧ください。