アップデート済
Supply & Demand Zones Liquidity & Stop Hunt [LunqFX]
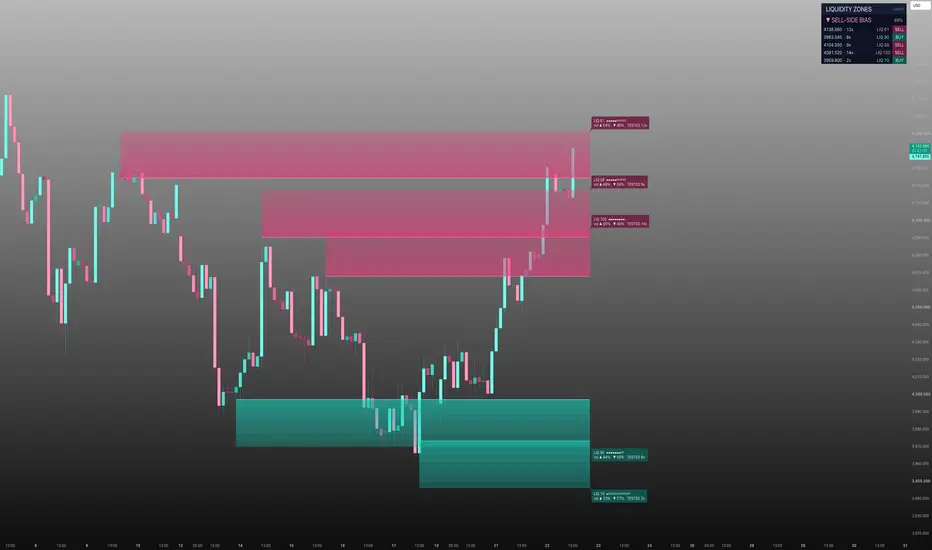
Supply and demand zones are where price reacts — but most indicators draw every swing as a box and leave you to guess which one matters. Liquidity Zones ranks them: it marks the key supply and demand zones, scores each one by how much liquidity it holds, and shows whether it is still fresh — so you know which level to trade and which to ignore.
❶ WHAT EACH ZONE SHOWS
Every zone is a coloured block — magenta = SUPPLY (sellers, above), teal = DEMAND (buyers, below) — and carries three readings that are original to this script:
LIQ SCORE (0–100) — how much volume traded inside the zone versus the strongest zone on the chart. 100 = the heaviest zone (the real magnet); a low score = a thin, weak level.
VOLUME ▲ / ▼ — the up-volume vs down-volume that built the zone: did buyers or sellers do the work inside it.
FRESH / TESTED N× — FRESH = price has not returned yet (strongest reaction expected); TESTED N× = already retested N times, weaker each time.
❷ HOW TO TRADE IT
1 — Read the BIAS in the panel. ▲ BUY-SIDE = favour longs, ▼ SELL-SIDE = favour shorts. Trade with it, not against it.
2 — Pick a zone with a HIGH LIQ Score (70+). Low-score zones are thin and unreliable — skip them.
3 — Prefer FRESH zones. A FRESH high-LIQ zone is the highest-probability reaction. A many-times-TESTED zone is more likely to break than hold.
4 — Wait for price to return to that zone. The bright edge line is your reference level.
5 — Enter on the reaction: LONG — bias BUY-SIDE, price drops into a FRESH teal DEMAND zone, LIQ 80, Volume ▲ (buyers dominant). Long on the reaction, stop below the zone, target the next supply zone above. SHORT — bias SELL-SIDE, price rallies into a FRESH magenta SUPPLY zone, LIQ 76, Volume ▼ (sellers dominant). Short on the reaction, stop above the zone, target the next demand zone below.
❸ WHAT TO AVOID
Trading low-LIQ zones — they hold little liquidity. Fading a zone whose Volume split disagrees with its side (e.g. a supply zone built on heavy up-volume) — the level is weak. Chasing a many-times-TESTED zone expecting a clean bounce.
Works on any symbol and timeframe — forex, gold (XAUUSD), indices, crypto and stocks — intraday and higher timeframes alike.
❹ DASHBOARD
The panel lists every zone with its price, LIQ Score, FRESH/TESTED status and side (BUY/SELL), plus a LIQ-weighted overall bias — the full picture at a glance. Optional neon candles can be turned off to keep your own style.
❺ HOW IT WORKS
1 — Swing highs and lows are found from confirmed pivots (closed bars — no repainting). Each swing high opens a supply zone, each swing low a demand zone. 2 — Each zone is a block centred on the swing, its height scaled to ATR so it fits the instrument's volatility. 3 — For every zone the script measures the volume traded inside it, the up/down-volume split, and how many separate times price entered it. 4 — LIQ Score = the zone's volume ÷ the strongest zone's volume, scaled 0–100. 5 — The bias is weighted by LIQ Score, so one heavy zone counts for more than several thin ones — an honest read of whether liquidity leans buy or sell.
No repainting
Zones are built only from confirmed pivots and rendered on the last bar over a fixed lookback. A zone that appears in a screenshot is a zone that was there live — history is never recalculated.
This indicator is an educational market-analysis tool, not financial advice. Zone strength and past reactions describe historical behavior and do not guarantee future results. Always confirm with your own analysis and manage risk.
❶ WHAT EACH ZONE SHOWS
Every zone is a coloured block — magenta = SUPPLY (sellers, above), teal = DEMAND (buyers, below) — and carries three readings that are original to this script:
LIQ SCORE (0–100) — how much volume traded inside the zone versus the strongest zone on the chart. 100 = the heaviest zone (the real magnet); a low score = a thin, weak level.
VOLUME ▲ / ▼ — the up-volume vs down-volume that built the zone: did buyers or sellers do the work inside it.
FRESH / TESTED N× — FRESH = price has not returned yet (strongest reaction expected); TESTED N× = already retested N times, weaker each time.
❷ HOW TO TRADE IT
1 — Read the BIAS in the panel. ▲ BUY-SIDE = favour longs, ▼ SELL-SIDE = favour shorts. Trade with it, not against it.
2 — Pick a zone with a HIGH LIQ Score (70+). Low-score zones are thin and unreliable — skip them.
3 — Prefer FRESH zones. A FRESH high-LIQ zone is the highest-probability reaction. A many-times-TESTED zone is more likely to break than hold.
4 — Wait for price to return to that zone. The bright edge line is your reference level.
5 — Enter on the reaction: LONG — bias BUY-SIDE, price drops into a FRESH teal DEMAND zone, LIQ 80, Volume ▲ (buyers dominant). Long on the reaction, stop below the zone, target the next supply zone above. SHORT — bias SELL-SIDE, price rallies into a FRESH magenta SUPPLY zone, LIQ 76, Volume ▼ (sellers dominant). Short on the reaction, stop above the zone, target the next demand zone below.
❸ WHAT TO AVOID
Trading low-LIQ zones — they hold little liquidity. Fading a zone whose Volume split disagrees with its side (e.g. a supply zone built on heavy up-volume) — the level is weak. Chasing a many-times-TESTED zone expecting a clean bounce.
Works on any symbol and timeframe — forex, gold (XAUUSD), indices, crypto and stocks — intraday and higher timeframes alike.
❹ DASHBOARD
The panel lists every zone with its price, LIQ Score, FRESH/TESTED status and side (BUY/SELL), plus a LIQ-weighted overall bias — the full picture at a glance. Optional neon candles can be turned off to keep your own style.
❺ HOW IT WORKS
1 — Swing highs and lows are found from confirmed pivots (closed bars — no repainting). Each swing high opens a supply zone, each swing low a demand zone. 2 — Each zone is a block centred on the swing, its height scaled to ATR so it fits the instrument's volatility. 3 — For every zone the script measures the volume traded inside it, the up/down-volume split, and how many separate times price entered it. 4 — LIQ Score = the zone's volume ÷ the strongest zone's volume, scaled 0–100. 5 — The bias is weighted by LIQ Score, so one heavy zone counts for more than several thin ones — an honest read of whether liquidity leans buy or sell.
No repainting
Zones are built only from confirmed pivots and rendered on the last bar over a fixed lookback. A zone that appears in a screenshot is a zone that was there live — history is never recalculated.
This indicator is an educational market-analysis tool, not financial advice. Zone strength and past reactions describe historical behavior and do not guarantee future results. Always confirm with your own analysis and manage risk.
リリースノート
🔧 Update — Bug Fixes & StabilityThe problem:
Some users hit constant runtime errors, especially on lower timeframes (1m, 5m) — the indicator would throw "calculation timed out" and stop working.
What's fixed:
✅ No more runtime errors — the indicator now runs stably on all timeframes
✅ Much better performance — zone calculations were running on every tick; they now run once per closed bar, which removes the timeouts and stops chart lag
✅ Fixed history overflow — on charts with limited data or high Lookback values, the script could request bars beyond available history; the scan range is now properly bounded and the data buffer expanded
✅ Smoother dashboard — the stats panel no longer flickers on every tick, and is fully non-repainting
Important: No logic changed. Zones, LIQ Score, buy/sell pressure %, FRESH/TESTED tags, bias, and the neon candles are all identical — values on closed bars are exactly the same as before. This is purely a stability and performance fix.

Trade setups with clear entry, stop, target and risk logic. Built for traders who want structure, not guessing.
💬 t.me/lunqfx
🌐 lunqfx.com/premium
💬 t.me/lunqfx
🌐 lunqfx.com/premium
免責事項
これらの情報および投稿は、TradingViewが提供または承認する金融、投資、取引、またはその他の種類の助言もしくは推奨であることを意図したものではなく、またこれらに該当するものでもありません。詳細は利用規約をご覧ください。
Trade setups with clear entry, stop, target and risk logic. Built for traders who want structure, not guessing.
💬 t.me/lunqfx
🌐 lunqfx.com/premium
💬 t.me/lunqfx
🌐 lunqfx.com/premium
免責事項
これらの情報および投稿は、TradingViewが提供または承認する金融、投資、取引、またはその他の種類の助言もしくは推奨であることを意図したものではなく、またこれらに該当するものでもありません。詳細は利用規約をご覧ください。