OPEN-SOURCE SCRIPT
Artemis Adaptive RSI
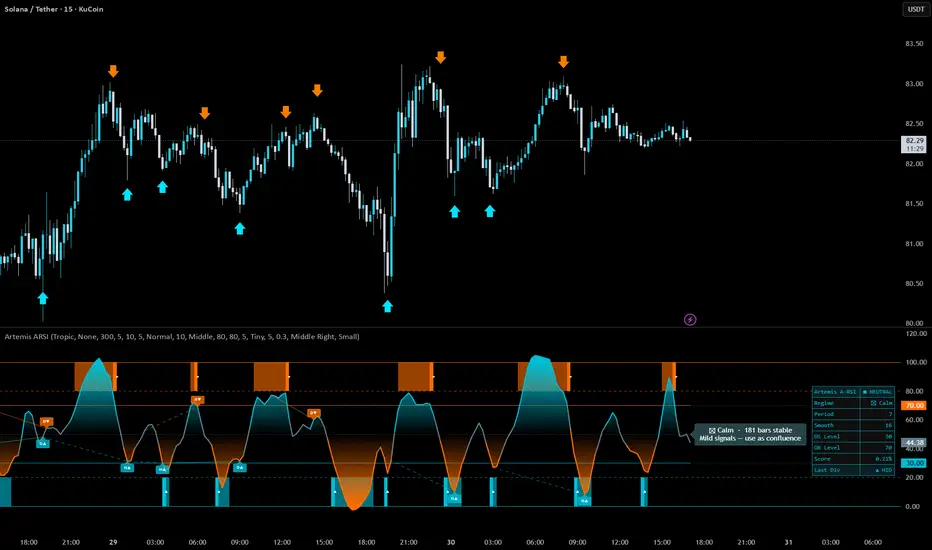
🟦 Artemis Adaptive RSI is a Pine v6 self-tuning RSI workbench. Instead of shipping with a fixed period and fixed thresholds — and forcing the trader to babysit the inputs across regimes (14 / 70 / 30 on stocks, 7 / 80 / 20 on crypto, 21 / 60 / 40 in trends) — a 60-candidate optimisation grid scores Supersmoother-filtered RSI variants against their own forward-return performance on a rolling window, then picks the variant whose threshold trips deliver the cleanest mean-reversion edge on the current market. The active period, smoothing, and OB / OS thresholds update online, and a five-state regime label tells you why the optimiser chose what it chose.
The indicator integrates seven analytical layers — Supersmoother-filtered RSI core, online candidate optimiser, hysteresis-locked regime classifier, Stochastic-Extreme-style multi-band zone visual, pivot-based Regular + Hidden divergence detection with a Smart AI Filter, adaptive trigger markers, theme-adaptive bar painter, and a PRO 8-row dashboard — each operating independently and rendered on a single, clean oscillator panel.
🟦 CREDITS & ATTRIBUTION
The adaptive optimisation CORE — Supersmoother-filtered RSI fleet, rolling-window incremental scorer, champion selection with hysteresis, and the five-state regime classifier — is derived from the open-source work of **GoodBadBitcoin** and published under the same MPL-2.0 license. Full respect to the original author for the design and the open release; this project would not exist without that groundwork.
- Source script — [Adaptive Modern RSI [GBB]](tradingview.com/script/jlRKZnLj-Adaptive-Modern-RSI-GBB/)
- Original author — [GoodBadBitcoin](tradingview.com/u/GoodBadBitcoin/)
Everything else — the Stochastic-Extreme-style multi-band zone UI, the twelve-theme palette system, the pivot-based divergence engine, the Smart AI Filter, the PRO dashboard, the hover-tooltipped regime badge, the theme-aware bar painter, and the curated nine-channel alert pack — is original work added on top.
🟦 HOW THE CORE ENGINE WORKS
**Supersmoother**
Each bar, the per-bar close change is split into two streams — positive (gains) and negative (losses) — and each stream is fed through an Ehlers two-pole Butterworth low-pass filter. The Supersmoother removes high-frequency noise without piling on the phase lag that naive EMA / RMA pre-smoothing chains accumulate. The filtered gain / loss streams then feed the classical Wilder RSI ratio:
rsi = 100 − 100 / (1 + smoothedGains / smoothedLosses)
**Candidate Fleet**
15 RSI variants are precomputed in parallel — every combination of:
| Axis | Values |
|---|---|
| RSI length | 7 / 10 / 14 / 21 / 28 |
| Supersmoother smoothing | 6 / 10 / 16 |
Combined with 4 threshold tiers (15-85 / 20-80 / 25-75 / 30-70), this gives the 60-slot fleet the optimiser grades against.
**Online Optimiser (Rolling-Edge Scorer)**
Every bar, each of the 60 slots is evaluated:
1. **Trigger detection** — for the slot's threshold pair, did the bar produce an OS-entry (RSI crossed down through OS) or an OB-exit (RSI crossed back down through OB)?
2. **Forward-return scoring** — if a trigger fired, score it by `close[t + fwdHorizon] / close[t] − 1` (signed by trigger direction).
3. **Rolling bookkeeping** — each slot maintains its own running mean over a sliding `scoreWindow`-bar window. Returns enter on add, exit on subtract, mean recomputed in O(1) per slot per bar — no rescans, no naive sum-of-products drift.
After every bar's update, the slot with the highest mean return wins — subject to two gates:
- **Min Triggers per Candidate** — under-sampled slots are disqualified
- **Switch Margin (%)** — a new champion must beat the current incumbent by this hysteresis margin before it actually takes over
This protects against bar-by-bar leadership flapping when two candidates trade marginal scores.
**Regime Classifier**
The crowned champion's shape (length-index, smoothing-index, level-index, mean-return) is read each bar and the market is tagged as one of five phases:
| Glyph | Phase | Meaning |
|---|---|---|
| ◐ | Adapting | Cold start — optimiser not yet armed (default RSI in use) |
| ✸ | Noisy | Score collapsed, no exploitable edge — sit out |
| ➜ | Trending | Long period + relaxed thresholds — trend dominates, avoid OB/OS reversals |
| ▣ | Range | Short period + strict thresholds — RSI's sweet spot, triggers reliable |
| ⊠ | Calm | Middling parameters — mild swings, use as light confluence |
The raw tag stream is then locked through a two-stage hysteresis machine: the displayed phase only updates after the underlying classification holds for `Regime Confirmation Bars` in a row. This keeps the floating badge from twitching on every minor optimiser jitter.
🟦 MULTI-BAND ZONE UI
A Stochastic-Extreme-style six-band visual at 100 / 80 / 70 / 50 / 30 / 20 / 0. The active OB / OS thresholds overlay as steplines that move as the optimiser updates. Zone fills key off the *adaptive* thresholds so the visual escalation tracks the actual signal logic, not a fixed 70 / 30 line.
The fills are tiered — when the RSI line plus the live champion's mean-return both confirm a zone state, the fill intensifies; otherwise the band shows a lighter tint. The 40 / 60 reference dotted lines and the 50 zero line are decorative — they are NOT the triggers.
**RSI line colour**
| Zone | Colour |
|---|---|
| Above 60 | theme-bull (price-strength bias) |
| Between 40 and 60 | neutral |
| Below 40 | theme-bear (price-weakness bias) |
These 40 / 60 bands are FIXED — they are NOT the adaptive OS / OB. The adaptive thresholds drive the triggers; the 40 / 60 bands just colour the RSI line for at-a-glance bias reading.
🟦 TRIGGER MARKERS
Triangle markers fire at the bar of OS entry / OB exit on the *adaptive* thresholds — the events the optimiser is actually scoring:
- ▲ **OS Entry Trigger** — RSI just crossed down through the adaptive OS threshold (mean-reversion long opportunity)
- ▼ **OB Exit Trigger** — RSI just crossed back down through the adaptive OB threshold from above (rejection / short opportunity)
Markers use `location.absolute` with fixed Y coordinates (10 / 90) so they stay glued to the same visual spot every bar — no drift between candles, no shift when zone fills update. Each visible triangle is paired with an invisible `label.style_circle` carrying a hover tooltip with live RSI value, active threshold, active period, and active smoothing — `plotshape()` does not support tooltips natively, so the dual-track rendering is required for hover content.
🟦 DIVERGENCE DETECTION
Pivot-based detection for the four classical divergence flavours:
| Type | Price | RSI | Signal |
|---|---|---|---|
| Regular Bull (D▲) | Lower Low | Higher Low | Potential reversal up |
| Regular Bear (D▼) | Higher High | Lower High | Potential reversal down |
| Hidden Bull (H▲) | Higher Low | Lower Low | Uptrend continuation |
| Hidden Bear (H▼) | Lower High | Higher High | Downtrend continuation |
Pivots are sampled on raw price (high / low) using `Pivot Arm` bars on each side (symmetric). Each pivot bar's RSI value is read **dynamically from the current active RSI series** via bar-index lookup — so when the optimiser switches champions between pivots, the comparison stays internally consistent (both endpoints come from the SAME series). This is a subtle but critical fix vs. naive divergence ports.
Regular Divergence labels (D▲ / D▼) use bracketed glyphs with solid styling — these are the reversal signals.
Hidden Divergence labels (H▲ / H▼) use the same bracket scheme — these are the continuation signals.
Each label hovers a tooltip with the price change, RSI change, and the pivot bar distance.
**Smart AI Filter**
An optional pre-filter that rejects low-quality divergences before they render. Three independent gates:
1. **Min RSI Swing** — minimum RSI difference between the two pivots (default: 5 points). Drops noise-level differences where RSI barely moved between pivots.
2. **Min Price Swing (%)** — minimum price swing between pivots as a percentage of the recent (80 bars) price range (default: 0.3%). Drops divergences where price barely moved relative to recent volatility.
3. **Zone Confirmation** — RSI at the current pivot must sit in the matching adaptive reversion half:
- Bullish divergence → RSI ≤ midpoint(liveOs, 50) (moderate-to-deep oversold)
- Bearish divergence → RSI ≥ midpoint(50, liveOb) (moderate-to-deep overbought)
The zone gate is adaptive — it tightens or loosens as the optimiser updates the live OS / OB thresholds. This encodes the classical "best divergences form at extremes" rule using the live adaptive thresholds, not a fixed 30 / 70.
When the master toggle is OFF (default), all detected divergences render. When ON, only divergences that clear all three gates survive. The filter applies identically to both chart rendering and alert conditions — no mismatch between visual and alert signals.
🟦 REGIME BADGE
A floating label pinned to the LATEST bar, extending rightward into the chart's right-margin / future area. The `label.style_label_left` style places the arrow tip on the LEFT of the box so it visually "points back" to the active RSI data without overlapping the oscillator line.
The badge shows:
- **Glyph + phase name** (e.g. `▣ Range`)
- **Bars stable** (how long the current phase has held)
- **Action note** (e.g. "RSI's sweet spot — triggers work well")
The background colour pulls from the theme palette — Range = theme-bull tint, Trending = theme-bear tint, Adapting / Noisy = theme-neutral tint, Calm = theme-signal tint — so the badge meaning is reinforced by the palette consistency.
**Hover tooltip**
Hovering the badge surfaces a comprehensive phase legend explaining all five glyphs, what each means, what action to take in each, and how to read the "bars stable" counter.
**Position**
User-selectable: Top (y = 80, upper third), Middle (y = 50, centre, default), Bottom (y = 20, lower third). The Y resolver maps the dropdown onto fixed pane-fraction coordinates so the badge stays parked at the same visual spot regardless of RSI value.
🟦 BAR COLORING
Two mutually exclusive modes apply a state-driven colour to every price bar on the chart:
| Mode | Behavior |
|---|---|
| None | Leave bars untouched (default) |
| RSI Zone | Theme-bear when RSI in OB zone, theme-bull when in OS zone, theme-neutral otherwise |
Uses the *adaptive* OB / OS thresholds, not fixed 30 / 70. The bar painter pulls directly from the active threshold state — when the optimiser switches candidates, the bar colour rule updates accordingly with no lag.
🟦 DASHBOARD
A compact 2-column, 8-row PRO data panel renders on the last bar when enabled. Every value derives from variables already computed upstream, so the dashboard adds zero overhead until the final bar.
| Row | Left | Right |
|---|---|---|
| Header | Artemis A-RSI | ▲ OB / ▼ OS / ■ Neutral (current bias) |
| Phase | Phase | ◐ ✸ ➜ ▣ ⊠ glyph + name (current regime) |
| Period | Period | Active RSI length (e.g. 14) |
| Smooth | Smooth | Active Supersmoother smoothing (e.g. 10) |
| OS Level | OS | Active adaptive OS threshold (e.g. 20) |
| OB Level | OB | Active adaptive OB threshold (e.g. 80) |
| Score | Score | Champion's mean forward return (in %) |
| Last Div | Last Div | Most recent divergence within last 50 bars (D▲ / D▼ / H▲ / H▼ / —) |
**Theme-Adaptive Chrome**
The dashboard auto-inverts its layout based on the active theme:
- **Dark themes** (Tropic, Amber, Pastel, Cyber, Helios, Electric, Candy, Bloomberg, Solar, Royal): header and footer use a faint `thBull` tint, middle rows stay solid dark, text uses full-saturation `thBull`. Border uses `thBull` at 20% transparency for strong theme presence.
- **Light themes** (Midnight, Graphite): backgrounds flip to white, text stays `thBull` (which is itself dark on these themes), border uses `thBull` at 40% transparency.
This guarantees text legibility against every palette without per-theme manual tuning.
**Position & Size**
Six anchor slots (Top / Middle / Bottom × Left / Right) and four text sizes (Tiny / Small / Normal / Large).
🟦 COLOR THEMES
Twelve cohesive palettes, each resolving to four axis colors. The whole script reads through these four variables — nothing below the theme resolver references a raw hex literal, so a single dropdown selection drives every plot, fill, stepline, divergence line, dashboard cell and badge.
| Theme | Character | Bull | Bear |
|---|---|---|---|
| Tropic | Cyan steel + deep orange | #00bcd4 | #ff6d00 |
| Amber | Warm amber + indigo blue | #ff9800 | #e53935 |
| Pastel | Sky blue + soft lavender | #4fc3f7 | #9575cd |
| Cyber | Neon lime + hot crimson | #00e676 | #ff1744 |
| Helios | Bright gold + scarlet | #ffd600 | #ef5350 |
| Electric | Electric aqua + magenta | #00e5ff | #e040fb |
| Candy | Neon green + hot pink | #69F0AE | #FF4081 |
| Bloomberg | Terminal orange + cyan | #ff8c00 | #00b0ff |
| Solar | Solarized olive + crimson | #859900 | #dc322f |
| Royal | Imperial gold + deep purple | #ffd700 | #6a0dad |
| Midnight | Deep navy + dark crimson | #0d47a1 | #b71c1c |
| Graphite | Near-black + silver grey | #1a1a1a | #757575 |
🟦 ALERT SYSTEM
Seven user toggles drive nine alert messages, all using `alert.freq_once_per_bar_close`:
| Toggle | Alert(s) | Condition |
|---|---|---|
| OS Entry Trigger | OS Entry | RSI crossed down through adaptive OS |
| OB Exit Trigger | OB Exit | RSI crossed back down through adaptive OB |
| Regime Change | Phase Flip | Locked regime label updates (post-hysteresis) |
| Regular Divergence | D▲ + D▼ | Reversal divergences detected (respects Smart AI Filter) |
| Hidden Divergence | H▲ + H▼ | Continuation divergences detected (respects Smart AI Filter) |
| RSI Mid Cross Up | Mid ↑ | RSI crossed above 50 |
| RSI Mid Cross Down | Mid ↓ | RSI crossed below 50 |
Each alert fires through `alert()` so the message body carries live context — current RSI value, the active adaptive threshold that triggered, active period and smoothing, and (for Regime Change) the previous phase's hold duration. Divergence alerts respect the Smart AI Filter — if the filter is ON and a divergence is rejected visually, the alert will also not fire.
🟦 SETTINGS REFERENCE
**Visual**
- Theme — 12 palette options. Default: Tropic
**Adaptation Core**
- Optimization Lookback (bars) — 100–1000. Default: 300
- Forward-Return Eval Horizon — 2–20. Default: 5
- Min Triggers per Candidate — ≥ 2. Default: 5
- Switch Margin (%) — 0–50, step 2.5. Default: 10
**Regime Label**
- Show Regime Label — Toggle. Default: ON
- Regime Label Size — Tiny / Small / Normal / Large / Huge. Default: Normal
- Regime Confirmation Bars — 1–100. Default: 10
- Regime Label Position — Top / Middle / Bottom. Default: Middle
**Zones & Levels**
- Show Adaptive Levels — Toggle. Default: ON
- Show Zone Fills — Toggle. Default: ON
- Show Trigger Signals — Toggle. Default: ON
**Divergence**
- Regular Divergence — Toggle. Default: ON
- Regular Opacity — 0–100. Default: 80
- Hidden Divergence — Toggle. Default: ON
- Hidden Opacity — 0–100. Default: 80
- Pivot Arm — 2–50. Default: 5
- Label Size — Tiny / Small / Normal / Large. Default: Tiny
- Smart AI Filter — Master toggle. Default: OFF
- Min RSI Swing — 1.0–50.0. Default: 5.0
- Min Price Swing (%) — 0.1–5.0. Default: 0.3
- Require Zone Confirmation — Toggle. Default: ON
**Bar Coloring**
- Bar Color Mode — None / RSI Zone. Default: None
**Dashboard**
- Show Dashboard — Toggle. Default: ON
- Panel Position — 6 anchor slots. Default: Middle Right
- Panel Text Size — Tiny / Small / Normal / Large. Default: Small
**Alerts**
- OS Entry Trigger — Default: ON
- OB Exit Trigger — Default: ON
- Regime Change — Default: ON
- Regular Divergence — Default: ON
- Hidden Divergence — Default: OFF
- RSI Mid Cross Up — Default: OFF
- RSI Mid Cross Down — Default: OFF
🟦 COMPATIBILITY
Works on all asset classes and all timeframes in TradingView Pine Script v6.
- Crypto: Spot, futures, perpetual contracts
- Forex: All pairs
- Equities: Stocks, ETFs, indices
- Commodities: Metals, energy, agriculture
- Timeframes: 1m through Monthly
Because the engine self-tunes its RSI period, smoothing, and OB / OS thresholds online, the same default settings work on a 5-second BTC chart and a weekly index chart without retuning. The optimiser sees the asset's actual reversion behaviour and adapts — no per-asset preset library needed.
🟦 TECHNICAL NOTES
- Pine Script v6
- `max_lines_count = 500`, `max_labels_count = 500`, `max_bars_back = 1000`
- No repainting — all values calculated on bar close. Pivot-based divergence results appear `Pivot Arm` bars late by design (standard Pine pivot confirmation behaviour)
- The adaptive RSI line is internally consistent across optimiser switches — divergence pivots read RSI dynamically via `activeRsi[bar_index − pivotBx]`, so both endpoints come from the SAME (current) RSI series even when the champion changes between pivots
- The Supersmoother filter relies on `var float lpY = 0.0` private state per call-site — Pine v6 issues one independent state slot per call-site, so the 15 fleet entries below produce 30 (15 × 2 streams) independent filter histories with zero cross-talk
- Champion switch is hysteresis-gated by `Switch Margin (%)` and an eligibility floor (`Min Triggers per Candidate`) — protects against bar-by-bar flapping when two candidates trade marginal scores
- Regime tag is doubly hysteresis-gated — first the candidate must hold, then the displayed phase only flips after `Regime Confirmation Bars` of stable tagging
- Trigger markers use `location.absolute` with fixed Y coordinates (10 / 90) for visual stability — no slide on zoom or candle-spacing changes
- Trigger marker tooltips piggy-back on invisible `label.style_circle` parallel renders — `plotshape()` does not natively support the `tooltip` argument
🟦 DISCLAIMER
This indicator is provided for educational and informational purposes only. It does not constitute financial advice. Past performance does not guarantee future results. Always conduct your own analysis and apply proper risk management.
The indicator integrates seven analytical layers — Supersmoother-filtered RSI core, online candidate optimiser, hysteresis-locked regime classifier, Stochastic-Extreme-style multi-band zone visual, pivot-based Regular + Hidden divergence detection with a Smart AI Filter, adaptive trigger markers, theme-adaptive bar painter, and a PRO 8-row dashboard — each operating independently and rendered on a single, clean oscillator panel.
🟦 CREDITS & ATTRIBUTION
The adaptive optimisation CORE — Supersmoother-filtered RSI fleet, rolling-window incremental scorer, champion selection with hysteresis, and the five-state regime classifier — is derived from the open-source work of **GoodBadBitcoin** and published under the same MPL-2.0 license. Full respect to the original author for the design and the open release; this project would not exist without that groundwork.
- Source script — [Adaptive Modern RSI [GBB]](tradingview.com/script/jlRKZnLj-Adaptive-Modern-RSI-GBB/)
- Original author — [GoodBadBitcoin](tradingview.com/u/GoodBadBitcoin/)
Everything else — the Stochastic-Extreme-style multi-band zone UI, the twelve-theme palette system, the pivot-based divergence engine, the Smart AI Filter, the PRO dashboard, the hover-tooltipped regime badge, the theme-aware bar painter, and the curated nine-channel alert pack — is original work added on top.
🟦 HOW THE CORE ENGINE WORKS
**Supersmoother**
Each bar, the per-bar close change is split into two streams — positive (gains) and negative (losses) — and each stream is fed through an Ehlers two-pole Butterworth low-pass filter. The Supersmoother removes high-frequency noise without piling on the phase lag that naive EMA / RMA pre-smoothing chains accumulate. The filtered gain / loss streams then feed the classical Wilder RSI ratio:
rsi = 100 − 100 / (1 + smoothedGains / smoothedLosses)
**Candidate Fleet**
15 RSI variants are precomputed in parallel — every combination of:
| Axis | Values |
|---|---|
| RSI length | 7 / 10 / 14 / 21 / 28 |
| Supersmoother smoothing | 6 / 10 / 16 |
Combined with 4 threshold tiers (15-85 / 20-80 / 25-75 / 30-70), this gives the 60-slot fleet the optimiser grades against.
**Online Optimiser (Rolling-Edge Scorer)**
Every bar, each of the 60 slots is evaluated:
1. **Trigger detection** — for the slot's threshold pair, did the bar produce an OS-entry (RSI crossed down through OS) or an OB-exit (RSI crossed back down through OB)?
2. **Forward-return scoring** — if a trigger fired, score it by `close[t + fwdHorizon] / close[t] − 1` (signed by trigger direction).
3. **Rolling bookkeeping** — each slot maintains its own running mean over a sliding `scoreWindow`-bar window. Returns enter on add, exit on subtract, mean recomputed in O(1) per slot per bar — no rescans, no naive sum-of-products drift.
After every bar's update, the slot with the highest mean return wins — subject to two gates:
- **Min Triggers per Candidate** — under-sampled slots are disqualified
- **Switch Margin (%)** — a new champion must beat the current incumbent by this hysteresis margin before it actually takes over
This protects against bar-by-bar leadership flapping when two candidates trade marginal scores.
**Regime Classifier**
The crowned champion's shape (length-index, smoothing-index, level-index, mean-return) is read each bar and the market is tagged as one of five phases:
| Glyph | Phase | Meaning |
|---|---|---|
| ◐ | Adapting | Cold start — optimiser not yet armed (default RSI in use) |
| ✸ | Noisy | Score collapsed, no exploitable edge — sit out |
| ➜ | Trending | Long period + relaxed thresholds — trend dominates, avoid OB/OS reversals |
| ▣ | Range | Short period + strict thresholds — RSI's sweet spot, triggers reliable |
| ⊠ | Calm | Middling parameters — mild swings, use as light confluence |
The raw tag stream is then locked through a two-stage hysteresis machine: the displayed phase only updates after the underlying classification holds for `Regime Confirmation Bars` in a row. This keeps the floating badge from twitching on every minor optimiser jitter.
🟦 MULTI-BAND ZONE UI
A Stochastic-Extreme-style six-band visual at 100 / 80 / 70 / 50 / 30 / 20 / 0. The active OB / OS thresholds overlay as steplines that move as the optimiser updates. Zone fills key off the *adaptive* thresholds so the visual escalation tracks the actual signal logic, not a fixed 70 / 30 line.
The fills are tiered — when the RSI line plus the live champion's mean-return both confirm a zone state, the fill intensifies; otherwise the band shows a lighter tint. The 40 / 60 reference dotted lines and the 50 zero line are decorative — they are NOT the triggers.
**RSI line colour**
| Zone | Colour |
|---|---|
| Above 60 | theme-bull (price-strength bias) |
| Between 40 and 60 | neutral |
| Below 40 | theme-bear (price-weakness bias) |
These 40 / 60 bands are FIXED — they are NOT the adaptive OS / OB. The adaptive thresholds drive the triggers; the 40 / 60 bands just colour the RSI line for at-a-glance bias reading.
🟦 TRIGGER MARKERS
Triangle markers fire at the bar of OS entry / OB exit on the *adaptive* thresholds — the events the optimiser is actually scoring:
- ▲ **OS Entry Trigger** — RSI just crossed down through the adaptive OS threshold (mean-reversion long opportunity)
- ▼ **OB Exit Trigger** — RSI just crossed back down through the adaptive OB threshold from above (rejection / short opportunity)
Markers use `location.absolute` with fixed Y coordinates (10 / 90) so they stay glued to the same visual spot every bar — no drift between candles, no shift when zone fills update. Each visible triangle is paired with an invisible `label.style_circle` carrying a hover tooltip with live RSI value, active threshold, active period, and active smoothing — `plotshape()` does not support tooltips natively, so the dual-track rendering is required for hover content.
🟦 DIVERGENCE DETECTION
Pivot-based detection for the four classical divergence flavours:
| Type | Price | RSI | Signal |
|---|---|---|---|
| Regular Bull (D▲) | Lower Low | Higher Low | Potential reversal up |
| Regular Bear (D▼) | Higher High | Lower High | Potential reversal down |
| Hidden Bull (H▲) | Higher Low | Lower Low | Uptrend continuation |
| Hidden Bear (H▼) | Lower High | Higher High | Downtrend continuation |
Pivots are sampled on raw price (high / low) using `Pivot Arm` bars on each side (symmetric). Each pivot bar's RSI value is read **dynamically from the current active RSI series** via bar-index lookup — so when the optimiser switches champions between pivots, the comparison stays internally consistent (both endpoints come from the SAME series). This is a subtle but critical fix vs. naive divergence ports.
Regular Divergence labels (D▲ / D▼) use bracketed glyphs with solid styling — these are the reversal signals.
Hidden Divergence labels (H▲ / H▼) use the same bracket scheme — these are the continuation signals.
Each label hovers a tooltip with the price change, RSI change, and the pivot bar distance.
**Smart AI Filter**
An optional pre-filter that rejects low-quality divergences before they render. Three independent gates:
1. **Min RSI Swing** — minimum RSI difference between the two pivots (default: 5 points). Drops noise-level differences where RSI barely moved between pivots.
2. **Min Price Swing (%)** — minimum price swing between pivots as a percentage of the recent (80 bars) price range (default: 0.3%). Drops divergences where price barely moved relative to recent volatility.
3. **Zone Confirmation** — RSI at the current pivot must sit in the matching adaptive reversion half:
- Bullish divergence → RSI ≤ midpoint(liveOs, 50) (moderate-to-deep oversold)
- Bearish divergence → RSI ≥ midpoint(50, liveOb) (moderate-to-deep overbought)
The zone gate is adaptive — it tightens or loosens as the optimiser updates the live OS / OB thresholds. This encodes the classical "best divergences form at extremes" rule using the live adaptive thresholds, not a fixed 30 / 70.
When the master toggle is OFF (default), all detected divergences render. When ON, only divergences that clear all three gates survive. The filter applies identically to both chart rendering and alert conditions — no mismatch between visual and alert signals.
🟦 REGIME BADGE
A floating label pinned to the LATEST bar, extending rightward into the chart's right-margin / future area. The `label.style_label_left` style places the arrow tip on the LEFT of the box so it visually "points back" to the active RSI data without overlapping the oscillator line.
The badge shows:
- **Glyph + phase name** (e.g. `▣ Range`)
- **Bars stable** (how long the current phase has held)
- **Action note** (e.g. "RSI's sweet spot — triggers work well")
The background colour pulls from the theme palette — Range = theme-bull tint, Trending = theme-bear tint, Adapting / Noisy = theme-neutral tint, Calm = theme-signal tint — so the badge meaning is reinforced by the palette consistency.
**Hover tooltip**
Hovering the badge surfaces a comprehensive phase legend explaining all five glyphs, what each means, what action to take in each, and how to read the "bars stable" counter.
**Position**
User-selectable: Top (y = 80, upper third), Middle (y = 50, centre, default), Bottom (y = 20, lower third). The Y resolver maps the dropdown onto fixed pane-fraction coordinates so the badge stays parked at the same visual spot regardless of RSI value.
🟦 BAR COLORING
Two mutually exclusive modes apply a state-driven colour to every price bar on the chart:
| Mode | Behavior |
|---|---|
| None | Leave bars untouched (default) |
| RSI Zone | Theme-bear when RSI in OB zone, theme-bull when in OS zone, theme-neutral otherwise |
Uses the *adaptive* OB / OS thresholds, not fixed 30 / 70. The bar painter pulls directly from the active threshold state — when the optimiser switches candidates, the bar colour rule updates accordingly with no lag.
🟦 DASHBOARD
A compact 2-column, 8-row PRO data panel renders on the last bar when enabled. Every value derives from variables already computed upstream, so the dashboard adds zero overhead until the final bar.
| Row | Left | Right |
|---|---|---|
| Header | Artemis A-RSI | ▲ OB / ▼ OS / ■ Neutral (current bias) |
| Phase | Phase | ◐ ✸ ➜ ▣ ⊠ glyph + name (current regime) |
| Period | Period | Active RSI length (e.g. 14) |
| Smooth | Smooth | Active Supersmoother smoothing (e.g. 10) |
| OS Level | OS | Active adaptive OS threshold (e.g. 20) |
| OB Level | OB | Active adaptive OB threshold (e.g. 80) |
| Score | Score | Champion's mean forward return (in %) |
| Last Div | Last Div | Most recent divergence within last 50 bars (D▲ / D▼ / H▲ / H▼ / —) |
**Theme-Adaptive Chrome**
The dashboard auto-inverts its layout based on the active theme:
- **Dark themes** (Tropic, Amber, Pastel, Cyber, Helios, Electric, Candy, Bloomberg, Solar, Royal): header and footer use a faint `thBull` tint, middle rows stay solid dark, text uses full-saturation `thBull`. Border uses `thBull` at 20% transparency for strong theme presence.
- **Light themes** (Midnight, Graphite): backgrounds flip to white, text stays `thBull` (which is itself dark on these themes), border uses `thBull` at 40% transparency.
This guarantees text legibility against every palette without per-theme manual tuning.
**Position & Size**
Six anchor slots (Top / Middle / Bottom × Left / Right) and four text sizes (Tiny / Small / Normal / Large).
🟦 COLOR THEMES
Twelve cohesive palettes, each resolving to four axis colors. The whole script reads through these four variables — nothing below the theme resolver references a raw hex literal, so a single dropdown selection drives every plot, fill, stepline, divergence line, dashboard cell and badge.
| Theme | Character | Bull | Bear |
|---|---|---|---|
| Tropic | Cyan steel + deep orange | #00bcd4 | #ff6d00 |
| Amber | Warm amber + indigo blue | #ff9800 | #e53935 |
| Pastel | Sky blue + soft lavender | #4fc3f7 | #9575cd |
| Cyber | Neon lime + hot crimson | #00e676 | #ff1744 |
| Helios | Bright gold + scarlet | #ffd600 | #ef5350 |
| Electric | Electric aqua + magenta | #00e5ff | #e040fb |
| Candy | Neon green + hot pink | #69F0AE | #FF4081 |
| Bloomberg | Terminal orange + cyan | #ff8c00 | #00b0ff |
| Solar | Solarized olive + crimson | #859900 | #dc322f |
| Royal | Imperial gold + deep purple | #ffd700 | #6a0dad |
| Midnight | Deep navy + dark crimson | #0d47a1 | #b71c1c |
| Graphite | Near-black + silver grey | #1a1a1a | #757575 |
🟦 ALERT SYSTEM
Seven user toggles drive nine alert messages, all using `alert.freq_once_per_bar_close`:
| Toggle | Alert(s) | Condition |
|---|---|---|
| OS Entry Trigger | OS Entry | RSI crossed down through adaptive OS |
| OB Exit Trigger | OB Exit | RSI crossed back down through adaptive OB |
| Regime Change | Phase Flip | Locked regime label updates (post-hysteresis) |
| Regular Divergence | D▲ + D▼ | Reversal divergences detected (respects Smart AI Filter) |
| Hidden Divergence | H▲ + H▼ | Continuation divergences detected (respects Smart AI Filter) |
| RSI Mid Cross Up | Mid ↑ | RSI crossed above 50 |
| RSI Mid Cross Down | Mid ↓ | RSI crossed below 50 |
Each alert fires through `alert()` so the message body carries live context — current RSI value, the active adaptive threshold that triggered, active period and smoothing, and (for Regime Change) the previous phase's hold duration. Divergence alerts respect the Smart AI Filter — if the filter is ON and a divergence is rejected visually, the alert will also not fire.
🟦 SETTINGS REFERENCE
**Visual**
- Theme — 12 palette options. Default: Tropic
**Adaptation Core**
- Optimization Lookback (bars) — 100–1000. Default: 300
- Forward-Return Eval Horizon — 2–20. Default: 5
- Min Triggers per Candidate — ≥ 2. Default: 5
- Switch Margin (%) — 0–50, step 2.5. Default: 10
**Regime Label**
- Show Regime Label — Toggle. Default: ON
- Regime Label Size — Tiny / Small / Normal / Large / Huge. Default: Normal
- Regime Confirmation Bars — 1–100. Default: 10
- Regime Label Position — Top / Middle / Bottom. Default: Middle
**Zones & Levels**
- Show Adaptive Levels — Toggle. Default: ON
- Show Zone Fills — Toggle. Default: ON
- Show Trigger Signals — Toggle. Default: ON
**Divergence**
- Regular Divergence — Toggle. Default: ON
- Regular Opacity — 0–100. Default: 80
- Hidden Divergence — Toggle. Default: ON
- Hidden Opacity — 0–100. Default: 80
- Pivot Arm — 2–50. Default: 5
- Label Size — Tiny / Small / Normal / Large. Default: Tiny
- Smart AI Filter — Master toggle. Default: OFF
- Min RSI Swing — 1.0–50.0. Default: 5.0
- Min Price Swing (%) — 0.1–5.0. Default: 0.3
- Require Zone Confirmation — Toggle. Default: ON
**Bar Coloring**
- Bar Color Mode — None / RSI Zone. Default: None
**Dashboard**
- Show Dashboard — Toggle. Default: ON
- Panel Position — 6 anchor slots. Default: Middle Right
- Panel Text Size — Tiny / Small / Normal / Large. Default: Small
**Alerts**
- OS Entry Trigger — Default: ON
- OB Exit Trigger — Default: ON
- Regime Change — Default: ON
- Regular Divergence — Default: ON
- Hidden Divergence — Default: OFF
- RSI Mid Cross Up — Default: OFF
- RSI Mid Cross Down — Default: OFF
🟦 COMPATIBILITY
Works on all asset classes and all timeframes in TradingView Pine Script v6.
- Crypto: Spot, futures, perpetual contracts
- Forex: All pairs
- Equities: Stocks, ETFs, indices
- Commodities: Metals, energy, agriculture
- Timeframes: 1m through Monthly
Because the engine self-tunes its RSI period, smoothing, and OB / OS thresholds online, the same default settings work on a 5-second BTC chart and a weekly index chart without retuning. The optimiser sees the asset's actual reversion behaviour and adapts — no per-asset preset library needed.
🟦 TECHNICAL NOTES
- Pine Script v6
- `max_lines_count = 500`, `max_labels_count = 500`, `max_bars_back = 1000`
- No repainting — all values calculated on bar close. Pivot-based divergence results appear `Pivot Arm` bars late by design (standard Pine pivot confirmation behaviour)
- The adaptive RSI line is internally consistent across optimiser switches — divergence pivots read RSI dynamically via `activeRsi[bar_index − pivotBx]`, so both endpoints come from the SAME (current) RSI series even when the champion changes between pivots
- The Supersmoother filter relies on `var float lpY = 0.0` private state per call-site — Pine v6 issues one independent state slot per call-site, so the 15 fleet entries below produce 30 (15 × 2 streams) independent filter histories with zero cross-talk
- Champion switch is hysteresis-gated by `Switch Margin (%)` and an eligibility floor (`Min Triggers per Candidate`) — protects against bar-by-bar flapping when two candidates trade marginal scores
- Regime tag is doubly hysteresis-gated — first the candidate must hold, then the displayed phase only flips after `Regime Confirmation Bars` of stable tagging
- Trigger markers use `location.absolute` with fixed Y coordinates (10 / 90) for visual stability — no slide on zoom or candle-spacing changes
- Trigger marker tooltips piggy-back on invisible `label.style_circle` parallel renders — `plotshape()` does not natively support the `tooltip` argument
🟦 DISCLAIMER
This indicator is provided for educational and informational purposes only. It does not constitute financial advice. Past performance does not guarantee future results. Always conduct your own analysis and apply proper risk management.
オープンソーススクリプト
TradingViewの精神に則り、このスクリプトの作者はコードをオープンソースとして公開してくれました。トレーダーが内容を確認・検証できるようにという配慮です。作者に拍手を送りましょう!無料で利用できますが、コードの再公開はハウスルールに従う必要があります。

免責事項
これらの情報および投稿は、TradingViewが提供または承認する金融、投資、取引、またはその他の種類の助言もしくは推奨であることを意図したものではなく、またこれらに該当するものでもありません。詳細は利用規約をご覧ください。
オープンソーススクリプト
TradingViewの精神に則り、このスクリプトの作者はコードをオープンソースとして公開してくれました。トレーダーが内容を確認・検証できるようにという配慮です。作者に拍手を送りましょう!無料で利用できますが、コードの再公開はハウスルールに従う必要があります。
免責事項
これらの情報および投稿は、TradingViewが提供または承認する金融、投資、取引、またはその他の種類の助言もしくは推奨であることを意図したものではなく、またこれらに該当するものでもありません。詳細は利用規約をご覧ください。