

🧭 Market Structure Overview
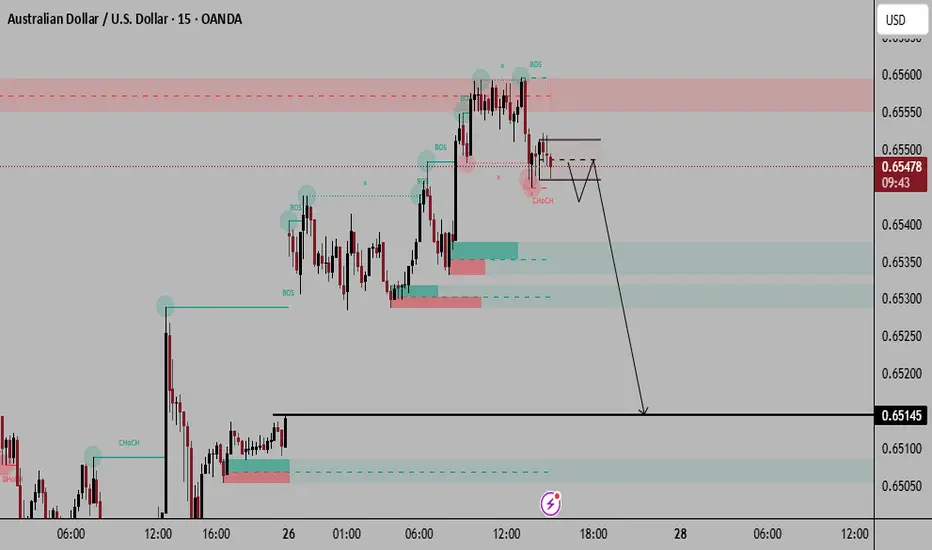
Current price: around 0.6547
The chart shows a bearish structure shift — after price reached a high near 0.6560–0.6565, it created:
A Break of Structure (BOS) to the downside.
A Change of Character (CHoCH) confirming a transition from bullish to bearish momentum.
🧱 Key Supply and Demand Zones
Supply zone (short entry area):
Marked in red around 0.6550–0.6560
This is where sellers previously entered and broke structure — potential retest zone for short entry.
Demand zones (targets):
Minor demand: around 0.6530–0.6535
Major demand / final target: near 0.6515–0.6510
📉 Trade Plan (Sell Setup)
Bias: Bearish
Entry zone (sell):
Wait for a retracement into 0.6550–0.6555 (supply zone retest)
Confirmation:
Look for lower time frame rejection (e.g. bearish engulfing, BOS down on 1–5m chart) at that zone.
Stop loss:
Above 0.6565 (just beyond the BOS high / supply zone)
Take profit targets:
TP1: 0.6535 (first demand / liquidity pocket)
TP2: 0.6515 (main target, strong demand zone)
Risk-to-reward (approx):
1:3 to 1:4, depending on entry precision
🔍 Market Logic
Price made a lower high and broke structure to the downside.
The CHoCH confirms momentum has shifted.
The liquidity above 0.6560 has been swept — institutions likely distributed there.
Expect a retracement into supply before the next impulsive leg down.
⚠️ Trade Management Tips
If price fails to reach 0.6550 and instead breaks below 0.6535 decisively, consider waiting for a pullback to 0.6540 for re-entry.
Move SL to breakeven after TP1 is hit.
Current price: around 0.6547
The chart shows a bearish structure shift — after price reached a high near 0.6560–0.6565, it created:
A Break of Structure (BOS) to the downside.
A Change of Character (CHoCH) confirming a transition from bullish to bearish momentum.
🧱 Key Supply and Demand Zones
Supply zone (short entry area):
Marked in red around 0.6550–0.6560
This is where sellers previously entered and broke structure — potential retest zone for short entry.
Demand zones (targets):
Minor demand: around 0.6530–0.6535
Major demand / final target: near 0.6515–0.6510
📉 Trade Plan (Sell Setup)
Bias: Bearish
Entry zone (sell):
Wait for a retracement into 0.6550–0.6555 (supply zone retest)
Confirmation:
Look for lower time frame rejection (e.g. bearish engulfing, BOS down on 1–5m chart) at that zone.
Stop loss:
Above 0.6565 (just beyond the BOS high / supply zone)
Take profit targets:
TP1: 0.6535 (first demand / liquidity pocket)
TP2: 0.6515 (main target, strong demand zone)
Risk-to-reward (approx):
1:3 to 1:4, depending on entry precision
🔍 Market Logic
Price made a lower high and broke structure to the downside.
The CHoCH confirms momentum has shifted.
The liquidity above 0.6560 has been swept — institutions likely distributed there.
Expect a retracement into supply before the next impulsive leg down.
⚠️ Trade Management Tips
If price fails to reach 0.6550 and instead breaks below 0.6535 decisively, consider waiting for a pullback to 0.6540 for re-entry.
Move SL to breakeven after TP1 is hit.

면책사항
해당 정보와 게시물은 금융, 투자, 트레이딩 또는 기타 유형의 조언이나 권장 사항으로 간주되지 않으며, 트레이딩뷰에서 제공하거나 보증하는 것이 아닙니다. 자세한 내용은 이용 약관을 참조하세요.
면책사항
해당 정보와 게시물은 금융, 투자, 트레이딩 또는 기타 유형의 조언이나 권장 사항으로 간주되지 않으며, 트레이딩뷰에서 제공하거나 보증하는 것이 아닙니다. 자세한 내용은 이용 약관을 참조하세요.