

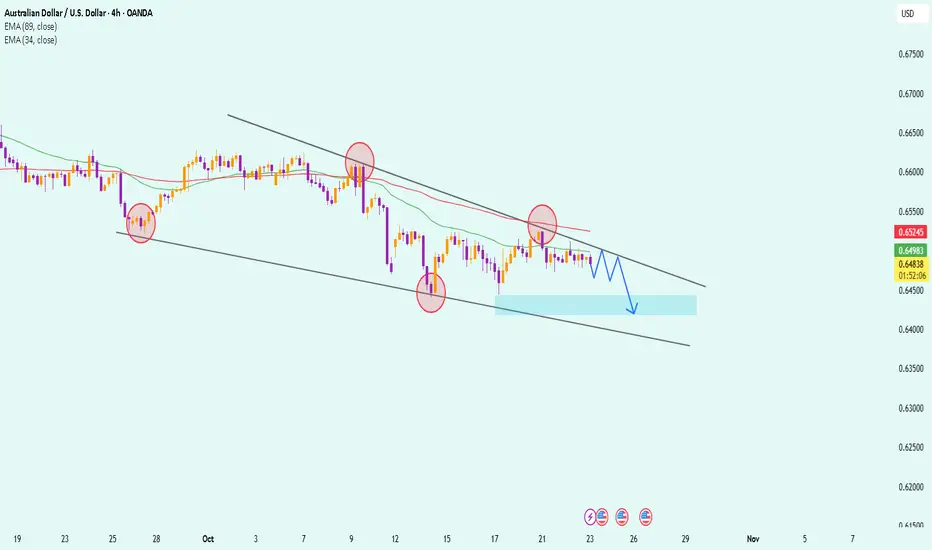
On the 4H chart, AUDUSD continues to move within a descending channel that has persisted since early October. Each time price touches the upper trendline, it gets sharply rejected — showing that sellers remain firmly in control.
Currently, the pair is hovering around the 0.6480 zone, just below both the EMA34 and EMA89, which are sloping downward — confirming that the medium-term downtrend is still intact.
From a fundamental perspective, weaker-than-expected Australian employment data and growing expectations that the RBA might cut rates sooner are weighing on the Aussie. Meanwhile, the U.S. dollar is supported by rising Treasury yields — further strengthening the bearish bias.
Short-term scenario: price may rebound slightly toward the 0.6500 area (testing EMA resistance + upper trendline) before continuing its decline toward the 0.6420 target zone — which also aligns with strong technical support and the bottom of the descending channel.
Currently, the pair is hovering around the 0.6480 zone, just below both the EMA34 and EMA89, which are sloping downward — confirming that the medium-term downtrend is still intact.
From a fundamental perspective, weaker-than-expected Australian employment data and growing expectations that the RBA might cut rates sooner are weighing on the Aussie. Meanwhile, the U.S. dollar is supported by rising Treasury yields — further strengthening the bearish bias.
Short-term scenario: price may rebound slightly toward the 0.6500 area (testing EMA resistance + upper trendline) before continuing its decline toward the 0.6420 target zone — which also aligns with strong technical support and the bottom of the descending channel.

관련 발행물
면책사항
해당 정보와 게시물은 금융, 투자, 트레이딩 또는 기타 유형의 조언이나 권장 사항으로 간주되지 않으며, 트레이딩뷰에서 제공하거나 보증하는 것이 아닙니다. 자세한 내용은 이용 약관을 참조하세요.
관련 발행물
면책사항
해당 정보와 게시물은 금융, 투자, 트레이딩 또는 기타 유형의 조언이나 권장 사항으로 간주되지 않으며, 트레이딩뷰에서 제공하거나 보증하는 것이 아닙니다. 자세한 내용은 이용 약관을 참조하세요.