

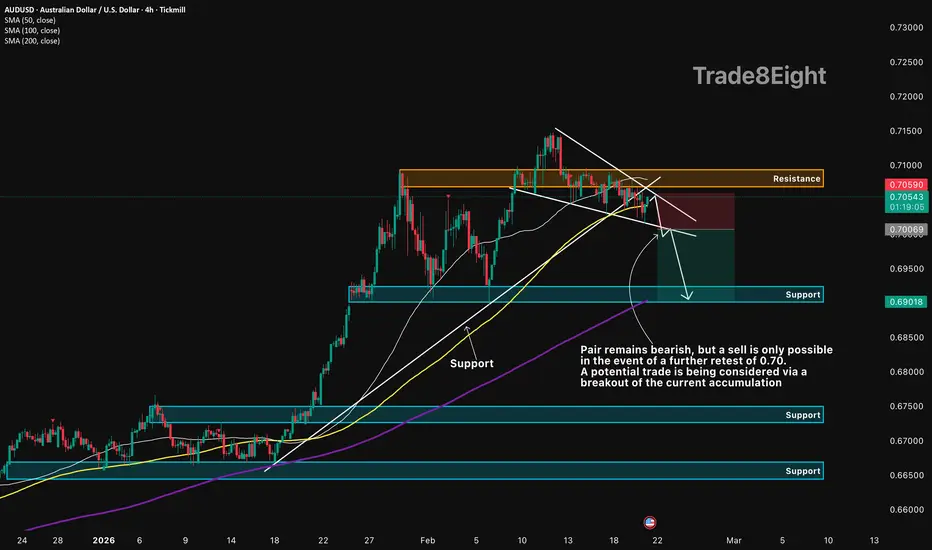
🛠 Technical Analysis: On the H4 chart, AUDUSD is transitioning into a corrective bearish phase after failing to extend above the upper resistance band near 0.705–0.709. Price is consolidating in a tight accumulation/ structure, with a descending trendline pressing from above and a rising support line holding the base. The pair remains capped below the SMA 50, while the SMA 100 is acting as a nearby pivot—suggesting sellers still have control under resistance. A clean breakdown from the current consolidation would confirm bearish continuation and shift focus to the next major support zone. The key trigger is a retest of the 0.7000 area (marked level) followed by rejection, which would validate a sell-the-retest setup. The primary downside objective is the 0.6902 support, aligning closely with the SMA 200 region and prior demand.
———————————————
❗️Trade Parameters (SELL)
———————————————
➡️ Entry Point: 0.70069
🎯 Take Profit: 0.69018
🔴 Stop Loss: 0.70590
⚠️ Disclaimer: This is a potential trade idea based on current analysis; market conditions and price direction are subject to change based on news factors and volatility.
———————————————
❗️Trade Parameters (SELL)
———————————————
➡️ Entry Point: 0.70069
🎯 Take Profit: 0.69018
🔴 Stop Loss: 0.70590
⚠️ Disclaimer: This is a potential trade idea based on current analysis; market conditions and price direction are subject to change based on news factors and volatility.
노트
🌍 Fundamental Analysis: AUDUSD is being driven by a tug-of-war between AUD support from Australia’s relatively resilient data backdrop and renewed USD demand into key US releases and Fed communication. The near-term downside pressure can still pull the pair back toward the 0.7000 area, especially if the US Dollar stays firm ahead of major catalysts. The 0.6900 as an important next downside level if bearish momentum extends after a breakdown. 
⚠️ Public market view only. Not financial advice. DYOR and manage your own risk.
관련 발행물
면책사항
해당 정보와 게시물은 금융, 투자, 트레이딩 또는 기타 유형의 조언이나 권장 사항으로 간주되지 않으며, 트레이딩뷰에서 제공하거나 보증하는 것이 아닙니다. 자세한 내용은 이용 약관을 참조하세요.
⚠️ Public market view only. Not financial advice. DYOR and manage your own risk.
관련 발행물
면책사항
해당 정보와 게시물은 금융, 투자, 트레이딩 또는 기타 유형의 조언이나 권장 사항으로 간주되지 않으며, 트레이딩뷰에서 제공하거나 보증하는 것이 아닙니다. 자세한 내용은 이용 약관을 참조하세요.