

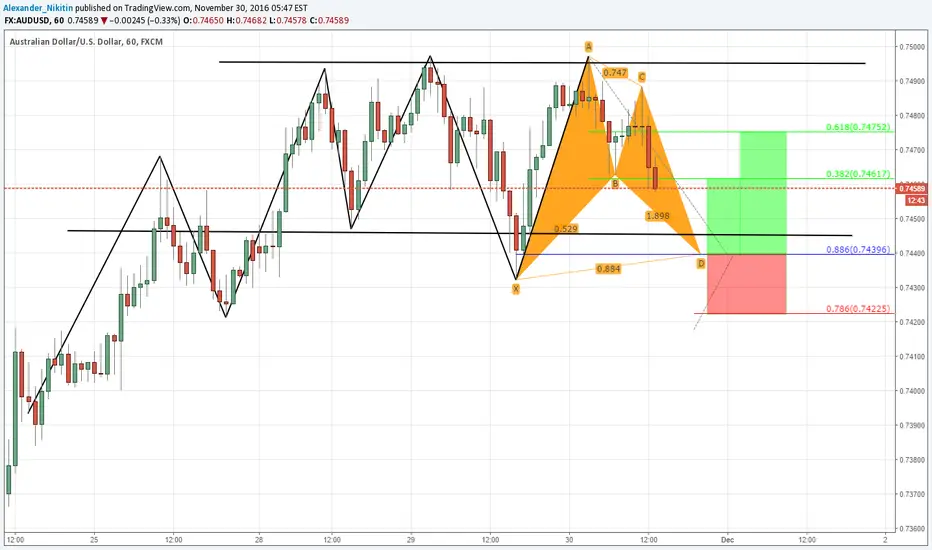
Bat Advanced formation rules of engagement.
Tools:
*Fibonacci retracements (38.2%, 50%, 61.8% and 88.6%)
Timeframes:
*The Bat Advanced formation was originally designed as a swing trading strategy. But it also works on lower timeframes.
Tactics:
*Seek to identify 4 market moves and 3 major Fibonacci zones. The combination of these moves forms the points (X, A, B, C, D) that fulfill the formation.
Rules of engagement: Criteria 1
The Bat Advanced formation starts with a market movement/impulse leg that establishes our X and A points.
Once X and A points have been identified, we then look for our first criteria.
Criteria 1: The market forms the B completion point by fulfilling at least a 50% retracement of the XA leg.
Note: AB move remains valid as long as there is at least a 50% retracement of XA and that it does not touch the 61.8% retracement of XA. Only candlewick is calculated here. Candle close is not important.
Rules of engagement: Criteria 2
If criteria 1 has been met, then look for criteria 2.
Criteria 2: The market forms the C completion point by fulfilling at least a 38.2% retracement of the AB.
Note: BC move remains valid as long as there is at least a 38.2% retracement of AB and that it does not extend past A. Only candlewick is calculated here. Candle close is not important.
Rules of engagement: Criteria 3
If criteria 1 and 2 have been met, then look for criteria 3.
Criteria 3: The market forms the D completion (entry point) by fulfilling a 88.6% XA.
Note: D point never extends past X.
Trade management: Entry, stops & targets.
Entry: Limit order is placed at D completion point.
Target 1: 38.2% retracement of AD leg. When attained half of the position closes & stop moves to breakeven.
Target 2: 61.8% retracements of AD leg.
Stop placement: Stop always goes past X. Either 113% XA extension or 1 ATR beyond X, or 78.6% of the 1st target distance above/below the entry.
Tools:
*Fibonacci retracements (38.2%, 50%, 61.8% and 88.6%)
Timeframes:
*The Bat Advanced formation was originally designed as a swing trading strategy. But it also works on lower timeframes.
Tactics:
*Seek to identify 4 market moves and 3 major Fibonacci zones. The combination of these moves forms the points (X, A, B, C, D) that fulfill the formation.
Rules of engagement: Criteria 1
The Bat Advanced formation starts with a market movement/impulse leg that establishes our X and A points.
Once X and A points have been identified, we then look for our first criteria.
Criteria 1: The market forms the B completion point by fulfilling at least a 50% retracement of the XA leg.
Note: AB move remains valid as long as there is at least a 50% retracement of XA and that it does not touch the 61.8% retracement of XA. Only candlewick is calculated here. Candle close is not important.
Rules of engagement: Criteria 2
If criteria 1 has been met, then look for criteria 2.
Criteria 2: The market forms the C completion point by fulfilling at least a 38.2% retracement of the AB.
Note: BC move remains valid as long as there is at least a 38.2% retracement of AB and that it does not extend past A. Only candlewick is calculated here. Candle close is not important.
Rules of engagement: Criteria 3
If criteria 1 and 2 have been met, then look for criteria 3.
Criteria 3: The market forms the D completion (entry point) by fulfilling a 88.6% XA.
Note: D point never extends past X.
Trade management: Entry, stops & targets.
Entry: Limit order is placed at D completion point.
Target 1: 38.2% retracement of AD leg. When attained half of the position closes & stop moves to breakeven.
Target 2: 61.8% retracements of AD leg.
Stop placement: Stop always goes past X. Either 113% XA extension or 1 ATR beyond X, or 78.6% of the 1st target distance above/below the entry.
액티브 트레이드
limit order was triggered거래청산: 스탑 닿음

관련 발행물
면책사항
해당 정보와 게시물은 금융, 투자, 트레이딩 또는 기타 유형의 조언이나 권장 사항으로 간주되지 않으며, 트레이딩뷰에서 제공하거나 보증하는 것이 아닙니다. 자세한 내용은 이용 약관을 참조하세요.
면책사항
해당 정보와 게시물은 금융, 투자, 트레이딩 또는 기타 유형의 조언이나 권장 사항으로 간주되지 않으며, 트레이딩뷰에서 제공하거나 보증하는 것이 아닙니다. 자세한 내용은 이용 약관을 참조하세요.