

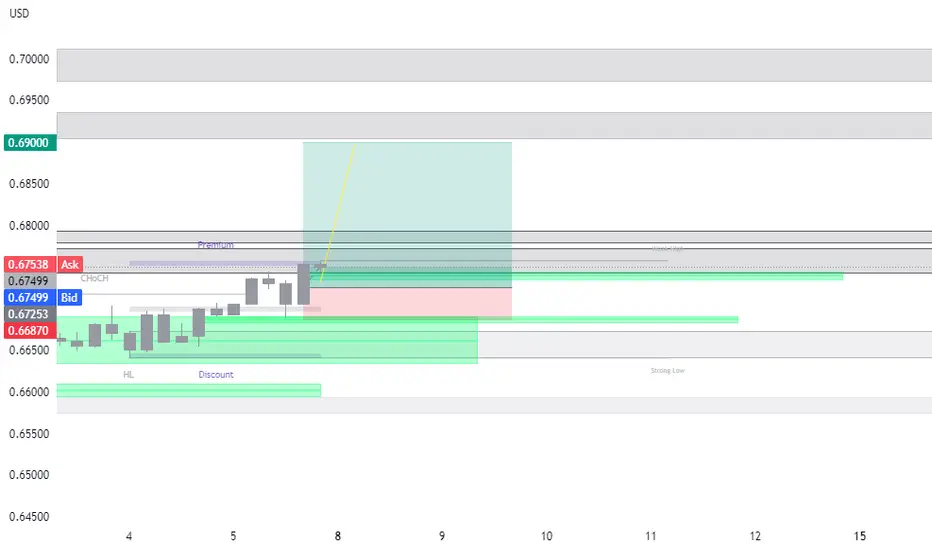
🔆MULTI-TIME FRAME TOP-DOWN ANALYSIS OVERVIEW☀️
1:✨Eagle eye: Multi-year bearish trend in effect.
2:📆Monthly: Market made an insider high and low, but was rejected from the monthly order block.
3:📅Weekly: Market structure is bearish, but it filled out the last swing 50% area and respected a strong reversal upside signal with a double bottom formation.
4:🕛Daily: Daily structure is bullish and the market completed its inducement, indicating an overall bullish trend. Market may go above 0.7100 levels after a long consolidation.
😇7 Dimension analysis
🟢 Analysis time frame: H4
5: 1 Price Structure: Sideways
6: 2 Pattern Candle Chart: Double Top
7: 3 Volume: High volume during this period suggests buyers are active somewhere.
8: 4 Momentum UNCONVENTIONAL RSI: Above 60, indicating a super bullish zone.
9: 5 Volatility measure Bollinger Bands: High bullish volatility.
10: 6 Strength ADX: Bulls are in power.
11: 7 Sentiment ROC: AUD is the strongest this week.
✔️ Entry Time Frame: 15 Min
12: Entry TF Structure: Bullish
13: Entry Move: Impulsive
14: Support Resistance Base: Last FVG should be a support.
15: Wait for a trigger event.
☑️ Final Comments: Buy at support or breakout.
16: 💡Decision: Buy
17: 🚀Entry: 0.6725
18: ✋Stop Loss: 0.6687
19: 🎯Take Profit: 0.6900
20: 😊Risk to Reward Ratio: 1:5
🕛 Expected Duration: 3 Days
1:✨Eagle eye: Multi-year bearish trend in effect.
2:📆Monthly: Market made an insider high and low, but was rejected from the monthly order block.
3:📅Weekly: Market structure is bearish, but it filled out the last swing 50% area and respected a strong reversal upside signal with a double bottom formation.
4:🕛Daily: Daily structure is bullish and the market completed its inducement, indicating an overall bullish trend. Market may go above 0.7100 levels after a long consolidation.
😇7 Dimension analysis
🟢 Analysis time frame: H4
5: 1 Price Structure: Sideways
6: 2 Pattern Candle Chart: Double Top
7: 3 Volume: High volume during this period suggests buyers are active somewhere.
8: 4 Momentum UNCONVENTIONAL RSI: Above 60, indicating a super bullish zone.
9: 5 Volatility measure Bollinger Bands: High bullish volatility.
10: 6 Strength ADX: Bulls are in power.
11: 7 Sentiment ROC: AUD is the strongest this week.
✔️ Entry Time Frame: 15 Min
12: Entry TF Structure: Bullish
13: Entry Move: Impulsive
14: Support Resistance Base: Last FVG should be a support.
15: Wait for a trigger event.
☑️ Final Comments: Buy at support or breakout.
16: 💡Decision: Buy
17: 🚀Entry: 0.6725
18: ✋Stop Loss: 0.6687
19: 🎯Take Profit: 0.6900
20: 😊Risk to Reward Ratio: 1:5
🕛 Expected Duration: 3 Days

면책사항
해당 정보와 게시물은 금융, 투자, 트레이딩 또는 기타 유형의 조언이나 권장 사항으로 간주되지 않으며, 트레이딩뷰에서 제공하거나 보증하는 것이 아닙니다. 자세한 내용은 이용 약관을 참조하세요.
면책사항
해당 정보와 게시물은 금융, 투자, 트레이딩 또는 기타 유형의 조언이나 권장 사항으로 간주되지 않으며, 트레이딩뷰에서 제공하거나 보증하는 것이 아닙니다. 자세한 내용은 이용 약관을 참조하세요.