
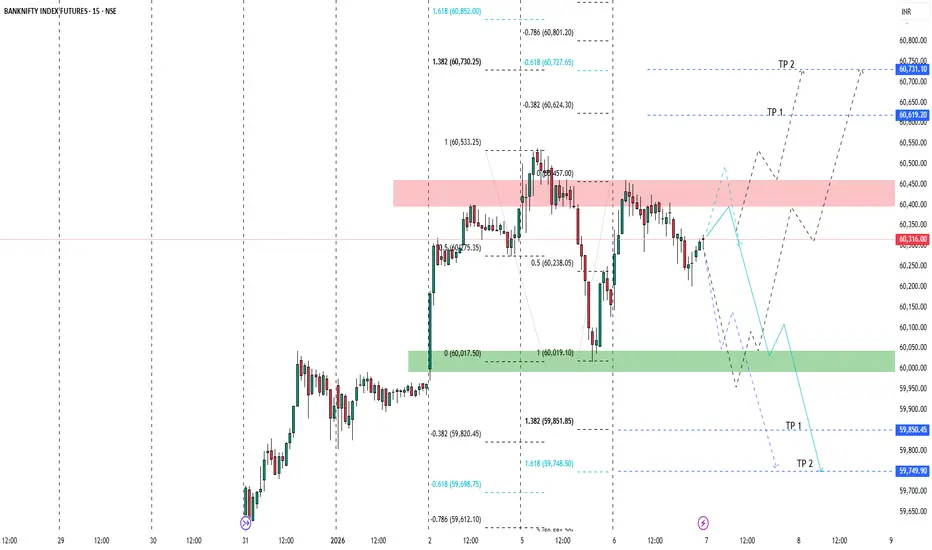
🔎 Market Structure
Overall range-bound with volatility
Price is currently inside a supply–demand battle zone
No clean trend yet → wait for confirmation
🔴 Supply / Resistance Zone (Important)
60,400 – 60,470 (red shaded area)
Strong selling pressure
Multiple rejections → sellers active
This is a make-or-break zone
👉 If price fails here → downside likely
👉 If price breaks & holds above → upside expansion
🟢 Demand / Support Zone
59,980 – 60,050 (green shaded area)
Strong buying interest
Previous bounce originated here
Acts as major intraday support
📈 Fibonacci Insights
Upside Fib Targets
0.618 → 60,727
1.0 → 60,730
1.618 → 60,852
Downside Fib Targets
1.0 → 59,851
1.618 → 59,748
These align well with your marked TP1 & TP2 levels 👍
🔮 Possible Scenarios
🟢 Bullish Scenario
Sustained close above 60,450
Volume expansion
Then targets:
🎯 TP1: 60,620
🎯 TP2: 60,730–60,850
📌 Best trades only after retest & hold
🔴 Bearish Scenario
Rejection from supply zone
Breakdown below 60,250
Targets:
🎯 TP1: 59,850
🎯 TP2: 59,750
📌 High probability if momentum increases on breakdown
⚠️ Trading Advice (Very Important)
Avoid middle-range trades
Let price come to zones
Trade only:
Break & retest
OR clear rejection candles (engulfing / strong wick)
Overall range-bound with volatility
Price is currently inside a supply–demand battle zone
No clean trend yet → wait for confirmation
🔴 Supply / Resistance Zone (Important)
60,400 – 60,470 (red shaded area)
Strong selling pressure
Multiple rejections → sellers active
This is a make-or-break zone
👉 If price fails here → downside likely
👉 If price breaks & holds above → upside expansion
🟢 Demand / Support Zone
59,980 – 60,050 (green shaded area)
Strong buying interest
Previous bounce originated here
Acts as major intraday support
📈 Fibonacci Insights
Upside Fib Targets
0.618 → 60,727
1.0 → 60,730
1.618 → 60,852
Downside Fib Targets
1.0 → 59,851
1.618 → 59,748
These align well with your marked TP1 & TP2 levels 👍
🔮 Possible Scenarios
🟢 Bullish Scenario
Sustained close above 60,450
Volume expansion
Then targets:
🎯 TP1: 60,620
🎯 TP2: 60,730–60,850
📌 Best trades only after retest & hold
🔴 Bearish Scenario
Rejection from supply zone
Breakdown below 60,250
Targets:
🎯 TP1: 59,850
🎯 TP2: 59,750
📌 High probability if momentum increases on breakdown
⚠️ Trading Advice (Very Important)
Avoid middle-range trades
Let price come to zones
Trade only:
Break & retest
OR clear rejection candles (engulfing / strong wick)
거래청산: 타겟 닿음

면책사항
해당 정보와 게시물은 금융, 투자, 트레이딩 또는 기타 유형의 조언이나 권장 사항으로 간주되지 않으며, 트레이딩뷰에서 제공하거나 보증하는 것이 아닙니다. 자세한 내용은 이용 약관을 참조하세요.
면책사항
해당 정보와 게시물은 금융, 투자, 트레이딩 또는 기타 유형의 조언이나 권장 사항으로 간주되지 않으며, 트레이딩뷰에서 제공하거나 보증하는 것이 아닙니다. 자세한 내용은 이용 약관을 참조하세요.