
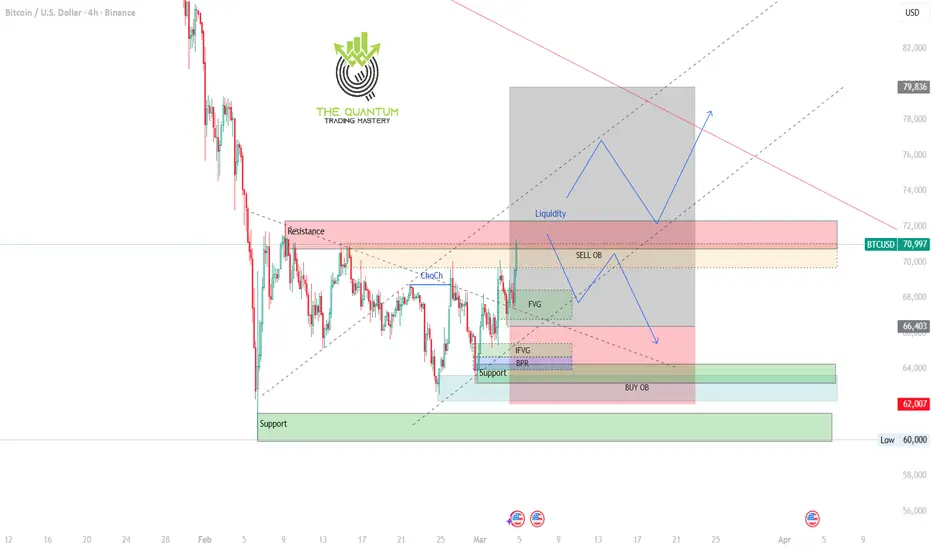
Market Structure • Bullish CHoCH → bearish trend weakening
• Price aiming for higher liquidity zones
Liquidity • Major liquidity above: 70k–72k
• Liquidity swept below → bullish bias confirmed
Key Zones • Strong Buy Zone: 60k–62k
• Secondary Buy Zone: 64k–65k (BPR + IFVG)
• Major Sell Zone: 70k–72k
FVG & BPR • Bullish retracement target: 64–65k
• FVG aligned with Sell OB → scalp short zone
Trendlines • Price inside ascending channel → likely higher after pullback
Best Trade (High Probability Swing Long) • Entry: 64.5k–65.5k
• SL: 61k (conservative)
• TP: 70k → 78k → 84k
• RRR: Strong (1:6 to 1:9)
Break‑and‑Retest Long • Entry: Above 72k retest
• SL: 69.5k
• TP: 78k–84k
Trade with your own risk with cations. Trade needs patience and clarity and proper risk management.
The Quantum Trading Mastery
• Price aiming for higher liquidity zones
Liquidity • Major liquidity above: 70k–72k
• Liquidity swept below → bullish bias confirmed
Key Zones • Strong Buy Zone: 60k–62k
• Secondary Buy Zone: 64k–65k (BPR + IFVG)
• Major Sell Zone: 70k–72k
FVG & BPR • Bullish retracement target: 64–65k
• FVG aligned with Sell OB → scalp short zone
Trendlines • Price inside ascending channel → likely higher after pullback
Best Trade (High Probability Swing Long) • Entry: 64.5k–65.5k
• SL: 61k (conservative)
• TP: 70k → 78k → 84k
• RRR: Strong (1:6 to 1:9)
Break‑and‑Retest Long • Entry: Above 72k retest
• SL: 69.5k
• TP: 78k–84k
Trade with your own risk with cations. Trade needs patience and clarity and proper risk management.
The Quantum Trading Mastery
액티브 트레이드
Active
면책사항
해당 정보와 게시물은 금융, 투자, 트레이딩 또는 기타 유형의 조언이나 권장 사항으로 간주되지 않으며, 트레이딩뷰에서 제공하거나 보증하는 것이 아닙니다. 자세한 내용은 이용 약관을 참조하세요.
면책사항
해당 정보와 게시물은 금융, 투자, 트레이딩 또는 기타 유형의 조언이나 권장 사항으로 간주되지 않으며, 트레이딩뷰에서 제공하거나 보증하는 것이 아닙니다. 자세한 내용은 이용 약관을 참조하세요.