
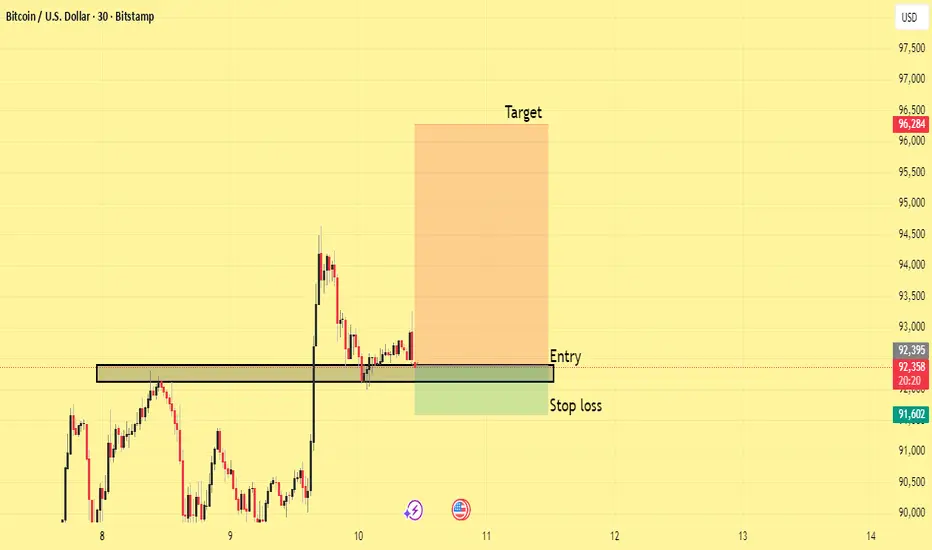
This setup highlights a potential long opportunity on BTCUSD following a clean retest of a key demand zone. After a sharp impulse move upward, price pulled back into a previously established support block, confirming it as a valid re-accumulation area. The market respected this zone with multiple rejections, signaling buyer interest.
The entry is positioned directly on the retest of the demand zone, aligning with structure and maintaining a favorable risk-reward profile. The stop loss is placed safely below the zone to account for volatility and prevent premature invalidation. The target aims for a continuation toward the next liquidity pocket above, reflecting the expectation that buyers will reclaim control and push price higher.
This idea leverages market structure, zone retest, and momentum recovery to outline a disciplined, high-probability long setup
The entry is positioned directly on the retest of the demand zone, aligning with structure and maintaining a favorable risk-reward profile. The stop loss is placed safely below the zone to account for volatility and prevent premature invalidation. The target aims for a continuation toward the next liquidity pocket above, reflecting the expectation that buyers will reclaim control and push price higher.
This idea leverages market structure, zone retest, and momentum recovery to outline a disciplined, high-probability long setup

Sharing My Exprience Here And providing Daily Forex Ideas
t.me/+2RlPKH3r_zcwMTFk
t.me/+2RlPKH3r_zcwMTFk Free Signal's Analysis Chart Mapping
Don't Worry Friend's I'm Here For Your Help ❤️ t.me/wolfpipsspot
t.me/+2RlPKH3r_zcwMTFk
t.me/+2RlPKH3r_zcwMTFk Free Signal's Analysis Chart Mapping
Don't Worry Friend's I'm Here For Your Help ❤️ t.me/wolfpipsspot
면책사항
해당 정보와 게시물은 금융, 투자, 트레이딩 또는 기타 유형의 조언이나 권장 사항으로 간주되지 않으며, 트레이딩뷰에서 제공하거나 보증하는 것이 아닙니다. 자세한 내용은 이용 약관을 참조하세요.
Sharing My Exprience Here And providing Daily Forex Ideas
t.me/+2RlPKH3r_zcwMTFk
t.me/+2RlPKH3r_zcwMTFk Free Signal's Analysis Chart Mapping
Don't Worry Friend's I'm Here For Your Help ❤️ t.me/wolfpipsspot
t.me/+2RlPKH3r_zcwMTFk
t.me/+2RlPKH3r_zcwMTFk Free Signal's Analysis Chart Mapping
Don't Worry Friend's I'm Here For Your Help ❤️ t.me/wolfpipsspot
면책사항
해당 정보와 게시물은 금융, 투자, 트레이딩 또는 기타 유형의 조언이나 권장 사항으로 간주되지 않으며, 트레이딩뷰에서 제공하거나 보증하는 것이 아닙니다. 자세한 내용은 이용 약관을 참조하세요.