
Hey guys, today Im giving you my secret how to make money and avoid that frustrating moments when profits are floating back to the markets. There is nothing simpler than taking the profits. Once you start doing this you will feel more comfortable in taking risk.
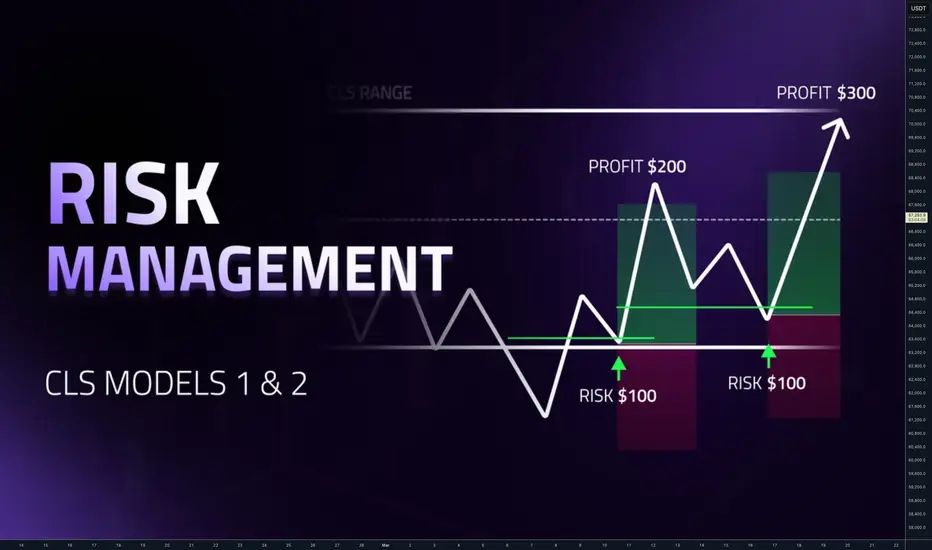
If you’ve seen my analyses before, you probably noticed that I often talk about CLS ranges together with Model 1 and Model 2. Today I want to explain the risk management behind this approach, because this is where many traders misunderstand the power of this idea. This structure is not just about entries. It’s mainly about how profits are taken in mechanical pre-defined way to avoid subjective decisions and how risk is managed between the two models.
🎯 Model 1 – The First Target
Model 1 happens after the manipulation of the CLS range and creation of the Order Block.
Power of this model (strategy / setup) is that it usually work even in countertrend. So in the fact if you focus just on this setup. It's enough to be a profitable trade.
Disadvantage of this model is that it's not always offering so good risk to reward ratio. But it has high winning ratio and mainly it set you to the risk free setup for the model 2.
Sticking to the plan
Once the manipulation happens and price confirms the direction, the first target is around the 50% of the CLS range. That’s the point where in most cases I close the entire position.
This might feel early for some traders, but there is a reason behind it. Many of them (model 1 entries) makes pullback and it give you another chagce for re-entry. This is what I call model 2. Because you already got profit from model 1. Now going to take model 2 as risk free trade.
🔄 Waiting for Model 2
After reaching the 50% level, the market often pulls back. If that doesn't happen, no problem at least you got some profit. This pullback usually comes into the 61.8 or 0.8 Fibonacci area, where another key level can align with the CLS structure. That is where Model 2 appears.
Model 2 is different. Instead of targeting the middle of the range, the target becomes the full CLS range high or low. This is where the bigger risk-reward trades usually happen and as you risking your profit from Model 1 setup, this trade is basically risk free for you and its more comfortable to stay in the position.
🧩 ETH - Trade example
after securing the profit on the model 1 price continued higher but full CLS range was not completed. And still we got a chance to re-enter
  then price has hit full CLS range
  🧪Why I decide to close all at 50% ?
Back in the days. I have spotted the CLS range and entered after the manipulation and I have been always targeting the full range, like on the example below because I wanted to stick to the positive RR at least 1:2. Great nothing bad on that, but look how price moves to the 50% of the CLS range and then it pullback back to my entry. Thats the moment when you see all your profits going back to the market. Its frustrating. You was right at 50% move and still nothing in your pocket yet. Than I was closing partials but its also not effective. Especially when you move SL to BE etc...
I realized this is happening too often, in the backtests I came to this idea. What if I close full profit at 50% and simply wait for another opportunity. Like this I know firs trade with RR 1:1.2 is nothing extra but later I realized how important it is for my trading psychology. Because if im taking the profit at 50% Im not facing pullback and seeing profits coming back. I got profits and I wait for another trade and it's really different.
📊Power of Statistical outcomes
here is where the magic happens when we work with the probabilities. To make it all easier let's say we risk $100 for a trade. There can only 4 possible outcomes.
1️⃣ Model 1 - Trade can end up in loss
This sometimes happens, you simply loose on Model1. Either for analyzing market wrongly or wrong timing. What ever it is. It's just a part of the process. You loose $100 2️⃣ Model 1 - Trade reach 50% and continue to complete the range.
In this outcome price hits your 50% target and than goes up and fill the whole range without a pullback for the model 2. No problem you got profit and you wait for the next range. 3️⃣ Model 1 & 2 - Model 2 hit SL
in a case if you took model 1 and it has hit TP. Let's say you earned 1.5 RR. So from first trade you earned $150. Now you go fro model 2 and you are risking $100 again. If trade end up in the loss you loose $100 but still got $50 at least form first trade. 4️⃣ Model 1 & 2 both winners
if you catch both models and both works. You earn quite good $150 form fist trade then second trade is risk free and you can get another $300 there as model 2 is ussually 3RR setup. 🧠 Why This Approach Works
The biggest advantage is psychological clarity. When you take profits at Model 1, your mind becomes free. You are no longer watching a winning trade slowly retrace and wondering if the market will take everything back. Instead, the first trade is closed, the profit is secured, and you calmly wait for the next setup. If Model 2 appears, you can take the trade with a clear mind. And in many cases, that second entry is effectively a risk-free opportunity because the first trade has already paid for the risk. If second setup fails you sill got profit from first model1 and if model2 doesnt occur still good.
📌 Final Thoughts
This is the core idea behind my CLS risk management.Secure the first move with Model 1.
Then wait patiently for Model 2 to target the full range. Sometimes the second entry never comes. Sometimes it delivers the biggest trade of the week. Both outcomes are perfectly fine. Out of 4 possible outcomes 3 are profitable. If you think in the series of trades this is massive edge. Do this over and over you are profitable.
In the next posts I will break down Model 1 and Model 2 in detail so you can clearly understand how these setups form and how to apply them in your own trading.
I promised myself I’d become the person I once needed the most as a beginner. Below are links to a powerful lessons I shared on Tradingview. Hope it can help you avoid years of trial and error I went thru.
📊 Sharpen your trading Strategy
⚙️ 100% Mechanical System - Complete Strategy
🔁 Daily Bias – Continuation
🔄 Daily Bias – Reversal
🧱 Key Level – Order Block
📉 How to Buy Lows and Sell Highs
🎯 Dealing Range – Enter on pullbacks
💧 Liquidity – Basics to understand
🕒 Timeframe Alignments
🚫 Market Narratives – Avoid traps
🐢 Turtle Soup Master – High reward method
🧘 How to stop overcomplicating trading
🕰️ Day Trading Cheat Code – Sessions
🇬🇧 London Session Trading
🔍 SMT Divergence – Secret Smart Money signal
📐 Standard Deviations – Predict future targets
🎣 Stop Hunt Trading
💧Liquidity Sweep Mastery
🔪 Asia Session Setups
📀 Gold Strategy
🧠 Level Up & Mindset
🛕 Monk Mode – Transition from 9–5 to full-time trading
⚠️ Trading Enemies – Habits that destroy success
🔄 Trader’s Routine – Build discipline daily
💪 Get Funded - $20 000 Monthly Plan
🧪 Winning Trading Plan
⭕ Backtesting vs Reality
🛡️ Risk Management
🏦 Risk Management for Prop Trading
📏 Risk in % or Fixed Position Size
🔐 Risk Per Trade – Keep consistency
🧪 Risk Reward vs Win Ratio
💎 Catch High Risk Reward Setups
☯️ Smart Money - Who control Markets
Adapt useful, Reject useless and add what is specifically yours.
David Perk
If you’ve seen my analyses before, you probably noticed that I often talk about CLS ranges together with Model 1 and Model 2. Today I want to explain the risk management behind this approach, because this is where many traders misunderstand the power of this idea.
🎯 Model 1 – The First Target
Model 1 happens after the manipulation of the CLS range and creation of the Order Block.
Power of this model (strategy / setup) is that it usually work even in countertrend. So in the fact if you focus just on this setup. It's enough to be a profitable trade.
Disadvantage of this model is that it's not always offering so good risk to reward ratio. But it has high winning ratio and mainly it set you to the risk free setup for the model 2.
Sticking to the plan
Once the manipulation happens and price confirms the direction, the first target is around the 50% of the CLS range. That’s the point where in most cases I close the entire position.
This might feel early for some traders, but there is a reason behind it. Many of them (model 1 entries) makes pullback and it give you another chagce for re-entry. This is what I call model 2. Because you already got profit from model 1. Now going to take model 2 as risk free trade.
🔄 Waiting for Model 2
After reaching the 50% level, the market often pulls back. If that doesn't happen, no problem at least you got some profit. This pullback usually comes into the 61.8 or 0.8 Fibonacci area, where another key level can align with the CLS structure. That is where Model 2 appears.
Model 2 is different. Instead of targeting the middle of the range, the target becomes the full CLS range high or low. This is where the bigger risk-reward trades usually happen and as you risking your profit from Model 1 setup, this trade is basically risk free for you and its more comfortable to stay in the position.
🧩 ETH - Trade example
after securing the profit on the model 1
Back in the days. I have spotted the CLS range and entered after the manipulation and I have been always targeting the full range, like on the example below because I wanted to stick to the positive RR at least 1:2.
I realized this is happening too often, in the backtests I came to this idea. What if I close full profit at 50% and simply wait for another opportunity. Like this
📊Power of Statistical outcomes
here is where the magic happens when we work with the probabilities. To make it all easier let's say we risk $100 for a trade. There can only 4 possible outcomes.
1️⃣ Model 1 - Trade can end up in loss
This sometimes happens, you simply loose on Model1. Either for analyzing market wrongly or wrong timing. What ever it is. It's just a part of the process. You loose $100
In this outcome price hits your 50% target and than goes up and fill the whole range without a pullback for the model 2. No problem you got profit and you wait for the next range.
in a case if you took model 1 and it has hit TP. Let's say you earned 1.5 RR. So from first trade you earned $150. Now you go fro model 2 and you are risking $100 again. If trade end up in the loss you loose $100 but still got $50 at least form first trade.
if you catch both models and both works. You earn quite good $150 form fist trade then second trade is risk free and you can get another $300 there as model 2 is ussually 3RR setup.
The biggest advantage is psychological clarity. When you take profits at Model 1, your mind becomes free. You are no longer watching a winning trade slowly retrace and wondering if the market will take everything back. Instead, the first trade is closed, the profit is secured, and you calmly wait for the next setup. If Model 2 appears, you can take the trade with a clear mind. And in many cases, that second entry is effectively a risk-free opportunity because the first trade has already paid for the risk. If second setup fails you sill got profit from first model1 and if model2 doesnt occur still good.
📌 Final Thoughts
This is the core idea behind my CLS risk management.Secure the first move with Model 1.
Then wait patiently for Model 2 to target the full range. Sometimes the second entry never comes. Sometimes it delivers the biggest trade of the week. Both outcomes are perfectly fine. Out of 4 possible outcomes 3 are profitable. If you think in the series of trades this is massive edge. Do this over and over you are profitable.
In the next posts I will break down Model 1 and Model 2 in detail so you can clearly understand how these setups form and how to apply them in your own trading.
I promised myself I’d become the person I once needed the most as a beginner. Below are links to a powerful lessons I shared on Tradingview. Hope it can help you avoid years of trial and error I went thru.
📊 Sharpen your trading Strategy
⚙️ 100% Mechanical System - Complete Strategy
🔁 Daily Bias – Continuation
🔄 Daily Bias – Reversal
🧱 Key Level – Order Block
📉 How to Buy Lows and Sell Highs
🎯 Dealing Range – Enter on pullbacks
💧 Liquidity – Basics to understand
🕒 Timeframe Alignments
🚫 Market Narratives – Avoid traps
🐢 Turtle Soup Master – High reward method
🧘 How to stop overcomplicating trading
🕰️ Day Trading Cheat Code – Sessions
🇬🇧 London Session Trading
🔍 SMT Divergence – Secret Smart Money signal
📐 Standard Deviations – Predict future targets
🎣 Stop Hunt Trading
💧Liquidity Sweep Mastery
🔪 Asia Session Setups
📀 Gold Strategy
🧠 Level Up & Mindset
🛕 Monk Mode – Transition from 9–5 to full-time trading
⚠️ Trading Enemies – Habits that destroy success
🔄 Trader’s Routine – Build discipline daily
💪 Get Funded - $20 000 Monthly Plan
🧪 Winning Trading Plan
⭕ Backtesting vs Reality
🛡️ Risk Management
🏦 Risk Management for Prop Trading
📏 Risk in % or Fixed Position Size
🔐 Risk Per Trade – Keep consistency
🧪 Risk Reward vs Win Ratio
💎 Catch High Risk Reward Setups
☯️ Smart Money - Who control Markets
Adapt useful, Reject useless and add what is specifically yours.
David Perk

🌎 Website & Verified Results
davidperkfx.com/
🔮 Community
davidperkfx.com/discord
🧪 Telegram
shorturl.at/fPjTX
50% Trading Bonus
shorturl.at/lmFa8
‼️ Tradingview Prop USA
shorturl.at/dNxSj
davidperkfx.com/
🔮 Community
davidperkfx.com/discord
🧪 Telegram
shorturl.at/fPjTX
50% Trading Bonus
shorturl.at/lmFa8
‼️ Tradingview Prop USA
shorturl.at/dNxSj
관련 발행물
면책사항
해당 정보와 게시물은 금융, 투자, 트레이딩 또는 기타 유형의 조언이나 권장 사항으로 간주되지 않으며, 트레이딩뷰에서 제공하거나 보증하는 것이 아닙니다. 자세한 내용은 이용 약관을 참조하세요.
🌎 Website & Verified Results
davidperkfx.com/
🔮 Community
davidperkfx.com/discord
🧪 Telegram
shorturl.at/fPjTX
50% Trading Bonus
shorturl.at/lmFa8
‼️ Tradingview Prop USA
shorturl.at/dNxSj
davidperkfx.com/
🔮 Community
davidperkfx.com/discord
🧪 Telegram
shorturl.at/fPjTX
50% Trading Bonus
shorturl.at/lmFa8
‼️ Tradingview Prop USA
shorturl.at/dNxSj
관련 발행물
면책사항
해당 정보와 게시물은 금융, 투자, 트레이딩 또는 기타 유형의 조언이나 권장 사항으로 간주되지 않으며, 트레이딩뷰에서 제공하거나 보증하는 것이 아닙니다. 자세한 내용은 이용 약관을 참조하세요.