
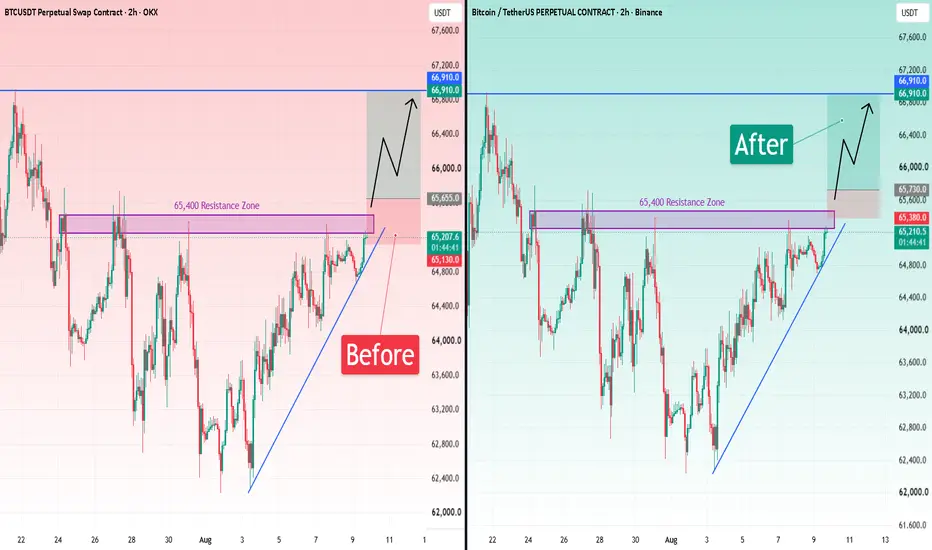
I saw a straightforward BTC long after the 65,400 breakout, with entry at 65,655, TP at 66,910, and SL at 65,130. A closer look exposed hidden structural risk, so I reworked the entire trade.
What changed my mind was the 65,655 entry: it sat inside the four-touch 4h resistance zone at 65,391.3–65,722.5 while the 4h trend was a Downtrend. That contradicted a confirmed breakout entry, even though the 1h and 15m evidence kept the long thesis conditionally viable.
I shifted the entry to 65,730, just 7.5 above 65,722.5, and required a 15m candle close above that boundary. This waits for demonstrated acceptance above the 4h barrier instead of buying inside unbroken resistance.
I kept the 66,910 take-profit unchanged because it sits 14.1 below the next 4h resistance at 66,924.1–67,255.4. That preserves the target just ahead of documented supply rather than pushing it into the same higher-timeframe resistance.
For the stop, I chose 65,380, 11.3 below the 65,391.3 lower boundary of the 4h zone. The original 65,130 sat inside 1h resistance and the 65,068.9–65,164.9 bullish FVG, so an ordinary retest could hit it without invalidating the bullish 15m structure.
The rebuild improves R from 1:2.39 to 1:3.37. With 350 of risk and 1,180 of reward, I get stronger asymmetry while keeping the target below 66,924.1 and placing the stop where a failed breakout is more clearly defined.
What changed my mind was the 65,655 entry: it sat inside the four-touch 4h resistance zone at 65,391.3–65,722.5 while the 4h trend was a Downtrend. That contradicted a confirmed breakout entry, even though the 1h and 15m evidence kept the long thesis conditionally viable.
I shifted the entry to 65,730, just 7.5 above 65,722.5, and required a 15m candle close above that boundary. This waits for demonstrated acceptance above the 4h barrier instead of buying inside unbroken resistance.
I kept the 66,910 take-profit unchanged because it sits 14.1 below the next 4h resistance at 66,924.1–67,255.4. That preserves the target just ahead of documented supply rather than pushing it into the same higher-timeframe resistance.
For the stop, I chose 65,380, 11.3 below the 65,391.3 lower boundary of the 4h zone. The original 65,130 sat inside 1h resistance and the 65,068.9–65,164.9 bullish FVG, so an ordinary retest could hit it without invalidating the bullish 15m structure.
The rebuild improves R from 1:2.39 to 1:3.37. With 350 of risk and 1,180 of reward, I get stronger asymmetry while keeping the target below 66,924.1 and placing the stop where a failed breakout is more clearly defined.

🤖 I review trade setups and signals with this AI Telegram bot (EN/RU):
🔗 t.me/sharkcouncil_bot
🔗 t.me/sharkcouncil_bot
면책사항
해당 정보와 게시물은 금융, 투자, 트레이딩 또는 기타 유형의 조언이나 권장 사항으로 간주되지 않으며, 트레이딩뷰에서 제공하거나 보증하는 것이 아닙니다. 자세한 내용은 이용 약관을 참조하세요.
🤖 I review trade setups and signals with this AI Telegram bot (EN/RU):
🔗 t.me/sharkcouncil_bot
🔗 t.me/sharkcouncil_bot
면책사항
해당 정보와 게시물은 금융, 투자, 트레이딩 또는 기타 유형의 조언이나 권장 사항으로 간주되지 않으며, 트레이딩뷰에서 제공하거나 보증하는 것이 아닙니다. 자세한 내용은 이용 약관을 참조하세요.