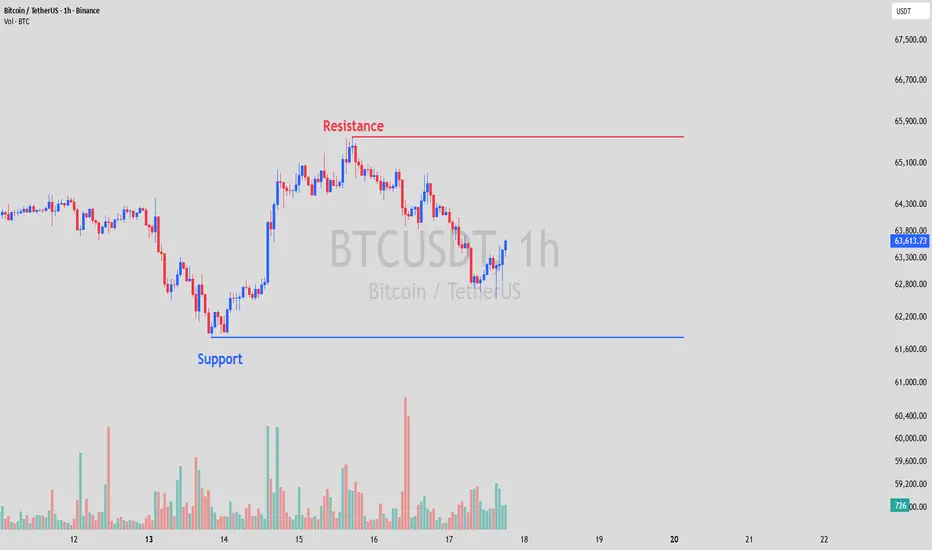

 BTCUSDT 1H — Range structure intact. Price bounced off $62,200 support, now consolidating at $63,400 with eyes on $65,800 resistance.
BTC sold off sharply into the $62,200 demand zone on July 14, met heavy buying volume, and ripped back toward $65,100. That level rejected, and price has now pulled back to $63,400 — still holding higher-low structure above the range floor.
📍 Key Levels:
Support: $62,200
Resistance: $65,800
📌 Entry: $63,400 (current consolidation zone)
🛑 Stop Loss: $61,800 (below support + buffer)
🎯 TP1: $65,100 (previous swing high)
🎯 TP2: $65,800 (range ceiling)
📐 R:R: 1:1.5 (to TP2)
🔍 Why this setup:
The $62,200 support held on a volume spike — the heaviest bars on this chart printed during that sell-off and bounce, confirming real buyer interest at the level. Price has reclaimed mid-range and is building a base. The range is clean: defined floor, defined ceiling, and price is closer to the floor than the ceiling. That asymmetry favors longs.
I'm watching $64,300 as the short-term inflection — a reclaim there likely accelerates the move toward $65,800. A break below $62,200 invalidates the entire setup.
노트
Price is currently at $64,732 — trade is +$1,332 from the $63,400 entry and running cleanly toward TP1.
After the entry, price dipped briefly to the $63,000 area on July 17, then recovered and has been building a solid consolidation base between $64,500–$64,900 over the last 36 hours. Higher-low structure is intact on the 1H — the mid-range reclaim I flagged at $64,300 has held convincingly.
TP1 ($65,100) is within striking distance. I'm watching for a break above $64,900 to confirm momentum into the $65,100–$65,300 zone. TP2 ($65,800) remains the full range ceiling target.
Stop loss untouched at $61,800. With price now $2,900+ above SL, I'm considering trailing to breakeven ($63,400) to lock in a risk-free trade.
🟢 Status: In profit. Setup playing out as expected. Patience for TP1.
액티브 트레이드
📊 Update — TP1 ✅ Hit
Target 1 at $65,100 has been reached. Price tapped the level and is now pulling back to $64,700, which is expected behavior after a liquidity grab at a key swing high.
For those who took partials at TP1 — well-managed. That's a ~$1,700 move from the $63,400 entry with stop at $61,800, locking in roughly 1:1 R:R on the first leg.
What now:
Stop on remaining position moved to breakeven ($63,400). No reason to give back profits. TP2 at $65,800 remains the final target — that's the range ceiling and the level that needs to break for any continuation higher.
If price holds above $64,300 on this pullback, the structure stays intact for the push toward TP2. A close back below $64,000 on the 1H weakens the case — at that point, taking full profit on the TP1 hit would have been the right call.
Range thesis is playing out. Patience on the rest.
노트
📊 Update 2 — TP2 Invalidated, Remaining Position Managed
Sharp rejection from the $64,800 area followed by a high-volume sell-off. Price is now at $64,050 — well below the $64,300 inflection level flagged in the previous update.
TP1 was secured. TP2 at $65,800 is off the table for now.
For anyone who trailed stop to breakeven at $63,400 after TP1 — the remaining position is still alive, but the structure has shifted. That volume spike on the drop signals aggressive selling, not just a healthy pullback. This is distribution, not consolidation.
Key levels to watch:
The $63,400 entry zone is now the last line of defense. A break below it confirms the range is rolling over and the $62,200 support gets retested. If you're still holding a runner, there's no shame in closing here at ~$64,000 — that's still +$600 per unit above entry on the remaining position.
Bottom line: The trade worked. TP1 hit, partials taken, risk removed. Not every setup delivers TP2. Knowing when a thesis is deteriorating is part of the edge.
노트
📊 Update 3 — Second Entry Triggered, Price Approaching TP2
After TP1 was secured, price sold off back into the $63,400 entry zone — exactly where the original setup was built. That pullback wasn't a breakdown. It was a retest of the range midpoint, and it held.
Second buy triggered at $63,400. Price has since rallied +$2,280 (+3.60%), now trading at $65,400 and pressing directly into the $65,800 resistance — our TP2 and range ceiling.
This is the level that matters. The $65,800 zone has rejected price twice on this chart. A clean break and close above it on the 1H flips the range structure bullish and opens the door for continuation. A third rejection here means the range is still in control.
Plan from here:
Partials at $65,800 if we get there. If resistance breaks with volume, trail stop below $65,000 and let it run. If rejected again — close and respect the range.
The thesis hasn't changed since the original post: defined floor, defined ceiling, and buying near the floor. The pullback shook out weak hands — the re-entry rewarded patience.
거래청산: 타겟 닿음
📊 Final Update — TP2 ✅ Hit | Trade Closed
Both targets delivered. TP2 at $65,800 has been reached — the range ceiling that defined this entire setup from day one.
Full recap:
First entry at $63,400 on the consolidation above the $62,200 support bounce. TP1 at $65,100 hit, partials taken. Price pulled back into the entry zone, offering a second buy at $63,400 — same level, same thesis. From there, a +$2,400 move (+3.79%) straight into TP2.
The range played out exactly as mapped. Defined floor, defined ceiling, buy near the floor, sell near the ceiling. No indicators, no complexity — just structure and patience.
What's next for BTC:
This trade is done. The $65,800 resistance has now been tagged multiple times. Whether it breaks or rejects from here is a separate setup with a separate plan. No bias carry-over from a winning trade.
Trade management summary:
📌 Entry: $63,400
🎯 TP1: $65,100 ✅
🎯 TP2: $65,800 ✅
🛑 SL: $61,800 (never threatened on second entry)
Clean structure. Clean execution. On to the next.

✅MY Free Signals Telegram
t.me/StrixEdge
✅Website
strix-edge.com
t.me/StrixEdge
✅Website
strix-edge.com
면책사항
해당 정보와 게시물은 금융, 투자, 트레이딩 또는 기타 유형의 조언이나 권장 사항으로 간주되지 않으며, 트레이딩뷰에서 제공하거나 보증하는 것이 아닙니다. 자세한 내용은 이용 약관을 참조하세요.
✅MY Free Signals Telegram
t.me/StrixEdge
✅Website
strix-edge.com
t.me/StrixEdge
✅Website
strix-edge.com
면책사항
해당 정보와 게시물은 금융, 투자, 트레이딩 또는 기타 유형의 조언이나 권장 사항으로 간주되지 않으며, 트레이딩뷰에서 제공하거나 보증하는 것이 아닙니다. 자세한 내용은 이용 약관을 참조하세요.