
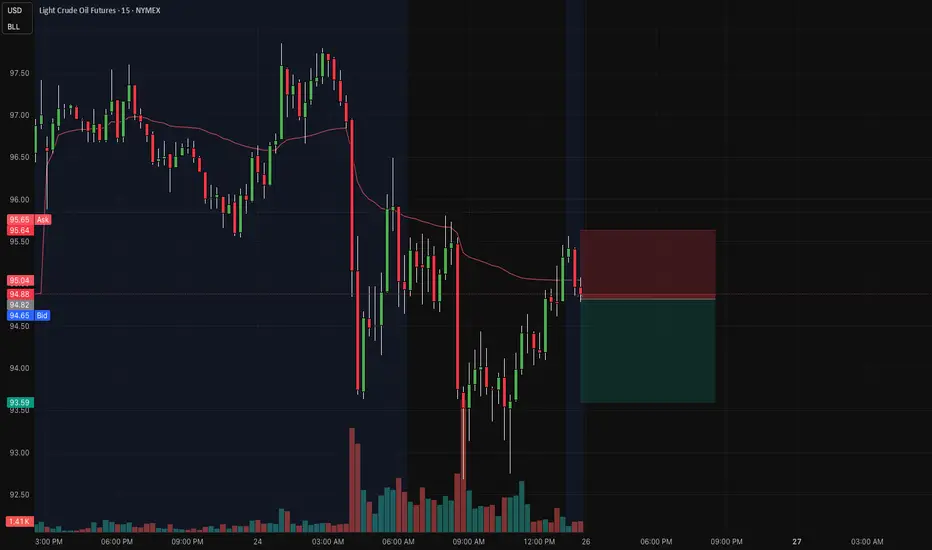
Market already shifted bearish → no reason to countertrend
Bounce is corrective, not impulsive → weak buyers
Price rejects near EMA / equilibrium zone (~94.8–95.0)
Sellers defending structure → continuation play
👉 Key idea:
In trends, weak pullbacks into resistance are opportunities—not reversals.
📊 1. Context
Strong prior selloff → bearish momentum established
Market forming lower highs
Bounce into equilibrium (EMA zone)
No strong reclaim of prior structure
⚙️ 2. Setup
Corrective move into resistance
Weak bullish continuation
Rejection near EMA / structure
Sellers stepping back in → continuation bias
🎯 3. Execution Plan
Entry: ~94.8–95.0 (rejection zone)
Stop: Above local high (~95.5)
Target: ~93.5–93.6
R:R: ~1.5R+
Invalidation: Strong acceptance above 95.5
🧠 NOTE
In trending markets, corrective moves into resistance with weak momentum often lead to continuation as trapped buyers unwind.

면책사항
해당 정보와 게시물은 금융, 투자, 트레이딩 또는 기타 유형의 조언이나 권장 사항으로 간주되지 않으며, 트레이딩뷰에서 제공하거나 보증하는 것이 아닙니다. 자세한 내용은 이용 약관을 참조하세요.
면책사항
해당 정보와 게시물은 금융, 투자, 트레이딩 또는 기타 유형의 조언이나 권장 사항으로 간주되지 않으며, 트레이딩뷰에서 제공하거나 보증하는 것이 아닙니다. 자세한 내용은 이용 약관을 참조하세요.