
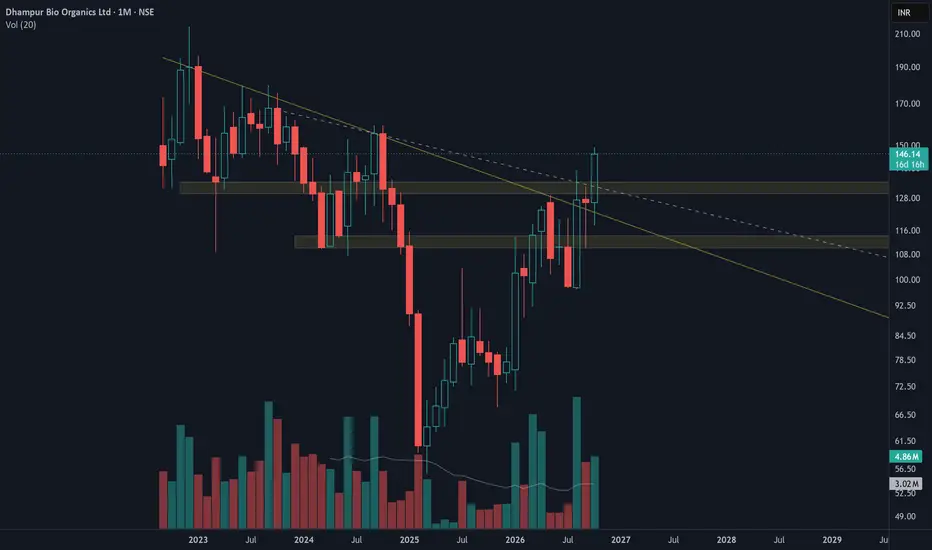
Pattern Structure: The chart showcases a well-defined descending pattern, a structural formation where the white dashed line acts as a crucial hidden resistance level before the current price action.
Volume Analysis: A significant surge in buying volume propels the breakout, serving as a vital confirmation and protecting traders from potential false breakouts.
Supply and Demand Flip Zone: Observe the transition zone: an initial demand area that turned into resistance, and has now been reclaimed, indicating a shift back to demand.
Importance of Risk Management: Preserving capital is key, which makes strict stop-losses a necessary component when navigating volatile market environments.
Probable Targets: Upward momentum is likely to target previous structural highs and liquidity zones located at the upper boundaries of the chart.
Disclaimer:
The information shared is solely for educational purposes and not financial advice. Trading involves risk, so assess your situation before taking action.
Volume Analysis: A significant surge in buying volume propels the breakout, serving as a vital confirmation and protecting traders from potential false breakouts.
Supply and Demand Flip Zone: Observe the transition zone: an initial demand area that turned into resistance, and has now been reclaimed, indicating a shift back to demand.
Importance of Risk Management: Preserving capital is key, which makes strict stop-losses a necessary component when navigating volatile market environments.
Probable Targets: Upward momentum is likely to target previous structural highs and liquidity zones located at the upper boundaries of the chart.
Disclaimer:
The information shared is solely for educational purposes and not financial advice. Trading involves risk, so assess your situation before taking action.

면책사항
해당 정보와 게시물은 금융, 투자, 트레이딩 또는 기타 유형의 조언이나 권장 사항으로 간주되지 않으며, 트레이딩뷰에서 제공하거나 보증하는 것이 아닙니다. 자세한 내용은 이용 약관을 참조하세요.
면책사항
해당 정보와 게시물은 금융, 투자, 트레이딩 또는 기타 유형의 조언이나 권장 사항으로 간주되지 않으며, 트레이딩뷰에서 제공하거나 보증하는 것이 아닙니다. 자세한 내용은 이용 약관을 참조하세요.