
Story:
📊 The Pattern
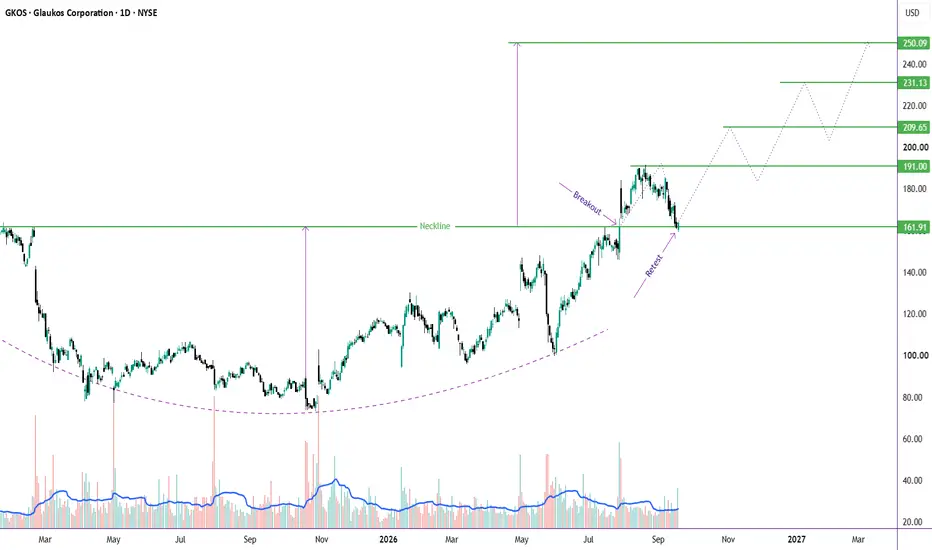
GKOS spent over a year carving out a round bottom from the ~$73 low, breaking above the $162 neckline on increased volume, then pulling back to retest that same neckline before bouncing.
⚡ The Confirmation
Volume stepped up on the breakout, and the retest held — the pullback found buyers at the neckline instead of slipping back into the base.
🎯 Levels to Watch
🟢 Thesis intact above: $159 (weekly close)
🔵 Target 1: $191 (recent high)
🔵 Target 2: $210
🔵 Target 3: $230
🏁 Measured target: $249
🧠 The Read: A round bottom breakout that comes back to retest the neckline and holds is a healthier entry than chasing the initial breakout candle. With volume confirming and the neckline holding, the path toward the measured target stays open in stepped fashion — scaling out at each level rather than expecting a straight run.
Chart study, not financial advice.
📊 The Pattern
GKOS spent over a year carving out a round bottom from the ~$73 low, breaking above the $162 neckline on increased volume, then pulling back to retest that same neckline before bouncing.
⚡ The Confirmation
Volume stepped up on the breakout, and the retest held — the pullback found buyers at the neckline instead of slipping back into the base.
🎯 Levels to Watch
🟢 Thesis intact above: $159 (weekly close)
🔵 Target 1: $191 (recent high)
🔵 Target 2: $210
🔵 Target 3: $230
🏁 Measured target: $249
🧠 The Read: A round bottom breakout that comes back to retest the neckline and holds is a healthier entry than chasing the initial breakout candle. With volume confirming and the neckline holding, the path toward the measured target stays open in stepped fashion — scaling out at each level rather than expecting a straight run.
Chart study, not financial advice.

📊 Charts → 🏗️ Structure → 🎯 Probability =📖 Chart Story
⏳ Patience → 🚀Success
🎯 If this setup makes sense to you, show it some support with a Boost.
⏳ Patience → 🚀Success
🎯 If this setup makes sense to you, show it some support with a Boost.
면책사항
해당 정보와 게시물은 금융, 투자, 트레이딩 또는 기타 유형의 조언이나 권장 사항으로 간주되지 않으며, 트레이딩뷰에서 제공하거나 보증하는 것이 아닙니다. 자세한 내용은 이용 약관을 참조하세요.
📊 Charts → 🏗️ Structure → 🎯 Probability =📖 Chart Story
⏳ Patience → 🚀Success
🎯 If this setup makes sense to you, show it some support with a Boost.
⏳ Patience → 🚀Success
🎯 If this setup makes sense to you, show it some support with a Boost.
면책사항
해당 정보와 게시물은 금융, 투자, 트레이딩 또는 기타 유형의 조언이나 권장 사항으로 간주되지 않으며, 트레이딩뷰에서 제공하거나 보증하는 것이 아닙니다. 자세한 내용은 이용 약관을 참조하세요.