
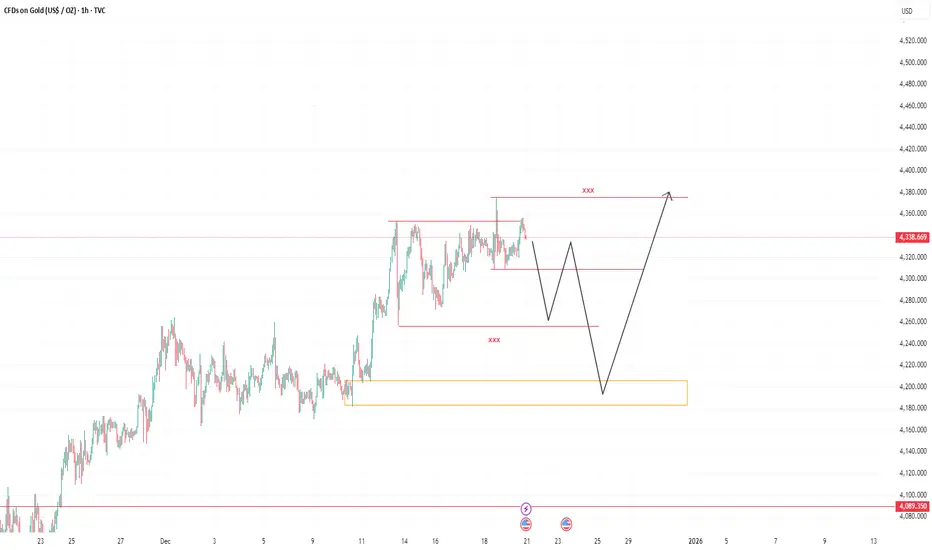
Gold is currently consolidating after a strong impulsive move to the upside. The price is trading inside a range, marked clearly by the red horizontal levels.
🔴 Key Resistance (Top Red Line)
This zone represents major resistance / liquidity where price has previously been rejected.
Multiple rejections here suggest sellers are active.
A clean breakout and hold above this level would signal bullish continuation.
🔴 Key Support (Middle Red Line)
Acts as range support and short-term decision zone.
Price is currently reacting around this area, showing indecision.
A breakdown below this level opens the door for deeper pullbacks.
🟧 Major Demand Zone (Orange Box)
This is a strong demand / accumulation area.
If price sweeps liquidity below the range, this zone is the high-probability buy area.
Expect strong reactions or reversal setups here.
🧠 Projected Price Path (Black Arrows)
The drawing suggests a liquidity grab scenario:
Price breaks below range support.
Sweeps sell-side liquidity.
Drops into the demand zone.
Strong bullish reaction from demand.
Expansion move back toward — and potentially above — resistance.
📌 Bias Summary
Short-term: Ranging / corrective.
Mid-term: Bullish, after liquidity sweep.
Best trades come from patience, not chasing breakouts.
💡 Let price come to your level. Trade the reaction, not the prediction.
🔴 Key Resistance (Top Red Line)
This zone represents major resistance / liquidity where price has previously been rejected.
Multiple rejections here suggest sellers are active.
A clean breakout and hold above this level would signal bullish continuation.
🔴 Key Support (Middle Red Line)
Acts as range support and short-term decision zone.
Price is currently reacting around this area, showing indecision.
A breakdown below this level opens the door for deeper pullbacks.
🟧 Major Demand Zone (Orange Box)
This is a strong demand / accumulation area.
If price sweeps liquidity below the range, this zone is the high-probability buy area.
Expect strong reactions or reversal setups here.
🧠 Projected Price Path (Black Arrows)
The drawing suggests a liquidity grab scenario:
Price breaks below range support.
Sweeps sell-side liquidity.
Drops into the demand zone.
Strong bullish reaction from demand.
Expansion move back toward — and potentially above — resistance.
📌 Bias Summary
Short-term: Ranging / corrective.
Mid-term: Bullish, after liquidity sweep.
Best trades come from patience, not chasing breakouts.
💡 Let price come to your level. Trade the reaction, not the prediction.
액티브 트레이드
takes the liquidity above first. could it be the lower next? or we on a distribution.. pewwww..거래청산: 타겟 닿음

면책사항
해당 정보와 게시물은 금융, 투자, 트레이딩 또는 기타 유형의 조언이나 권장 사항으로 간주되지 않으며, 트레이딩뷰에서 제공하거나 보증하는 것이 아닙니다. 자세한 내용은 이용 약관을 참조하세요.
면책사항
해당 정보와 게시물은 금융, 투자, 트레이딩 또는 기타 유형의 조언이나 권장 사항으로 간주되지 않으며, 트레이딩뷰에서 제공하거나 보증하는 것이 아닙니다. 자세한 내용은 이용 약관을 참조하세요.