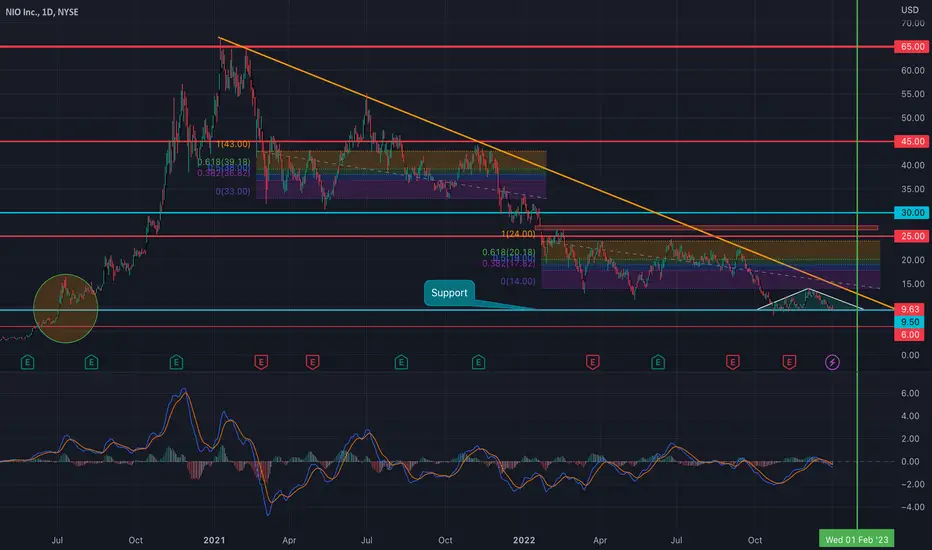
DESCRIPTION: In the chart above I have provided a macro analysis update for my previous prediction for NIO.
POINTS:
1. Adjusted pockets for SUPPLY & DEMAND: 1ST LEVEL = $14 - $24 & 2ND LEVEL = $33 - $43.
2. SUPPLY & DEMAND POCKETS do in fact show a common deviation of 10 points of spread.
3. Current $9.50 is serving as CRITICAL SUPPORT that is broken would invalidate entire setup.
4. If we come to see a continuation of this sideways consolidation between $9.50 & $14 price action will begin to squeeze for bullish divergence.
5. More than covered gap from early July 2020.
Scenario #1: Bullish scenario can mean we see price action move into 1ST LEVEL SUPPLY & DEMAND ZONE as we invalidate bearish trend.
Scenario #2: Bearish scenario can mean we break below our critical support of $9.50 and fall to $6.00.
 NIO
NIO
POINTS:
1. Adjusted pockets for SUPPLY & DEMAND: 1ST LEVEL = $14 - $24 & 2ND LEVEL = $33 - $43.
2. SUPPLY & DEMAND POCKETS do in fact show a common deviation of 10 points of spread.
3. Current $9.50 is serving as CRITICAL SUPPORT that is broken would invalidate entire setup.
4. If we come to see a continuation of this sideways consolidation between $9.50 & $14 price action will begin to squeeze for bullish divergence.
5. More than covered gap from early July 2020.
Scenario #1: Bullish scenario can mean we see price action move into 1ST LEVEL SUPPLY & DEMAND ZONE as we invalidate bearish trend.
Scenario #2: Bearish scenario can mean we break below our critical support of $9.50 and fall to $6.00.
NIO
관련 발행물
면책사항
해당 정보와 게시물은 금융, 투자, 트레이딩 또는 기타 유형의 조언이나 권장 사항으로 간주되지 않으며, 트레이딩뷰에서 제공하거나 보증하는 것이 아닙니다. 자세한 내용은 이용 약관을 참조하세요.
관련 발행물
면책사항
해당 정보와 게시물은 금융, 투자, 트레이딩 또는 기타 유형의 조언이나 권장 사항으로 간주되지 않으며, 트레이딩뷰에서 제공하거나 보증하는 것이 아닙니다. 자세한 내용은 이용 약관을 참조하세요.