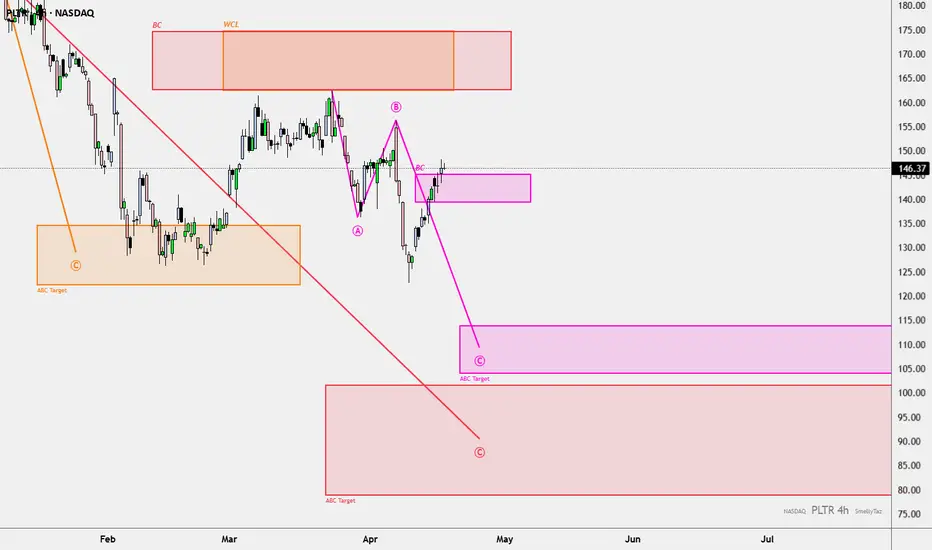
 PLTR on the 4H chart is trading back into the mid-140s BC pocket after rebounding off the April low. That puts price in a reaction area, not in clean breakout territory, and the location matters more than the latest green candle.
Structurally, the local magenta sequence still favors downside while the B pivot remains intact. The bounce from A has now pushed back into BC, but the broader red map is still bearish as well, with the larger C objective sitting much lower. When the local sequence and the higher-timeframe structure lean the same way, the short thesis gets cleaner.
From a liquidity angle, the rebound has already lifted through nearby short-term highs on the way into this zone. If price cannot accept above BC, the next logical draw is the unfinished internal delivery below, with the marked magenta C zone around 105–114 as the first meaningful objective. The deeper red C remains on the table only if that lower repricing continues.
This view weakens quickly if PLTR starts building acceptance above the current BC area and especially if the recent B high gets reclaimed. For now, this looks more like corrective strength into a bearish reaction zone than a confirmed trend reversal.
This is not financial advice.
거래청산: 스탑 닿음

면책사항
해당 정보와 게시물은 금융, 투자, 트레이딩 또는 기타 유형의 조언이나 권장 사항으로 간주되지 않으며, 트레이딩뷰에서 제공하거나 보증하는 것이 아닙니다. 자세한 내용은 이용 약관을 참조하세요.
면책사항
해당 정보와 게시물은 금융, 투자, 트레이딩 또는 기타 유형의 조언이나 권장 사항으로 간주되지 않으며, 트레이딩뷰에서 제공하거나 보증하는 것이 아닙니다. 자세한 내용은 이용 약관을 참조하세요.