
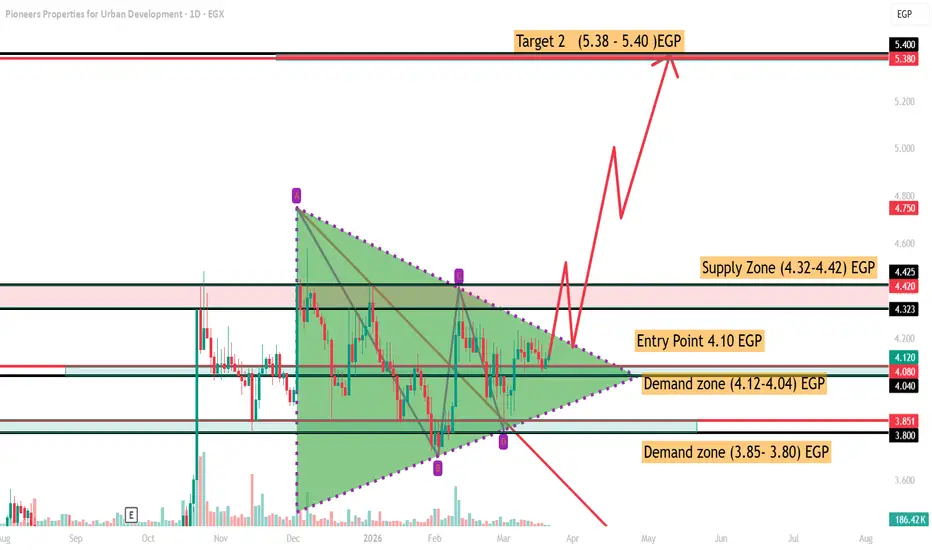
📊 Market Structure & Pattern
The stock is forming a symmetrical triangle (compression pattern) after a prolonged consolidation.
Price is near the apex, which means a strong breakout is قريب.
The internal structure (A–B–C–D swings) suggests accumulation phase rather than distribution.
🔑 Key Levels
🟢 Demand Zones (Support)
4.12 – 4.04 EGP → Primary demand (current holding area)
3.85 – 3.80 EGP → Stronger support (last دفاع zone)
🔴 Supply Zone (Resistance)
4.32 – 4.42 EGP → Key breakout barrier
🎯 Targets
Target 1: ~4.75 EGP
Target 2: 5.38 – 5.40 EGP
🎯 Trade Setup (Bullish Scenario)
Entry: Around 4.05 – 4.12 EGP
Confirmation Entry: Break above 4.42 EGP
Targets:
T1: 4.75 EGP
T2: 5.40 EGP
💡 Rationale:
Price holding above demand zone
Compression → usually leads to expansion (strong move)
Higher lows forming → buyers gaining control
Favorable risk/reward setup
📈 Breakout Strategy
Aggressive: Buy near demand (current price zone)
Conservative: Wait for daily close above 4.42 EGP
This confirms triangle breakout
Likely triggers momentum move upward
📉 Bearish Scenario
If price breaks below 4.00 EGP:
Pattern fails ❌
Price likely drops to 3.80 EGP
A deeper break below 3.80 → shifts trend to bearish
📊 Volume Insight
Volume is contracting → typical before breakout
Watch for volume spike on breakout 4.42 to confirm strength
🧠 Professional View
Bias: Bullish (with confirmation)
Market is in accumulation phase
Best approach:
Position early near support
Or enter on confirmed breakout
✅ Conclusion
This is a high-potential breakout setup
Key trigger: 4.42 EGP
Upside move could be fast and sharp once breakout happens
The stock is forming a symmetrical triangle (compression pattern) after a prolonged consolidation.
Price is near the apex, which means a strong breakout is قريب.
The internal structure (A–B–C–D swings) suggests accumulation phase rather than distribution.
🔑 Key Levels
🟢 Demand Zones (Support)
4.12 – 4.04 EGP → Primary demand (current holding area)
3.85 – 3.80 EGP → Stronger support (last دفاع zone)
🔴 Supply Zone (Resistance)
4.32 – 4.42 EGP → Key breakout barrier
🎯 Targets
Target 1: ~4.75 EGP
Target 2: 5.38 – 5.40 EGP
🎯 Trade Setup (Bullish Scenario)
Entry: Around 4.05 – 4.12 EGP
Confirmation Entry: Break above 4.42 EGP
Targets:
T1: 4.75 EGP
T2: 5.40 EGP
💡 Rationale:
Price holding above demand zone
Compression → usually leads to expansion (strong move)
Higher lows forming → buyers gaining control
Favorable risk/reward setup
📈 Breakout Strategy
Aggressive: Buy near demand (current price zone)
Conservative: Wait for daily close above 4.42 EGP
This confirms triangle breakout
Likely triggers momentum move upward
📉 Bearish Scenario
If price breaks below 4.00 EGP:
Pattern fails ❌
Price likely drops to 3.80 EGP
A deeper break below 3.80 → shifts trend to bearish
📊 Volume Insight
Volume is contracting → typical before breakout
Watch for volume spike on breakout 4.42 to confirm strength
🧠 Professional View
Bias: Bullish (with confirmation)
Market is in accumulation phase
Best approach:
Position early near support
Or enter on confirmed breakout
✅ Conclusion
This is a high-potential breakout setup
Key trigger: 4.42 EGP
Upside move could be fast and sharp once breakout happens
액티브 트레이드
achived
면책사항
해당 정보와 게시물은 금융, 투자, 트레이딩 또는 기타 유형의 조언이나 권장 사항으로 간주되지 않으며, 트레이딩뷰에서 제공하거나 보증하는 것이 아닙니다. 자세한 내용은 이용 약관을 참조하세요.
면책사항
해당 정보와 게시물은 금융, 투자, 트레이딩 또는 기타 유형의 조언이나 권장 사항으로 간주되지 않으며, 트레이딩뷰에서 제공하거나 보증하는 것이 아닙니다. 자세한 내용은 이용 약관을 참조하세요.