
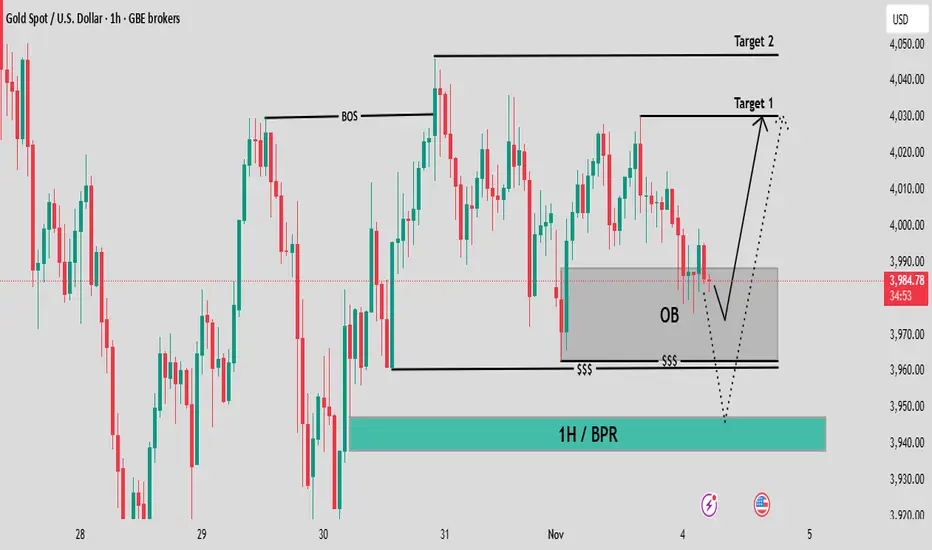
A potential trading setup based on concepts from Smart Money Concepts (SMC) or similar institutional methodologies.
Asset and Timeframe: XAU/USD (Gold Spot / US Dollar) on a 1-Hour (1H) timeframe.
Current Price: The price is hovering around $3,983.55.
Market Structure:
There's a recent Break of Structure (BOS), suggesting an upward bias or a shift in momentum to the bullish side.
The price is currently pulling back into a key zone.
Key Zones/Concepts:
OB (Order Block): The shaded gray area is identified as an Order Block. This is a zone where significant institutional buying/selling previously occurred, and the price is expected to react to it.
$$$ (Liquidity/Equal Lows): The three dollar signs indicate an area of liquidity or equal lows below the current price action. These are often targeted for a stop-hunt or liquidity grab before a significant move.
1H / BPR (Balance Price Range): The lower green box is labeled as a 1H / BPR. A Balance Price Range is a more refined area of support/demand, suggesting an even stronger reaction zone if the initial OB fails.
Projected Trade Scenarios: The dotted lines outline two primary possibilities:
Bullish Scenario (Solid Line): A bounce from the OB (Order Block) to hit Target 1 ($4,030.00).
Bearish/Liquidity Grab Scenario (Dotted Line): A drop below the OB to sweep the $$$ (Liquidity), potentially testing the 1H / BPR before a sharp reversal back up to Target 1 or even Target 2 ($4,050.00).
Asset and Timeframe: XAU/USD (Gold Spot / US Dollar) on a 1-Hour (1H) timeframe.
Current Price: The price is hovering around $3,983.55.
Market Structure:
There's a recent Break of Structure (BOS), suggesting an upward bias or a shift in momentum to the bullish side.
The price is currently pulling back into a key zone.
Key Zones/Concepts:
OB (Order Block): The shaded gray area is identified as an Order Block. This is a zone where significant institutional buying/selling previously occurred, and the price is expected to react to it.
$$$ (Liquidity/Equal Lows): The three dollar signs indicate an area of liquidity or equal lows below the current price action. These are often targeted for a stop-hunt or liquidity grab before a significant move.
1H / BPR (Balance Price Range): The lower green box is labeled as a 1H / BPR. A Balance Price Range is a more refined area of support/demand, suggesting an even stronger reaction zone if the initial OB fails.
Projected Trade Scenarios: The dotted lines outline two primary possibilities:
Bullish Scenario (Solid Line): A bounce from the OB (Order Block) to hit Target 1 ($4,030.00).
Bearish/Liquidity Grab Scenario (Dotted Line): A drop below the OB to sweep the $$$ (Liquidity), potentially testing the 1H / BPR before a sharp reversal back up to Target 1 or even Target 2 ($4,050.00).
액티브 트레이드

📊 Professional Forex & Gold Analyst | Trading pure price action and high-probability market structure. Daily 4–5 quality trade setups with disciplined risk management. Join: t.me/+NJDp2aIM3QphYWNk| Contact: @fx_martin9
면책사항
해당 정보와 게시물은 금융, 투자, 트레이딩 또는 기타 유형의 조언이나 권장 사항으로 간주되지 않으며, 트레이딩뷰에서 제공하거나 보증하는 것이 아닙니다. 자세한 내용은 이용 약관을 참조하세요.
📊 Professional Forex & Gold Analyst | Trading pure price action and high-probability market structure. Daily 4–5 quality trade setups with disciplined risk management. Join: t.me/+NJDp2aIM3QphYWNk| Contact: @fx_martin9
면책사항
해당 정보와 게시물은 금융, 투자, 트레이딩 또는 기타 유형의 조언이나 권장 사항으로 간주되지 않으며, 트레이딩뷰에서 제공하거나 보증하는 것이 아닙니다. 자세한 내용은 이용 약관을 참조하세요.