
Market Context (Short-Term)
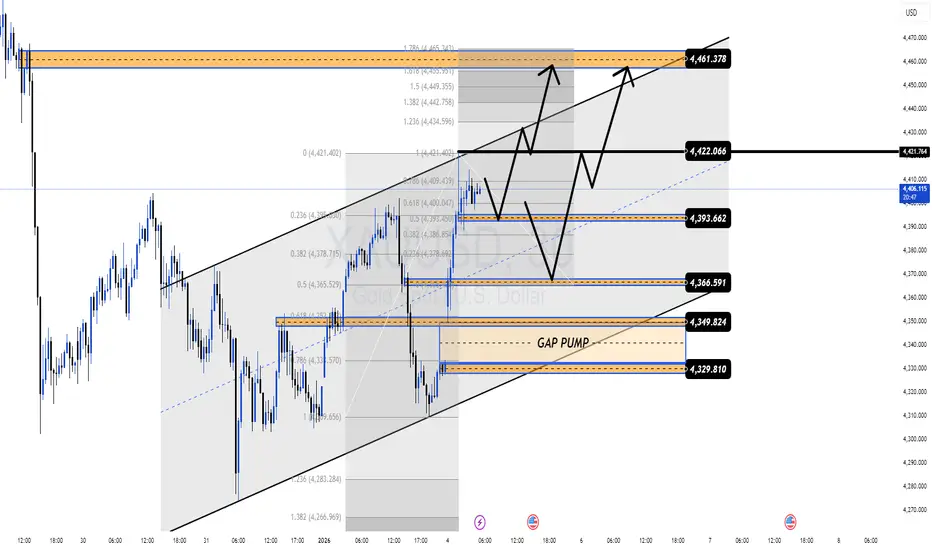
After the previous sharp sell-off, Gold has recovered and moved back into an ascending channel.
The current price action suggests a technical rebound and rebalancing phase, not a full trend reversal.
Market structure is forming Higher Lows within the channel, indicating that buyers are still in control of the short-term flow.
Technical Structure & Key Zones
Price is consolidating around the mid-range of the ascending channel.
Pullbacks remain shallow, showing healthy bullish behavior.
Key technical levels on the chart:
Sell / Resistance Zone: 4,461 – 4,465
Pivot Zone: 4,422
Buy Zone 1: 4,393
Buy Zone 2 (GAP / Demand): 4,366 – 4,350
Deep Buy Zone: 4,329
→ The lower Buy zones align with ascending trendline support + demand + price gap, making them high-probability reaction areas.
Trading Plan – MMF Style
Primary Scenario (Trend-Following BUY):
Wait for price to pull back into 4,393 → 4,366.
Look for bullish confirmation (rejection wicks, strong closes, structure holding).
BUY on confirmation.
Targets:
TP1: 4,422
TP2: 4,461
Secondary Scenario (Short-Term SELL):
If price reaches 4,461 – 4,465 and fails to break and hold, a short-term correction may occur.
SELL setups here are counter-trend scalps only, with tight risk management.
Invalidation & Risk Notes
The bullish structure is invalidated if price closes decisively below 4,329.
Avoid FOMO in the middle of the range.
Only execute trades at predefined key zones.
Adjust position size carefully, as the market is still in a technical pullback phase.
After the previous sharp sell-off, Gold has recovered and moved back into an ascending channel.
The current price action suggests a technical rebound and rebalancing phase, not a full trend reversal.
Market structure is forming Higher Lows within the channel, indicating that buyers are still in control of the short-term flow.
Technical Structure & Key Zones
Price is consolidating around the mid-range of the ascending channel.
Pullbacks remain shallow, showing healthy bullish behavior.
Key technical levels on the chart:
Sell / Resistance Zone: 4,461 – 4,465
Pivot Zone: 4,422
Buy Zone 1: 4,393
Buy Zone 2 (GAP / Demand): 4,366 – 4,350
Deep Buy Zone: 4,329
→ The lower Buy zones align with ascending trendline support + demand + price gap, making them high-probability reaction areas.
Trading Plan – MMF Style
Primary Scenario (Trend-Following BUY):
Wait for price to pull back into 4,393 → 4,366.
Look for bullish confirmation (rejection wicks, strong closes, structure holding).
BUY on confirmation.
Targets:
TP1: 4,422
TP2: 4,461
Secondary Scenario (Short-Term SELL):
If price reaches 4,461 – 4,465 and fails to break and hold, a short-term correction may occur.
SELL setups here are counter-trend scalps only, with tight risk management.
Invalidation & Risk Notes
The bullish structure is invalidated if price closes decisively below 4,329.
Avoid FOMO in the middle of the range.
Only execute trades at predefined key zones.
Adjust position size carefully, as the market is still in a technical pullback phase.

⚜️Trade with Money Market Flow, logic, Price action
🔥Live Market Updates-Realtime Trading Plans & Signal
t.me/+sBwjxIJbdoFmNjk1
⚜️Risk Reward 1.3 to 2.5...
⚜️Daily 8 to 16 Signals VIP
MMFLOW gives you precision entries & BIGWIN profits
🔥Live Market Updates-Realtime Trading Plans & Signal
t.me/+sBwjxIJbdoFmNjk1
⚜️Risk Reward 1.3 to 2.5...
⚜️Daily 8 to 16 Signals VIP
MMFLOW gives you precision entries & BIGWIN profits
면책사항
해당 정보와 게시물은 금융, 투자, 트레이딩 또는 기타 유형의 조언이나 권장 사항으로 간주되지 않으며, 트레이딩뷰에서 제공하거나 보증하는 것이 아닙니다. 자세한 내용은 이용 약관을 참조하세요.
⚜️Trade with Money Market Flow, logic, Price action
🔥Live Market Updates-Realtime Trading Plans & Signal
t.me/+sBwjxIJbdoFmNjk1
⚜️Risk Reward 1.3 to 2.5...
⚜️Daily 8 to 16 Signals VIP
MMFLOW gives you precision entries & BIGWIN profits
🔥Live Market Updates-Realtime Trading Plans & Signal
t.me/+sBwjxIJbdoFmNjk1
⚜️Risk Reward 1.3 to 2.5...
⚜️Daily 8 to 16 Signals VIP
MMFLOW gives you precision entries & BIGWIN profits
면책사항
해당 정보와 게시물은 금융, 투자, 트레이딩 또는 기타 유형의 조언이나 권장 사항으로 간주되지 않으며, 트레이딩뷰에서 제공하거나 보증하는 것이 아닙니다. 자세한 내용은 이용 약관을 참조하세요.