
Hey Trader!
The Gold market is navigating a complex macro backdrop ahead of the FOMC minutes. Although there have been some signs of softening US economic data, the overall sentiment is dominated by a 'Hawkish Hold' (high-for-longer interest rate) fear, which sustains elevated Treasury yields and puts significant downward pressure on Gold. Traders are now laser-focused on the FOMC minutes for confirmation, where a hawkish signal could trigger the next breakdown phase of the current technical structure.
Technical Playbook:
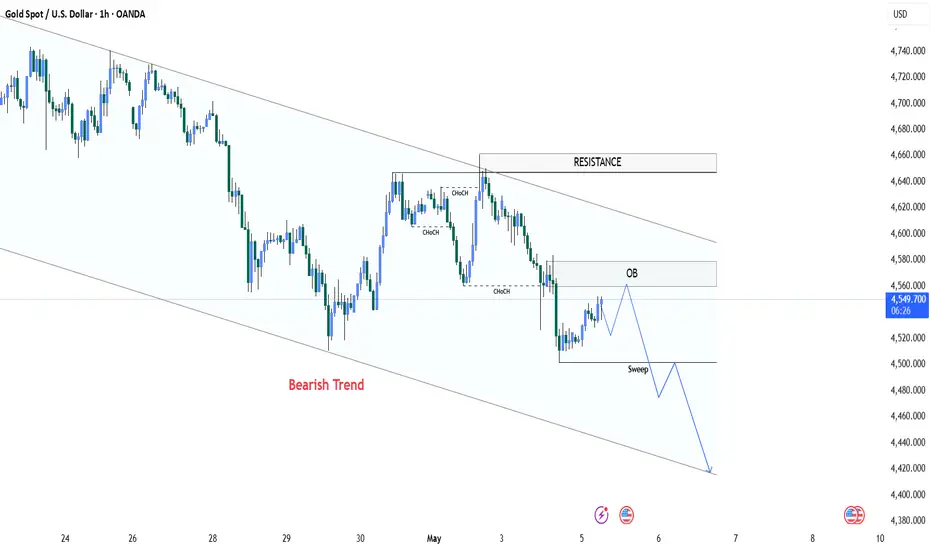
The Bias: Strongly Bearish. Price action remains locked within a clear, descending channel on the H1 chart, reinforced by a consistent series of lower highs and lower lows. The 'Bearish Trend' label on the chart further confirms this dominant technical structure.
The Main Zone: The immediate area of concern is the 'Order Block' (OB) situated between $4,550 - $4,560. This key supply level must hold to maintain the current bearish momentum. There is also a major RESISTANCE zone above at $4,640 - $4,660, which represents a deeper sell-side liquidity area.
🏁 The Target: Our primary downside objective is a continuation of the descending channel structure, targeting a completion of a major liquidity Sweep of the previous lows. The ultimate target for this bearish push is the $4,420 - $4,440 range, near the channel's lower boundary.
Invalidation: The bearish thesis would be invalidated only if we see a sustained H1 close above the major RESISTANCE zone at $4,660. This would signal a clean breakout from the descending channel and a potential market reversal, shifting the bias from bearish back to bullish.
The Gold market is navigating a complex macro backdrop ahead of the FOMC minutes. Although there have been some signs of softening US economic data, the overall sentiment is dominated by a 'Hawkish Hold' (high-for-longer interest rate) fear, which sustains elevated Treasury yields and puts significant downward pressure on Gold. Traders are now laser-focused on the FOMC minutes for confirmation, where a hawkish signal could trigger the next breakdown phase of the current technical structure.
Technical Playbook:
The Bias: Strongly Bearish. Price action remains locked within a clear, descending channel on the H1 chart, reinforced by a consistent series of lower highs and lower lows. The 'Bearish Trend' label on the chart further confirms this dominant technical structure.
The Main Zone: The immediate area of concern is the 'Order Block' (OB) situated between $4,550 - $4,560. This key supply level must hold to maintain the current bearish momentum. There is also a major RESISTANCE zone above at $4,640 - $4,660, which represents a deeper sell-side liquidity area.
🏁 The Target: Our primary downside objective is a continuation of the descending channel structure, targeting a completion of a major liquidity Sweep of the previous lows. The ultimate target for this bearish push is the $4,420 - $4,440 range, near the channel's lower boundary.
Invalidation: The bearish thesis would be invalidated only if we see a sustained H1 close above the major RESISTANCE zone at $4,660. This would signal a clean breakout from the descending channel and a potential market reversal, shifting the bias from bearish back to bullish.
액티브 트레이드
OB Tapped
Price has officially pushed into the critical H1 Order Block (4560 - 4575) within the descending channel. As we test this key supply zone, we are looking for the next structural move.
Trade Plan:
Entry Zone (OB): 4560 - 4575. Watch for LTF CHoCH or strong bearish rejection inside this box.
Take Profit (Sweep): 4500 (Targeting the recent lows for a liquidity sweep).
Invalidation (SL): H1 close above the OB structure.
Keep risk management strict. Wait for clear LTF confirmation before stepping in.
What are you seeing on the lower timeframes? Let’s discuss in the comments!
거래청산: 타겟 닿음
Bullish Momentum Prevails! 🚀
Short Entry: 4,585.156 ➡️ Target Hit: 4,547.454 (+377 pips)
Long Entry: 4,547.102 ➡️ Target Hit: 4,647.874 (+1,007 pips)
Total Gains: 1,384 Pips! 🎯

🚀 Welcome Traders 🚀
🧠 FX / Finance Q&A
🔍 Real-time Technical Analysis
🌊 Daily Forex Liquidity Data
⚡️ Trading Ideas / Setups / Tech
🛡 For Educational Purposes Only — Not Financial Advice
⬇️Join here:
t.me/+rv1UpCv4NrIzYmY9
🧠 FX / Finance Q&A
🔍 Real-time Technical Analysis
🌊 Daily Forex Liquidity Data
⚡️ Trading Ideas / Setups / Tech
🛡 For Educational Purposes Only — Not Financial Advice
⬇️Join here:
t.me/+rv1UpCv4NrIzYmY9
면책사항
해당 정보와 게시물은 금융, 투자, 트레이딩 또는 기타 유형의 조언이나 권장 사항으로 간주되지 않으며, 트레이딩뷰에서 제공하거나 보증하는 것이 아닙니다. 자세한 내용은 이용 약관을 참조하세요.
🚀 Welcome Traders 🚀
🧠 FX / Finance Q&A
🔍 Real-time Technical Analysis
🌊 Daily Forex Liquidity Data
⚡️ Trading Ideas / Setups / Tech
🛡 For Educational Purposes Only — Not Financial Advice
⬇️Join here:
t.me/+rv1UpCv4NrIzYmY9
🧠 FX / Finance Q&A
🔍 Real-time Technical Analysis
🌊 Daily Forex Liquidity Data
⚡️ Trading Ideas / Setups / Tech
🛡 For Educational Purposes Only — Not Financial Advice
⬇️Join here:
t.me/+rv1UpCv4NrIzYmY9
면책사항
해당 정보와 게시물은 금융, 투자, 트레이딩 또는 기타 유형의 조언이나 권장 사항으로 간주되지 않으며, 트레이딩뷰에서 제공하거나 보증하는 것이 아닙니다. 자세한 내용은 이용 약관을 참조하세요.