OPEN-SOURCE SCRIPT
업데이트됨 T4T Balanced Price Range (BPR)
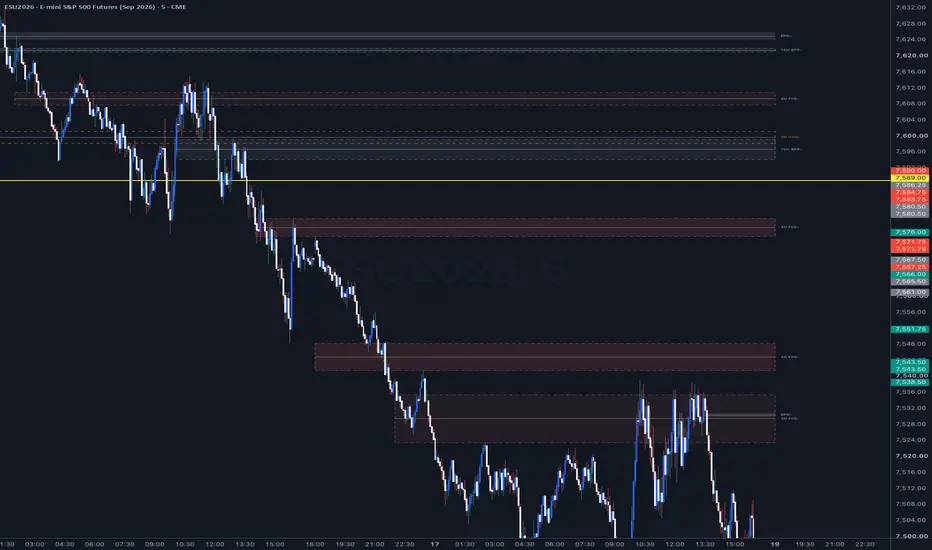
A Balanced Price Range is one of the most overlooked yet reliable zones in Smart Money Concept - and this indicator finds them for you automatically, with precision.
When price displaces aggressively in one direction and leaves a Fair Value Gap, then displaces back in the opposite direction and leaves an opposing FVG, the area where two gaps overlap is a BPR. That overlap represents price territory that has been delivered in both directions. - buyside and sellside imbalances rebalance against each other. When Price returns to this zone, it frequently reacts with speed, making the BPR a high-sensitivity support/resistance level and refined entry area for continuation setups.
Most traders mark the full range of both FVG's and wonder why their zones are sloppy. This indicator draws only the shared overlap - the true BPR - nothing more.
What it does
BPR's shine as retracement entries in trending conditions. After a BPR forms, wait for price to trade back into the zone - the midline is your refinement level - and look for your confirmation there, targeting the liquidity the displacement was reaching for.Because the zones has been delivered in both directions, a clean breakthrough it is information too: it signals the rebalance failed and the opposing side is in control.
Trade the zone, not the noise. Quality over quantity - structure over ego.
"Patience Pays"
When price displaces aggressively in one direction and leaves a Fair Value Gap, then displaces back in the opposite direction and leaves an opposing FVG, the area where two gaps overlap is a BPR. That overlap represents price territory that has been delivered in both directions. - buyside and sellside imbalances rebalance against each other. When Price returns to this zone, it frequently reacts with speed, making the BPR a high-sensitivity support/resistance level and refined entry area for continuation setups.
Most traders mark the full range of both FVG's and wonder why their zones are sloppy. This indicator draws only the shared overlap - the true BPR - nothing more.
What it does
- Automatically detects bullish and bearish FVG's in real time and pairs opposing gaps that share price territory within your chosen window
- Draws only the intersection of the two gaps, with a clean equilibrium midline for precise entry refinement
- Classifies each BPR by the direction of the rebalancing displacement: BPR+ (support) and BPR- (resistance), labeled at the leading edge of the zone
- Tracks mitigation - a bullish BPR is invalidated on a break below its low, a bearish on a break above, with you choice of close-based or wick based triggers
- Optionally keeps mitigated zones on the chart, dimmed, so you can review how price treated them
BPR's shine as retracement entries in trending conditions. After a BPR forms, wait for price to trade back into the zone - the midline is your refinement level - and look for your confirmation there, targeting the liquidity the displacement was reaching for.Because the zones has been delivered in both directions, a clean breakthrough it is information too: it signals the rebalance failed and the opposing side is in control.
Trade the zone, not the noise. Quality over quantity - structure over ego.
"Patience Pays"
릴리즈 노트
Added broader adjustment Displacement Filter.릴리즈 노트
Displacement filter updated to detect higher quality BPR's.릴리즈 노트
Added MTF BPR detection - you can now view higher time-frame BPR's on the lower time-frame.릴리즈 노트
Update - Higher-timeframe BPR's + HTF FVG/iFVG ZonesThis update now turns T4T BPR indicator into a full multi-timeframe imbalance tool.
- The same BPR detection now runs on a higher-timeframe of you choice and protects those zones onto your execution chart
- A zone confirms exactly one bar chart after the HTF bar that completes it closes, and never moves afterwards
- Separate on-chart cap and dedicated information alerts on HTF BPR's
- Two independent HTF FVG/iFVG zones - TF1 and TF2
릴리즈 노트
Liquidity sweep filter added.릴리즈 노트
MTF FVG/iFVG zones are now visible on native timeframes as well as below.오픈 소스 스크립트
트레이딩뷰의 진정한 정신에 따라, 이 스크립트의 작성자는 이를 오픈소스로 공개하여 트레이더들이 기능을 검토하고 검증할 수 있도록 했습니다. 작성자에게 찬사를 보냅니다! 이 코드는 무료로 사용할 수 있지만, 코드를 재게시하는 경우 하우스 룰이 적용된다는 점을 기억하세요.

Join the T4Trading Discord community for live trading sessions and mentoring. #PatiencePays
면책사항
해당 정보와 게시물은 금융, 투자, 트레이딩 또는 기타 유형의 조언이나 권장 사항으로 간주되지 않으며, 트레이딩뷰에서 제공하거나 보증하는 것이 아닙니다. 자세한 내용은 이용 약관을 참조하세요.
오픈 소스 스크립트
트레이딩뷰의 진정한 정신에 따라, 이 스크립트의 작성자는 이를 오픈소스로 공개하여 트레이더들이 기능을 검토하고 검증할 수 있도록 했습니다. 작성자에게 찬사를 보냅니다! 이 코드는 무료로 사용할 수 있지만, 코드를 재게시하는 경우 하우스 룰이 적용된다는 점을 기억하세요.
Join the T4Trading Discord community for live trading sessions and mentoring. #PatiencePays
면책사항
해당 정보와 게시물은 금융, 투자, 트레이딩 또는 기타 유형의 조언이나 권장 사항으로 간주되지 않으며, 트레이딩뷰에서 제공하거나 보증하는 것이 아닙니다. 자세한 내용은 이용 약관을 참조하세요.