OPEN-SOURCE SCRIPT
업데이트됨 Zone-to-Zone Execution Engine + Pulse
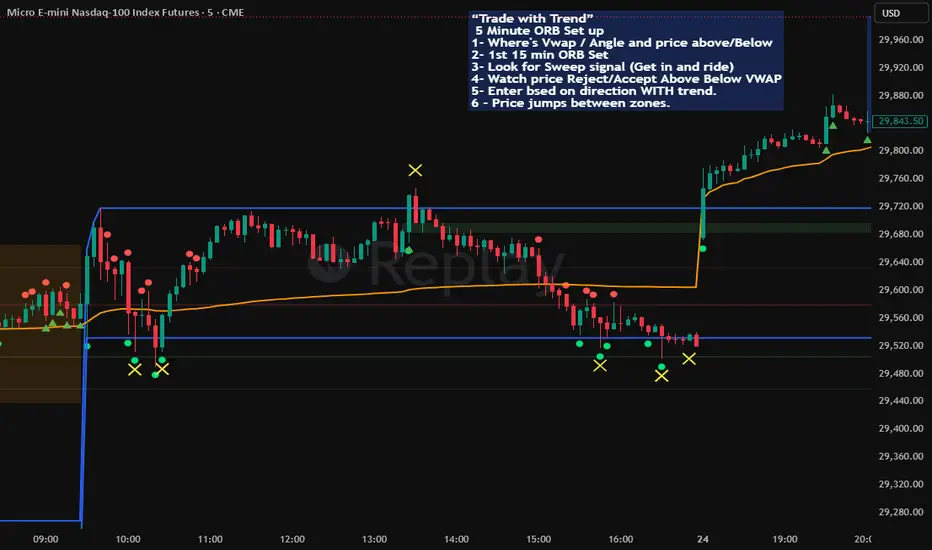
It marks areas where price previously moved away strongly, and assumes price may react there again.
These are:
Demand zones (where buying previously started)
Supply zones (where selling previously started)
Think of them as:
“places where something unfinished happened”
🟦 Step 1 — Identify zones
When you see a blue box:
That is a reaction zone
Price left that area with strength before
You don’t predict anything yet.
You just mark:
“this is a decision area”
🧭 Step 2 — Wait for price to return
You do NOTHING until price comes back to a zone.
There are only 3 situations:
1. Price approaches zone
→ prepare
2. Price enters zone
→ watch reaction closely
3. Price leaves zone
→ decision happens here
⚡ Step 3 — Watch reaction (this is the entire strategy)
When price touches the zone, you look for ONE thing:
Does it reject or break?
🔵 Bullish zone (demand)
Good reaction:
price dips into zone
wick below / push into it
then closes back up
👉 Meaning:
buyers defended the area
Expectation:
move up toward next supply zone
Bad reaction:
price falls through and keeps going
👉 Meaning:
zone failed
Ignore it after break
🔴 Bearish zone (supply)
Good reaction:
price pushes into zone
wicks above
closes back down
👉 Meaning:
sellers defended the area
Expectation:
move down toward next demand zone
Bad reaction:
price breaks through and holds above
👉 Zone is dead
📊 Step 4 — The only real rule: zone-to-zone movement
You are not trading bounces.
You are trading movement between zones:
Demand → Supply
Supply → Demand
That’s it.
🧠 Simple mental model
Think of price like this:
It builds pressure at zones
It releases toward the next zone
It repeats
So your job is NOT prediction.
It’s:
“Which zone is price leaving, and which zone is it likely heading to next?”
⚠️ What NOT to do
Avoid:
trading every touch
entering before reaction
assuming every zone will hold
forcing reversals in strong trends
🔥 Beginner rule (most important)
Only act after:
price touches a zone AND shows rejection
Not before.
🧭 One-line summary
Zone-to-zone trading is:
“Wait for price to hit a zone, confirm rejection, then ride it toward the next opposite zone.”
These are:
Demand zones (where buying previously started)
Supply zones (where selling previously started)
Think of them as:
“places where something unfinished happened”
🟦 Step 1 — Identify zones
When you see a blue box:
That is a reaction zone
Price left that area with strength before
You don’t predict anything yet.
You just mark:
“this is a decision area”
🧭 Step 2 — Wait for price to return
You do NOTHING until price comes back to a zone.
There are only 3 situations:
1. Price approaches zone
→ prepare
2. Price enters zone
→ watch reaction closely
3. Price leaves zone
→ decision happens here
⚡ Step 3 — Watch reaction (this is the entire strategy)
When price touches the zone, you look for ONE thing:
Does it reject or break?
🔵 Bullish zone (demand)
Good reaction:
price dips into zone
wick below / push into it
then closes back up
👉 Meaning:
buyers defended the area
Expectation:
move up toward next supply zone
Bad reaction:
price falls through and keeps going
👉 Meaning:
zone failed
Ignore it after break
🔴 Bearish zone (supply)
Good reaction:
price pushes into zone
wicks above
closes back down
👉 Meaning:
sellers defended the area
Expectation:
move down toward next demand zone
Bad reaction:
price breaks through and holds above
👉 Zone is dead
📊 Step 4 — The only real rule: zone-to-zone movement
You are not trading bounces.
You are trading movement between zones:
Demand → Supply
Supply → Demand
That’s it.
🧠 Simple mental model
Think of price like this:
It builds pressure at zones
It releases toward the next zone
It repeats
So your job is NOT prediction.
It’s:
“Which zone is price leaving, and which zone is it likely heading to next?”
⚠️ What NOT to do
Avoid:
trading every touch
entering before reaction
assuming every zone will hold
forcing reversals in strong trends
🔥 Beginner rule (most important)
Only act after:
price touches a zone AND shows rejection
Not before.
🧭 One-line summary
Zone-to-zone trading is:
“Wait for price to hit a zone, confirm rejection, then ride it toward the next opposite zone.”
릴리즈 노트
Update to change colors of zones for personal touch as well as some AI updating to give more accurate zones. adjust settings to your style. (if you not sure, paste source code to chat GPT and explain your style. 오픈 소스 스크립트
트레이딩뷰의 진정한 정신에 따라, 이 스크립트의 작성자는 이를 오픈소스로 공개하여 트레이더들이 기능을 검토하고 검증할 수 있도록 했습니다. 작성자에게 찬사를 보냅니다! 이 코드는 무료로 사용할 수 있지만, 코드를 재게시하는 경우 하우스 룰이 적용된다는 점을 기억하세요.

면책사항
해당 정보와 게시물은 금융, 투자, 트레이딩 또는 기타 유형의 조언이나 권장 사항으로 간주되지 않으며, 트레이딩뷰에서 제공하거나 보증하는 것이 아닙니다. 자세한 내용은 이용 약관을 참조하세요.
오픈 소스 스크립트
트레이딩뷰의 진정한 정신에 따라, 이 스크립트의 작성자는 이를 오픈소스로 공개하여 트레이더들이 기능을 검토하고 검증할 수 있도록 했습니다. 작성자에게 찬사를 보냅니다! 이 코드는 무료로 사용할 수 있지만, 코드를 재게시하는 경우 하우스 룰이 적용된다는 점을 기억하세요.
면책사항
해당 정보와 게시물은 금융, 투자, 트레이딩 또는 기타 유형의 조언이나 권장 사항으로 간주되지 않으며, 트레이딩뷰에서 제공하거나 보증하는 것이 아닙니다. 자세한 내용은 이용 약관을 참조하세요.