OPEN-SOURCE SCRIPT
BTM - SMC Confluence Engine
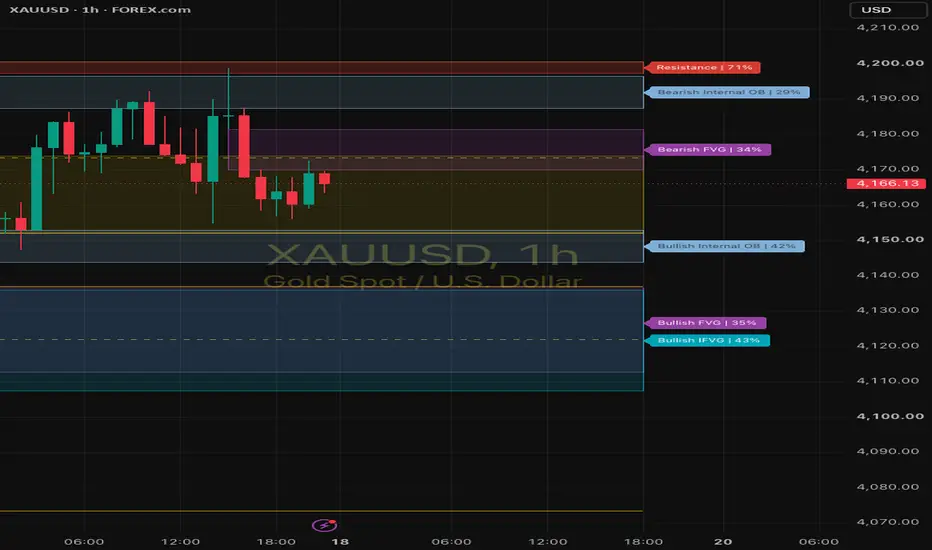
SMC Confluence Engine maps the smart-money zones that matter around current price, scores each one from 1 to 100, and keeps the chart readable by showing only the nearest, strongest zones. It combines order blocks, internal order blocks, breaker blocks, fair value gaps, inverse FVGs, support/resistance, momentum candles and an auto-Fibonacci, so you can see where several reasons for a reaction line up in one place.
ZONE TYPES
Each type has its own colour and every zone is labelled with its bias and type (e.g. "Bearish Breaker").
• Order Block (OB): the last opposite-colour candle before the move that broke a swing high or low (swing structure, 20-bar pivots by default). Very tall OB candles are trimmed to the side nearest price (1 ATR by default).
• Internal Order Block (iOB): the same logic on the smaller internal structure (5-bar pivots by default).
• Breaker Block: an OB or iOB that price has closed through. It flips polarity, so a failed bullish OB becomes bearish resistance and vice versa.
• Fair Value Gap (FVG): a 3-candle imbalance where the wicks of candle 1 and candle 3 do not overlap. Gaps smaller than a set fraction of ATR are ignored.
• Inverse FVG (IFVG): an FVG that price has closed through, flipped to the opposite side.
• Support / Resistance: swing pivots widened into zones by ATR, shown in green and red. With role reversal on, broken resistance becomes support and broken support becomes resistance.
STRENGTH SCORE (1-100)
Every zone is scored from:
• its type (order blocks are weighted highest),
• quality: how strongly price moved away from it (gap size for FVGs, reaction size for S/R), blended with relative volume where the feed has volume,
• retests: S/R gains strength with each respected touch, while OBs, breakers, FVGs and IFVGs lose strength with each touch, as the first retest is usually the best,
• age: older zones slowly lose strength.
Overlapping zones of the same type are merged into one zone, labelled e.g. "Bullish FVG (2 merged)". The strongest zone counts in full and each extra zone adds part of its own strength, so merged zones score higher but never exceed 100. Different types are never merged: an FVG and an IFVG, or an OB and an internal OB, always stay separate.
CLEAN DISPLAY
Only the nearest bearish zones above price and bullish zones below price are drawn (3 each by default), and zones under 25% strength are hidden. Labels sit in the right margin and are stacked so they never overlap. Hover a label to see the zone's exact top and bottom price. Zone shading gets stronger as the score rises.
MOMENTUM CANDLES
A candle is coloured white when it shows strong displacement: a body of at least 1.5x ATR, a body filling at least 70% of the candle, volume of at least 2x its 20-bar average, the biggest body of the last 10 candles, and a close beyond those candles' high or low. Every threshold is adjustable. On feeds without volume, the momentum rules are used on their own.
AUTO FIBONACCI
Fibonacci levels are drawn on the latest confirmed swing leg, using a zigzag of swing highs and lows: 38.2, 50, 61.8 and 78.6 (23.6 optional), the 127.2% and 161.8% targets (261.8 optional), and a shaded OTE zone (62-79%) or golden pocket (61.8-65%). An order block or FVG sitting inside the OTE is a classic confluence area.
REPAINTING
Zone detection, breaks, flips, touch counts and candle colours are all calculated on closed bars only, so nothing appears and then disappears within a bar. Swing-based items (order blocks, support/resistance and the fib) need the swing to be confirmed first. They appear a set number of bars after the swing (the pivot length) and are drawn from the swing candle. History and real-time behave the same way.
HOW TO USE
• Look for price returning to a high-strength zone in the direction of the higher-timeframe trend.
• Extra confluence: the zone sits inside the fib OTE, lines up with a round number or the previous day's high/low, or a white momentum candle leaves the zone.
• Use the Display settings to show more or fewer zones, or raise the strength filter to keep only the strongest.
NOTES
Built and tuned on XAUUSD, but works on any symbol and timeframe. Strength scores rank zones against each other and are not a probability of success. This script is for analysis and education only and is not financial advice.
오픈 소스 스크립트
트레이딩뷰의 진정한 정신에 따라, 이 스크립트의 작성자는 이를 오픈소스로 공개하여 트레이더들이 기능을 검토하고 검증할 수 있도록 했습니다. 작성자에게 찬사를 보냅니다! 이 코드는 무료로 사용할 수 있지만, 코드를 재게시하는 경우 하우스 룰이 적용된다는 점을 기억하세요.

면책사항
해당 정보와 게시물은 금융, 투자, 트레이딩 또는 기타 유형의 조언이나 권장 사항으로 간주되지 않으며, 트레이딩뷰에서 제공하거나 보증하는 것이 아닙니다. 자세한 내용은 이용 약관을 참조하세요.
오픈 소스 스크립트
트레이딩뷰의 진정한 정신에 따라, 이 스크립트의 작성자는 이를 오픈소스로 공개하여 트레이더들이 기능을 검토하고 검증할 수 있도록 했습니다. 작성자에게 찬사를 보냅니다! 이 코드는 무료로 사용할 수 있지만, 코드를 재게시하는 경우 하우스 룰이 적용된다는 점을 기억하세요.
면책사항
해당 정보와 게시물은 금융, 투자, 트레이딩 또는 기타 유형의 조언이나 권장 사항으로 간주되지 않으며, 트레이딩뷰에서 제공하거나 보증하는 것이 아닙니다. 자세한 내용은 이용 약관을 참조하세요.