OPEN-SOURCE SCRIPT
Dynamic Buy and Sell - Hitz2kk
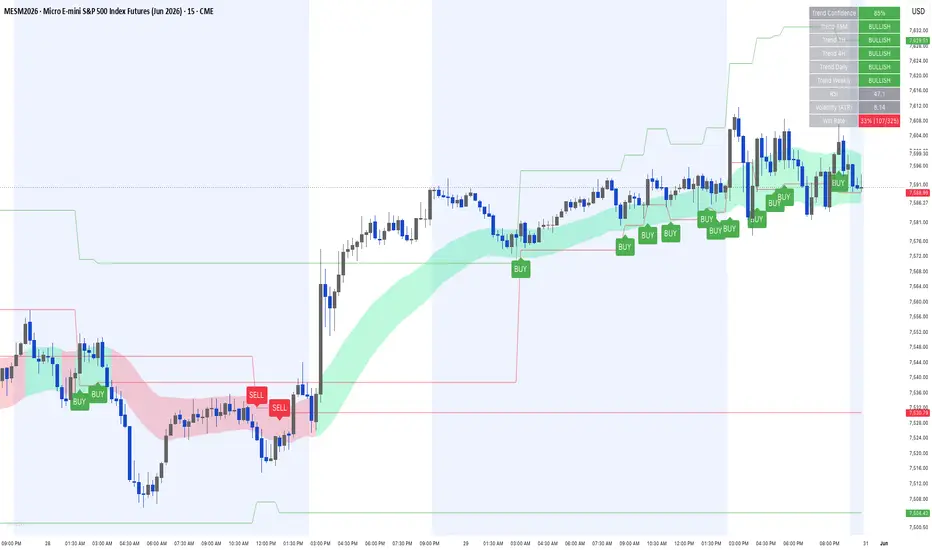
Dynamic Buy and Sell — by hitz2kk
Dynamic Buy and Sell is an all-in-one trend and signal indicator that combines a volatility-adjusted EMA ribbon, a five-timeframe trend dashboard, a configurable entry engine, and built-in ATR risk levels — all overlaid directly on price.
What it does
The core is a trend ribbon built from a fast and slow EMA with an ATR band drawn around the midline. The ribbon shades green when structure is bullish and red when bearish, and the band expands and contracts with volatility so it adapts to current conditions instead of using fixed offsets.
A multi-timeframe dashboard in the top-right reads the EMA trend across 15-minute, 1-hour, 4-hour, daily, and weekly charts. Above it, a Trend Confidence score (0–100%) blends the local trend, RSI, price position relative to the ribbon, and all five higher-timeframe trends into a single conviction reading — green at 70%+, orange at 50–69%, red below.
BUY and SELL labels print only when conditions align: the ribbon trend agrees, the fast EMA slopes in the signal's direction, RSI is on the correct side of its threshold, and your chosen entry trigger fires.
Key features
Three entry modes: Ribbon Breakout (momentum), Candlestick (engulfing and pin-bar reversals), or Either
Optional volume and MACD confirmation filters to tighten signals
ATR-based stop and target levels plotted on every signal, with adjustable risk:reward
Live win-rate tally that tracks how signals resolved against their stop/target
Five-timeframe trend dashboard with an aggregated confidence score
Configurable EMA, RSI, ATR, and threshold inputs
How to use it
Choose your trigger mode in settings. Use the dashboard and confidence score to read the broader environment, then act on labels that print in the direction of that bias. Higher-confidence signals backed by aligned higher-timeframe trends are the stronger setups; signals firing against a red dashboard warrant caution. Enable the volume and MACD filters when you want fewer, higher-conviction signals.
Notes
All calculations run on confirmed bars and higher-timeframe data uses lookahead-off, so signals and the dashboard do not repaint after a bar closes. The win-rate tally is an on-chart estimate based on bar highs and lows, not a precise backtest — for exact statistics, run a strategy version through TradingView's tester. This is a decision-support tool, not a standalone system; test settings on your own instrument and timeframe and always apply your own risk management.
This script is original and provided for educational purposes. Nothing here is financial advice.
오픈 소스 스크립트
트레이딩뷰의 진정한 정신에 따라, 이 스크립트의 작성자는 이를 오픈소스로 공개하여 트레이더들이 기능을 검토하고 검증할 수 있도록 했습니다. 작성자에게 찬사를 보냅니다! 이 코드는 무료로 사용할 수 있지만, 코드를 재게시하는 경우 하우스 룰이 적용된다는 점을 기억하세요.

면책사항
해당 정보와 게시물은 금융, 투자, 트레이딩 또는 기타 유형의 조언이나 권장 사항으로 간주되지 않으며, 트레이딩뷰에서 제공하거나 보증하는 것이 아닙니다. 자세한 내용은 이용 약관을 참조하세요.
오픈 소스 스크립트
트레이딩뷰의 진정한 정신에 따라, 이 스크립트의 작성자는 이를 오픈소스로 공개하여 트레이더들이 기능을 검토하고 검증할 수 있도록 했습니다. 작성자에게 찬사를 보냅니다! 이 코드는 무료로 사용할 수 있지만, 코드를 재게시하는 경우 하우스 룰이 적용된다는 점을 기억하세요.
면책사항
해당 정보와 게시물은 금융, 투자, 트레이딩 또는 기타 유형의 조언이나 권장 사항으로 간주되지 않으며, 트레이딩뷰에서 제공하거나 보증하는 것이 아닙니다. 자세한 내용은 이용 약관을 참조하세요.