OPEN-SOURCE SCRIPT
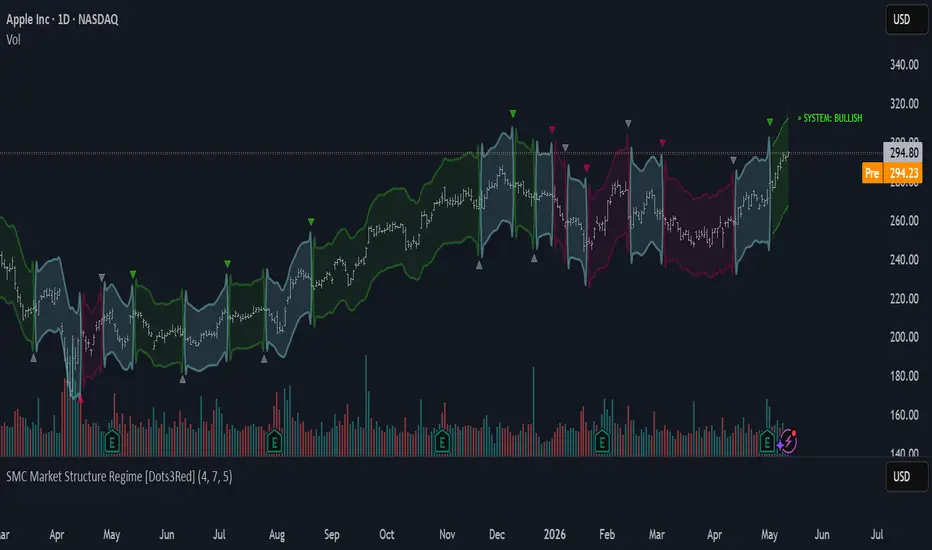
SMC Market Structure Regime [Dots3Red]
Most traders can spot BOS and CHoCH.
Reading the CURRENT market regime in real time is much harder.
SMC Market Structure Regime transforms raw price structure into a dynamic visual system — highlighting bullish, bearish, and weakening phases using adaptive boundaries and smart-money logic.
Built for traders who want cleaner SMC visualization without cluttered charts.
─────────────────────────────────
FEATURES
─────────────────────────────────
◆ Smart Money Structure Detection
◆ Adaptive Structure Boundaries
◆ Real-Time Regime Projection
◆ Clean Visual Design
─────────────────────────────────
HOW TO READ
─────────────────────────────────
▲ Green Zone — Bullish Regime
HH + HL structure confirmed. Market is in bullish continuation.
▼ Red Zone — Bearish Regime
LH + LL structure confirmed. Market is in bearish continuation.
◆ Teal Zone — Neutral / Transition
Structure is resetting. Wait for BOS confirmation before committing.
⚠ Orange Warning — Weakening Structure
Current regime is showing signs of exhaustion. Possible CHoCH incoming.
BOS Label
Structure continuation confirmed in the direction of the regime.
»CHoCH« Label
Character of the market is changing. Possible reversal forming.
─────────────────────────────────
SETTINGS
─────────────────────────────────
Pivot Length
Controls sensitivity of swing detection.
Lower = more sensitive, higher = smoother structure.
Boundary Offset %
Controls how wide the envelope sits around price.
Increase for volatile assets, decrease for tight structure.
Boundary Smoothing
EMA period for boundary curves.
Lower = reactive, higher = smooth channel look.
─────────────────────────────────
BEST USED WITH
─────────────────────────────────
─────────────────────────────────
NOTES
─────────────────────────────────
This indicator is a visualization and context tool.
It works best as part of a broader SMC framework — not as a standalone signal.
No indicator constitutes financial advice. Trade responsibly.
Reading the CURRENT market regime in real time is much harder.
SMC Market Structure Regime transforms raw price structure into a dynamic visual system — highlighting bullish, bearish, and weakening phases using adaptive boundaries and smart-money logic.
Built for traders who want cleaner SMC visualization without cluttered charts.
─────────────────────────────────
FEATURES
─────────────────────────────────
◆ Smart Money Structure Detection
- Automatic BOS (Break of Structure) detection
- CHoCH (Change of Character) transitions
- Bullish / Bearish / Neutral regime tracking
◆ Adaptive Structure Boundaries
- Smoothed curved regime envelopes
- Dynamic offset zones that breathe with price
- Visual market phase mapping
◆ Real-Time Regime Projection
- Live regime state on the last bar
- Detects weakening structure conditions
- Highlights possible transition phases before they confirm
◆ Clean Visual Design
- Minimal chart clutter
- Cyberpunk-inspired color system — fast visual reads
- Designed for speed, not noise
─────────────────────────────────
HOW TO READ
─────────────────────────────────
▲ Green Zone — Bullish Regime
HH + HL structure confirmed. Market is in bullish continuation.
▼ Red Zone — Bearish Regime
LH + LL structure confirmed. Market is in bearish continuation.
◆ Teal Zone — Neutral / Transition
Structure is resetting. Wait for BOS confirmation before committing.
⚠ Orange Warning — Weakening Structure
Current regime is showing signs of exhaustion. Possible CHoCH incoming.
BOS Label
Structure continuation confirmed in the direction of the regime.
»CHoCH« Label
Character of the market is changing. Possible reversal forming.
─────────────────────────────────
SETTINGS
─────────────────────────────────
Pivot Length
Controls sensitivity of swing detection.
Lower = more sensitive, higher = smoother structure.
Boundary Offset %
Controls how wide the envelope sits around price.
Increase for volatile assets, decrease for tight structure.
Boundary Smoothing
EMA period for boundary curves.
Lower = reactive, higher = smooth channel look.
─────────────────────────────────
BEST USED WITH
─────────────────────────────────
- Higher timeframe bias confirmation
- Liquidity zone mapping
- Volume analysis
- Order block confirmation
- Intraday and swing trading setups
─────────────────────────────────
NOTES
─────────────────────────────────
This indicator is a visualization and context tool.
It works best as part of a broader SMC framework — not as a standalone signal.
No indicator constitutes financial advice. Trade responsibly.
오픈 소스 스크립트
트레이딩뷰의 진정한 정신에 따라, 이 스크립트의 작성자는 이를 오픈소스로 공개하여 트레이더들이 기능을 검토하고 검증할 수 있도록 했습니다. 작성자에게 찬사를 보냅니다! 이 코드는 무료로 사용할 수 있지만, 코드를 재게시하는 경우 하우스 룰이 적용된다는 점을 기억하세요.

Connect the dots to elevate your trading.
면책사항
해당 정보와 게시물은 금융, 투자, 트레이딩 또는 기타 유형의 조언이나 권장 사항으로 간주되지 않으며, 트레이딩뷰에서 제공하거나 보증하는 것이 아닙니다. 자세한 내용은 이용 약관을 참조하세요.
오픈 소스 스크립트
트레이딩뷰의 진정한 정신에 따라, 이 스크립트의 작성자는 이를 오픈소스로 공개하여 트레이더들이 기능을 검토하고 검증할 수 있도록 했습니다. 작성자에게 찬사를 보냅니다! 이 코드는 무료로 사용할 수 있지만, 코드를 재게시하는 경우 하우스 룰이 적용된다는 점을 기억하세요.
Connect the dots to elevate your trading.
면책사항
해당 정보와 게시물은 금융, 투자, 트레이딩 또는 기타 유형의 조언이나 권장 사항으로 간주되지 않으며, 트레이딩뷰에서 제공하거나 보증하는 것이 아닙니다. 자세한 내용은 이용 약관을 참조하세요.