
Mastering the EMA 9 & 15 Crossover: High-Probability Strategy
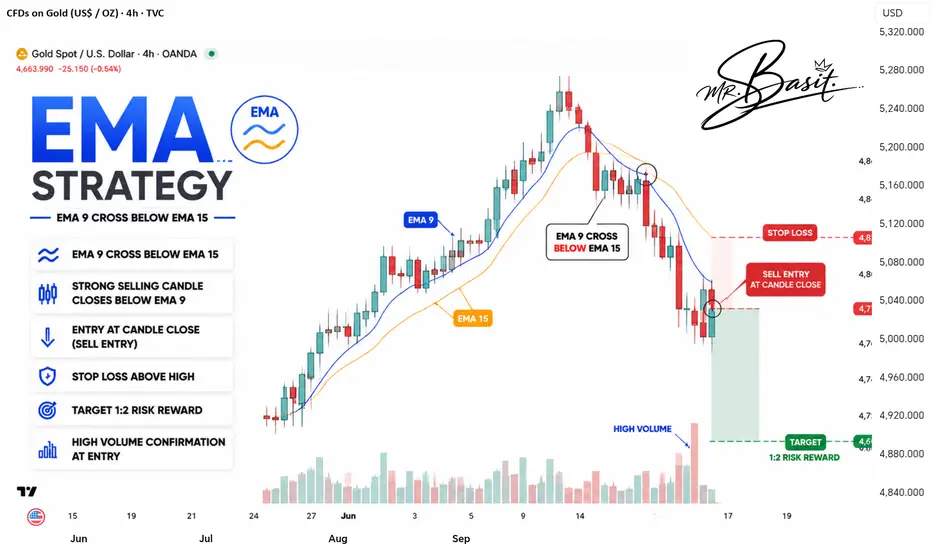
This trading strategy leverages a powerful combination of the EMA 9 and EMA 15 moving averages to identify precise entry points. By waiting for the EMA 9 to cross below the EMA 15, we align with a potential downward momentum. This crossover is even more reliable when it coincides with a key Fibonacci retracement level—acting as a strong support or resistance. Once the price tests that Fibonacci zone and the bearish candle closes below the EMA 9, we enter at the candle’s low, setting a stop loss at its high. We aim for a 1:2 risk-to-reward ratio, ensuring disciplined risk management. Furthermore, volume confirmation at entry adds confidence—when volume surges at this point, it validates the move. By integrating these elements—trend confirmation, Fibonacci precision, and volume—we create a robust, disciplined strategy. Traders should always verify these conditions across multiple time frames for extra confidence, ensuring that each trade is backed by strong technical and structural factors.
This EMA 9 and EMA 15 crossover strategy is designed for precision entries in short term trading while maintaining disciplined risk management. The primary signal is generated when the EMA 9 crosses below the EMA 15, indicating a potential bearish move. However, the strategy does not rely solely on this crossover. To enhance reliability, the trader should also analyze key support and resistance zones using Fibonacci retracement levels. A confluence of the EMA crossover and a price reaction at a significant Fibonacci level dramatically increases the probability of a successful trade.
Entry is ideally taken when a strong confirmation candle closes below the EMA 9 after the crossover, with its low serving as the entry point. The high of this candle sets the stop loss, providing a defined risk level. For targeting profits, the strategy recommends a minimum 1:2 risk-to-reward ratio, allowing traders to maintain positive expectancy over multiple trades. Volume plays a crucial role—spikes in volume at the point of entry reinforce the strength of the breakout or reversal, giving additional confidence to the trade setup.
Traders are encouraged to analyze multiple time frames before taking a position. For example, while the 5-minute chart may provide the immediate entry, checking the 15-minute or 1-hour chart for alignment with broader trend direction helps avoid counter-trend entries. This approach combines EMA momentum, Fibonacci structural levels, and volume confirmation to create a robust framework for executing high-probability trades. Discipline in following these rules, along with proper money management, ensures that the strategy is both repeatable and effective, providing consistent results for traders seeking reliable short-term opportunities.
This EMA 9 and EMA 15 crossover strategy is designed for precision entries in short term trading while maintaining disciplined risk management. The primary signal is generated when the EMA 9 crosses below the EMA 15, indicating a potential bearish move. However, the strategy does not rely solely on this crossover. To enhance reliability, the trader should also analyze key support and resistance zones using Fibonacci retracement levels. A confluence of the EMA crossover and a price reaction at a significant Fibonacci level dramatically increases the probability of a successful trade.
Entry is ideally taken when a strong confirmation candle closes below the EMA 9 after the crossover, with its low serving as the entry point. The high of this candle sets the stop loss, providing a defined risk level. For targeting profits, the strategy recommends a minimum 1:2 risk-to-reward ratio, allowing traders to maintain positive expectancy over multiple trades. Volume plays a crucial role—spikes in volume at the point of entry reinforce the strength of the breakout or reversal, giving additional confidence to the trade setup.
Traders are encouraged to analyze multiple time frames before taking a position. For example, while the 5-minute chart may provide the immediate entry, checking the 15-minute or 1-hour chart for alignment with broader trend direction helps avoid counter-trend entries. This approach combines EMA momentum, Fibonacci structural levels, and volume confirmation to create a robust framework for executing high-probability trades. Discipline in following these rules, along with proper money management, ensures that the strategy is both repeatable and effective, providing consistent results for traders seeking reliable short-term opportunities.
Nota
This chart demonstrates a precise short-term trading setup based on EMA 9 and EMA 15. The trader entered a position following a clear EMA 9 crossover below the EMA 15, confirming a bearish move.
Entry Point:
The entry was taken at the candle close where the EMA 9 crossed below EMA 15 within a significant support/resistance zone, validated by previous market structure and volume confirmation.
Stop Loss:
The stop loss was placed above the high of the entry candle, protecting the trade from unexpected reversals while maintaining a defined risk level.
Target:
The target was set at the previous strong low, aligning with structural support, providing a clear 1:2 risk-to-reward ratio.
Structural Notes:
The chart shows a break of structure (BOS) and a change of character (CHOCH) confirming the trend direction.
Price reacted strongly at support zones and liquidity points, validating the high-probability entry.
EMA crossover, combined with market structure and volume, provided a disciplined, repeatable trading setup.
Summary:
This trade exemplifies disciplined short-term trading using EMA crossovers, key market structure, and volume confirmation. The combination of these factors ensures that the entry, stop loss, and target are all aligned with high-probability conditions, reducing risk while maximizing potential reward.
Nota
Take a look at this chart and share your analysis or thoughts
Nota
Entry is ideally taken when a strong confirmation candle closes below the EMA 9 after the crossover, with its low serving as the entry point. The high of this candle sets the stop loss, providing a defined risk level. For targeting profits, the strategy recommends a minimum 1:2 risk-to-reward ratio, allowing traders to maintain positive expectancy over multiple trades. Volume plays a crucial role—spikes in volume at the point of entry reinforce the strength of the breakout or reversal, giving additional confidence to the trade setup.
What You'll Get
Daily Forex signals with high accuracy
t.me/+grB4SWKmzRY3OTlk
Technical & fundamental analysis
Risk management tips to protect your capital
Join now and start profit daily free signal
t.me/+EdfnjydA0JIwZjM8
Daily Forex signals with high accuracy
t.me/+grB4SWKmzRY3OTlk
Technical & fundamental analysis
Risk management tips to protect your capital
Join now and start profit daily free signal
t.me/+EdfnjydA0JIwZjM8
Penafian
Maklumat dan penerbitan adalah tidak bertujuan, dan tidak membentuk, nasihat atau cadangan kewangan, pelaburan, dagangan atau jenis lain yang diberikan atau disahkan oleh TradingView. Baca lebih dalam Terma Penggunaan.
What You'll Get
Daily Forex signals with high accuracy
t.me/+grB4SWKmzRY3OTlk
Technical & fundamental analysis
Risk management tips to protect your capital
Join now and start profit daily free signal
t.me/+EdfnjydA0JIwZjM8
Daily Forex signals with high accuracy
t.me/+grB4SWKmzRY3OTlk
Technical & fundamental analysis
Risk management tips to protect your capital
Join now and start profit daily free signal
t.me/+EdfnjydA0JIwZjM8
Penafian
Maklumat dan penerbitan adalah tidak bertujuan, dan tidak membentuk, nasihat atau cadangan kewangan, pelaburan, dagangan atau jenis lain yang diberikan atau disahkan oleh TradingView. Baca lebih dalam Terma Penggunaan.