Shaakuni - Market Structure (BOS/CHoCH) & Order Blocks
Overview
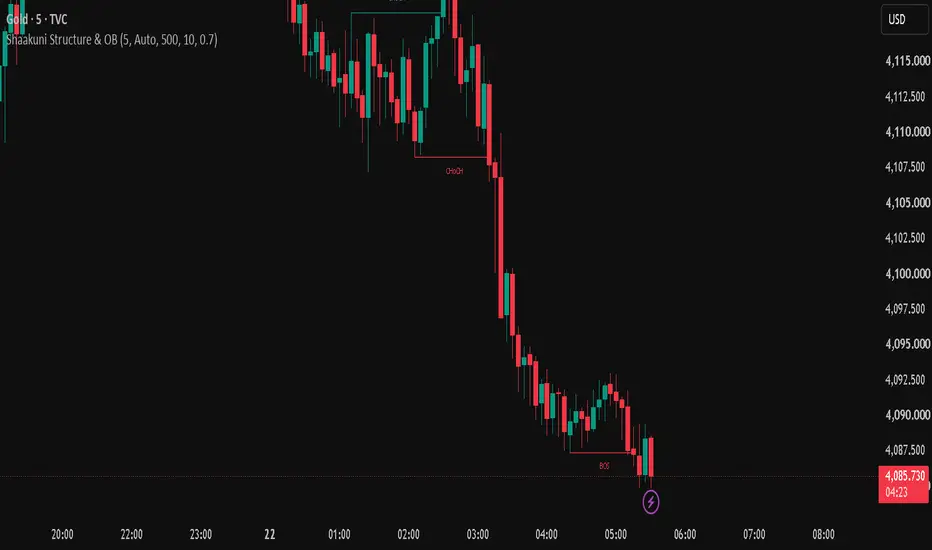
Shaakuni - Market Structure (BOS/CHoCH) & Order Blocks draws two things on the chart: market structure breaks (BOS and CHoCH) based on swing highs and swing lows, and simple Order Blocks (zones where a strong move started) with mitigation tracking. It does not generate buy or sell signals and it does not predict anything. The two parts are calculated independently of each other and each can be switched off.
Key concepts
Swing highs and swing lows: a swing high is a bar whose high is the highest of the surrounding bars, and a swing low is a bar whose low is the lowest of the surrounding bars. The script uses them as the reference points for structure.
BOS (break of structure): a bar closes beyond the latest swing high or swing low in the direction of the current structure. For example, in an uptrend, a close above the latest swing high is a bullish BOS.
CHoCH (change of character): a bar closes beyond the latest swing level against the previous structure. For example, after bearish structure, a close above the latest swing high is a bullish CHoCH.
Order Block (OB): in this script an Order Block is the last candle of the opposite colour before a strong move that breaks recent highs or lows. A bullish OB is the last down candle before a strong up move, and a bearish OB is the last up candle before a strong down move. The idea is that the area around that candle may matter if price returns to it. On 1H and higher timeframes the zones are labelled POI (point of interest) instead of OB.
How market structure is calculated
1. A swing high or swing low is confirmed with a pivot using "Structure Swing Length" (default 5 bars on each side). Because a pivot needs those bars to confirm, a swing is only recognised 5 bars after it formed.
2. The script keeps the most recent swing high and swing low. If a newer swing of the same type is confirmed before the old one is broken, the newer one replaces it.
3. When a bar closes above the tracked swing high, a bullish break is drawn from the swing candle to the breaking bar. When a bar closes below the tracked swing low, a bearish break is drawn. A wick beyond the level without a close does not count.
4. The break is labelled CHoCH if the previous structure was the opposite direction, and BOS otherwise. Before the first break there is no previous structure, so the first break is labelled BOS.
5. Each swing level is used for one break only, then the script waits for the next confirmed swing.
How Order Blocks are calculated
The calculation runs once per closed bar. First, the script finds the highest high (bullish case) or lowest low (bearish case) of the last N bars ("OB Structure Lookback", default 10). Second, if the current bar closes beyond that level, it counts as a break; the extreme must be at least 3 bars old, so very small moves are ignored. Third, the script finds the lowest low (or highest high for the bearish case) that formed after that extreme, and looks for an impulse candle between that point and the current bar: a candle in the direction of the break whose body is at least a set multiple of ATR(14) ("OB Impulse Candle", default 0.7 x ATR). If no such candle exists, no zone is created. Fourth, the Order Block is the closest opposite-coloured candle before that impulse, no further back than that low (or high); its high-to-low range becomes the box. Fifth, the zone is created only if price has not already traded back into it since the candle that follows it. Finally, once a later closed bar overlaps the box, the zone is marked as mitigated and, by default, hidden ("Show Mitigated" shows it as a dark box). Fresh zones extend to the right with price. Old zones are removed after a lookback that depends on the timeframe (or a manual value you set).
The Order Block rule does not use the BOS/CHoCH swing levels. It has its own lookback, so an Order Block is not necessarily linked to a BOS or CHoCH label on the chart.
How to use it
Use the structure labels to see when price closes beyond recent swings and whether that break continues or reverses the previous structure. Use the Order Blocks as areas to watch if price returns: an unmitigated zone has not been revisited, a mitigated zone has already been tested. Many traders combine references like these with their own confirmation and risk rules; this script is meant as a map, not a trade plan. Bullish and bearish structure, Order Blocks, fresh zones and mitigated zones can each be switched on or off, and colours, swing length, OB lookback and impulse size are adjustable.
Alerts
Six alert conditions are available: bullish BOS, bullish CHoCH, bearish BOS, bearish CHoCH, new bullish Order Block and new bearish Order Block. Choose "Once per bar close" when creating the alert.
Why it is built this way
BOS, CHoCH and Order Blocks are widely used ideas and this script does not claim to have invented them. It puts a close-based structure reading and an ATR-filtered Order Block rule with mitigation tracking in one script with open source code, so each step can be checked. The Order Block rule is the same one used in my other published script "Shaakuni - Liquidity Levels & Order Blocks". That script combines it with previous day and previous week levels and a session panel; this one combines it with BOS/CHoCH structure and does not include previous-period levels.
Limitations
Structure breaks and Order Blocks are placed after they are confirmed, drawn back on an earlier candle, so a label or zone you see was not visible at the moment that candle printed. Swings are recognised only after the pivot length has passed. Only the latest unbroken swing high and swing low are tracked, so older unbroken swings are replaced. A break needs a candle close; a wick beyond a swing level is ignored. The Order Block rule is a simple mechanical approximation of a discretionary idea and will not match every trader's definition. Zones older than the lookback are removed, and TradingView limits the number of lines, boxes and labels, so the oldest drawings may disappear. This is a visual aid and not financial advice.
Shaakuni - Market Structure (BOS/CHoCH) & Order Blocks draws two things on the chart: market structure breaks (BOS and CHoCH) based on swing highs and swing lows, and simple Order Blocks (zones where a strong move started) with mitigation tracking. It does not generate buy or sell signals and it does not predict anything. The two parts are calculated independently of each other and each can be switched off.
Key concepts
Swing highs and swing lows: a swing high is a bar whose high is the highest of the surrounding bars, and a swing low is a bar whose low is the lowest of the surrounding bars. The script uses them as the reference points for structure.
BOS (break of structure): a bar closes beyond the latest swing high or swing low in the direction of the current structure. For example, in an uptrend, a close above the latest swing high is a bullish BOS.
CHoCH (change of character): a bar closes beyond the latest swing level against the previous structure. For example, after bearish structure, a close above the latest swing high is a bullish CHoCH.
Order Block (OB): in this script an Order Block is the last candle of the opposite colour before a strong move that breaks recent highs or lows. A bullish OB is the last down candle before a strong up move, and a bearish OB is the last up candle before a strong down move. The idea is that the area around that candle may matter if price returns to it. On 1H and higher timeframes the zones are labelled POI (point of interest) instead of OB.
How market structure is calculated
1. A swing high or swing low is confirmed with a pivot using "Structure Swing Length" (default 5 bars on each side). Because a pivot needs those bars to confirm, a swing is only recognised 5 bars after it formed.
2. The script keeps the most recent swing high and swing low. If a newer swing of the same type is confirmed before the old one is broken, the newer one replaces it.
3. When a bar closes above the tracked swing high, a bullish break is drawn from the swing candle to the breaking bar. When a bar closes below the tracked swing low, a bearish break is drawn. A wick beyond the level without a close does not count.
4. The break is labelled CHoCH if the previous structure was the opposite direction, and BOS otherwise. Before the first break there is no previous structure, so the first break is labelled BOS.
5. Each swing level is used for one break only, then the script waits for the next confirmed swing.
How Order Blocks are calculated
The calculation runs once per closed bar. First, the script finds the highest high (bullish case) or lowest low (bearish case) of the last N bars ("OB Structure Lookback", default 10). Second, if the current bar closes beyond that level, it counts as a break; the extreme must be at least 3 bars old, so very small moves are ignored. Third, the script finds the lowest low (or highest high for the bearish case) that formed after that extreme, and looks for an impulse candle between that point and the current bar: a candle in the direction of the break whose body is at least a set multiple of ATR(14) ("OB Impulse Candle", default 0.7 x ATR). If no such candle exists, no zone is created. Fourth, the Order Block is the closest opposite-coloured candle before that impulse, no further back than that low (or high); its high-to-low range becomes the box. Fifth, the zone is created only if price has not already traded back into it since the candle that follows it. Finally, once a later closed bar overlaps the box, the zone is marked as mitigated and, by default, hidden ("Show Mitigated" shows it as a dark box). Fresh zones extend to the right with price. Old zones are removed after a lookback that depends on the timeframe (or a manual value you set).
The Order Block rule does not use the BOS/CHoCH swing levels. It has its own lookback, so an Order Block is not necessarily linked to a BOS or CHoCH label on the chart.
How to use it
Use the structure labels to see when price closes beyond recent swings and whether that break continues or reverses the previous structure. Use the Order Blocks as areas to watch if price returns: an unmitigated zone has not been revisited, a mitigated zone has already been tested. Many traders combine references like these with their own confirmation and risk rules; this script is meant as a map, not a trade plan. Bullish and bearish structure, Order Blocks, fresh zones and mitigated zones can each be switched on or off, and colours, swing length, OB lookback and impulse size are adjustable.
Alerts
Six alert conditions are available: bullish BOS, bullish CHoCH, bearish BOS, bearish CHoCH, new bullish Order Block and new bearish Order Block. Choose "Once per bar close" when creating the alert.
Why it is built this way
BOS, CHoCH and Order Blocks are widely used ideas and this script does not claim to have invented them. It puts a close-based structure reading and an ATR-filtered Order Block rule with mitigation tracking in one script with open source code, so each step can be checked. The Order Block rule is the same one used in my other published script "Shaakuni - Liquidity Levels & Order Blocks". That script combines it with previous day and previous week levels and a session panel; this one combines it with BOS/CHoCH structure and does not include previous-period levels.
Limitations
Structure breaks and Order Blocks are placed after they are confirmed, drawn back on an earlier candle, so a label or zone you see was not visible at the moment that candle printed. Swings are recognised only after the pivot length has passed. Only the latest unbroken swing high and swing low are tracked, so older unbroken swings are replaced. A break needs a candle close; a wick beyond a swing level is ignored. The Order Block rule is a simple mechanical approximation of a discretionary idea and will not match every trader's definition. Zones older than the lookback are removed, and TradingView limits the number of lines, boxes and labels, so the oldest drawings may disappear. This is a visual aid and not financial advice.

Penafian
Maklumat dan penerbitan adalah tidak bertujuan, dan tidak membentuk, nasihat atau cadangan kewangan, pelaburan, dagangan atau jenis lain yang diberikan atau disahkan oleh TradingView. Baca lebih dalam Terma Penggunaan.
Penafian
Maklumat dan penerbitan adalah tidak bertujuan, dan tidak membentuk, nasihat atau cadangan kewangan, pelaburan, dagangan atau jenis lain yang diberikan atau disahkan oleh TradingView. Baca lebih dalam Terma Penggunaan.