OPEN-SOURCE SCRIPT
Telah dikemas kini Sphinx Unicorn - FVG Breaker Nesting Model
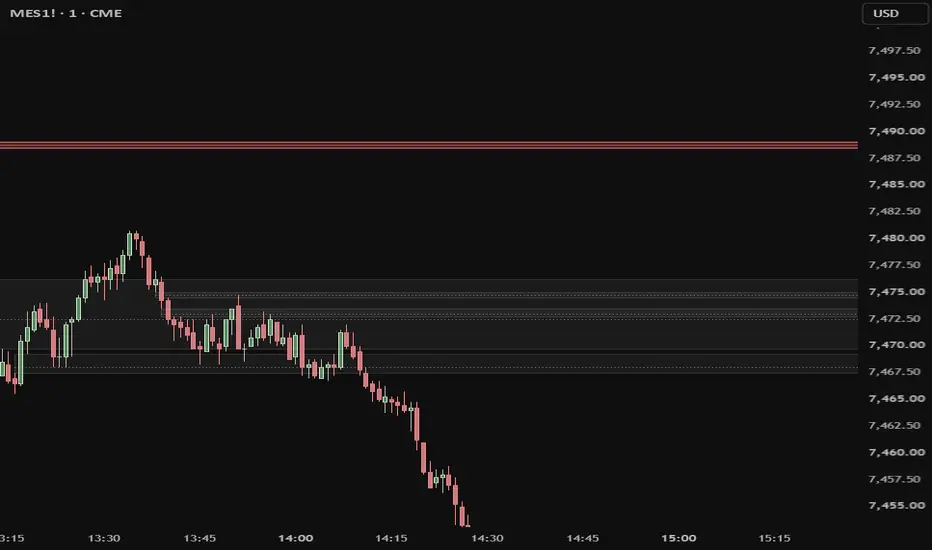
Description:
Sphinx Unicorn identifies a specific price structure from ICT-influenced methodology: a swing point that forms inside an unfilled fair value gap (FVG), which price then reclaims through displacement. This structure is commonly called a "unicorn" — a breaker nested within an FVG. The script scans for these continuously, tracks each candidate through a defined lifecycle, and confirms only those that complete the full sequence.
What makes this different from a generic FVG or order-block indicator
Most FVG scripts simply draw every gap. Most breaker scripts simply mark broken structure. This one requires the two to coincide and survives a multi-stage confirmation before it marks anything as complete:
The nesting test — a swing must sit inside an FVG that is still unfilled at the moment the swing forms. A gap price has already traded through is rejected, which removes the majority of low-quality candidates on intraday timeframes.
The Balanced Price Range (BPR) gate — activation requires the breaking leg to leave its own fair value gap that overlaps the nesting gap. A slow drift through the level does not qualify; only a genuine displacement that creates a second, opposing inefficiency does.
A self-scaling displacement filter — the gap left by the breaking leg must be at least a configurable fraction (default 0.75) of the size of the gap it inverts. This means a large level demands a proportionally decisive break to confirm, while a small level needs less. The threshold scales with the structure itself rather than using a fixed point or tick value, so it adapts across instruments and volatility regimes without re-tuning.
How it calculates
FVGs are detected using the standard three-bar definition (a gap between the first and third bar's wicks). A pivot is qualified as "nested" when its price falls strictly within an unfilled gap's range inside the search window. Overlapping gaps in the same direction are collapsed into a single zone drawn at the largest gap, so clustered inefficiencies read as one level rather than a stack of boxes. Displacement is confirmed on bar close beyond both the swing and the gap's far edge, subject to the BPR and ratio conditions above.
The four zone states
Level (grey, thin): a nested swing that has been superseded by a newer one. Price may still react here, but it is no longer the watched candidate and cannot activate.
Armed (grey, dashed): the current front-runner — the zone actively being evaluated for displacement.
Active (green or red): a confirmed unicorn. The displacement completed with a valid BPR.
Spent (purple): an Active zone that price has since mitigated. It is retained as a reference level, since a proven structure often sees price return to it.
How to use it
This tool marks where a precise entry structure exists. It is not a standalone system and is best used as one input within a layered approach. In practice it is strongest when the confirmed zone aligns with an independently identified key level — for example a higher-timeframe draw on liquidity, a volume or dealer-positioning level, or a session reference — and when it is paired with SMT (Smart Money Technique) divergence read across correlated instruments on the manipulation leg that forms the breaker. A confirmed unicorn sitting at a defended level, with SMT divergence present on that leg, represents the confluence this structure is designed to isolate. A confirmed unicorn with no surrounding context should be treated with more caution.
Alerts are provided for both the arming and activation of a zone, in each direction.
Inputs
Swing strength, FVG search radius, strict-nesting toggle, displacement-close requirement, BPR requirement and lookback, minimum displacement gap size, and the self-scaling displacement ratio. Display controls cover zone colors per state, the on-chart zone limit, and the mitigation rule (touch versus close-through). A diagnostic panel shows a live count of zones in each state.
Limitations and behavior traders should know
The nesting swing is detected using pivots, which require bars on both sides to confirm. A zone therefore arms only after the pivot's right-hand bars have formed; it does not arm on the exact pivot bar in real time.
On strongly trending sessions the model produces few or no setups, because reversals into unfilled opposing gaps are rare in a one-directional market. Empty output in a trend is expected behavior, not a failure.
SMT divergence, referenced above as a recommended confluence, is read by the trader from correlated instruments and is not drawn by this script.
This indicator marks structure. It does not predict direction, guarantee outcomes, or constitute a trading system on its own.
Open-source. Part of the Sphinx suite by Hermetic Trader.
Sphinx Unicorn identifies a specific price structure from ICT-influenced methodology: a swing point that forms inside an unfilled fair value gap (FVG), which price then reclaims through displacement. This structure is commonly called a "unicorn" — a breaker nested within an FVG. The script scans for these continuously, tracks each candidate through a defined lifecycle, and confirms only those that complete the full sequence.
What makes this different from a generic FVG or order-block indicator
Most FVG scripts simply draw every gap. Most breaker scripts simply mark broken structure. This one requires the two to coincide and survives a multi-stage confirmation before it marks anything as complete:
The nesting test — a swing must sit inside an FVG that is still unfilled at the moment the swing forms. A gap price has already traded through is rejected, which removes the majority of low-quality candidates on intraday timeframes.
The Balanced Price Range (BPR) gate — activation requires the breaking leg to leave its own fair value gap that overlaps the nesting gap. A slow drift through the level does not qualify; only a genuine displacement that creates a second, opposing inefficiency does.
A self-scaling displacement filter — the gap left by the breaking leg must be at least a configurable fraction (default 0.75) of the size of the gap it inverts. This means a large level demands a proportionally decisive break to confirm, while a small level needs less. The threshold scales with the structure itself rather than using a fixed point or tick value, so it adapts across instruments and volatility regimes without re-tuning.
How it calculates
FVGs are detected using the standard three-bar definition (a gap between the first and third bar's wicks). A pivot is qualified as "nested" when its price falls strictly within an unfilled gap's range inside the search window. Overlapping gaps in the same direction are collapsed into a single zone drawn at the largest gap, so clustered inefficiencies read as one level rather than a stack of boxes. Displacement is confirmed on bar close beyond both the swing and the gap's far edge, subject to the BPR and ratio conditions above.
The four zone states
Level (grey, thin): a nested swing that has been superseded by a newer one. Price may still react here, but it is no longer the watched candidate and cannot activate.
Armed (grey, dashed): the current front-runner — the zone actively being evaluated for displacement.
Active (green or red): a confirmed unicorn. The displacement completed with a valid BPR.
Spent (purple): an Active zone that price has since mitigated. It is retained as a reference level, since a proven structure often sees price return to it.
How to use it
This tool marks where a precise entry structure exists. It is not a standalone system and is best used as one input within a layered approach. In practice it is strongest when the confirmed zone aligns with an independently identified key level — for example a higher-timeframe draw on liquidity, a volume or dealer-positioning level, or a session reference — and when it is paired with SMT (Smart Money Technique) divergence read across correlated instruments on the manipulation leg that forms the breaker. A confirmed unicorn sitting at a defended level, with SMT divergence present on that leg, represents the confluence this structure is designed to isolate. A confirmed unicorn with no surrounding context should be treated with more caution.
Alerts are provided for both the arming and activation of a zone, in each direction.
Inputs
Swing strength, FVG search radius, strict-nesting toggle, displacement-close requirement, BPR requirement and lookback, minimum displacement gap size, and the self-scaling displacement ratio. Display controls cover zone colors per state, the on-chart zone limit, and the mitigation rule (touch versus close-through). A diagnostic panel shows a live count of zones in each state.
Limitations and behavior traders should know
The nesting swing is detected using pivots, which require bars on both sides to confirm. A zone therefore arms only after the pivot's right-hand bars have formed; it does not arm on the exact pivot bar in real time.
On strongly trending sessions the model produces few or no setups, because reversals into unfilled opposing gaps are rare in a one-directional market. Empty output in a trend is expected behavior, not a failure.
SMT divergence, referenced above as a recommended confluence, is read by the trader from correlated instruments and is not drawn by this script.
This indicator marks structure. It does not predict direction, guarantee outcomes, or constitute a trading system on its own.
Open-source. Part of the Sphinx suite by Hermetic Trader.
Nota Keluaran
Update — Zone declutteringAdded ATR-based decluttering to reduce chart noise when multiple zones form at similar prices. Two independent, toggleable rules in the Display group:
Confirmed zones (Active or Spent) now clear any unconfirmed Level whose nearest edge falls within 1 ATR, so a proven zone is not crowded by lesser marks.
Two unconfirmed zones (Level or Armed) whose edges sit within 0.5 ATR collapse to one, keeping the larger gap.
Distances are measured edge-to-edge, so overlapping zones always resolve regardless of their relative heights. A new ATR-length input (default 14) controls the spacing measure; it affects display only and never changes which zones activate.
Both rules can be turned off individually if you prefer to see every zone.
Note: culled zones are removed permanently rather than hidden. Because ATR changes over time, a zone cleared while ATR was wide will not reappear if ATR later narrows.
Skrip sumber terbuka
Dalam semangat TradingView sebenar, pencipta skrip ini telah menjadikannya sumber terbuka, jadi pedagang boleh menilai dan mengesahkan kefungsiannya. Terima kasih kepada penulis! Walaupuan anda boleh menggunakan secara percuma, ingat bahawa penerbitan semula kod ini tertakluk kepada Peraturan Dalaman.

Penafian
Maklumat dan penerbitan adalah tidak bertujuan, dan tidak membentuk, nasihat atau cadangan kewangan, pelaburan, dagangan atau jenis lain yang diberikan atau disahkan oleh TradingView. Baca lebih dalam Terma Penggunaan.
Skrip sumber terbuka
Dalam semangat TradingView sebenar, pencipta skrip ini telah menjadikannya sumber terbuka, jadi pedagang boleh menilai dan mengesahkan kefungsiannya. Terima kasih kepada penulis! Walaupuan anda boleh menggunakan secara percuma, ingat bahawa penerbitan semula kod ini tertakluk kepada Peraturan Dalaman.
Penafian
Maklumat dan penerbitan adalah tidak bertujuan, dan tidak membentuk, nasihat atau cadangan kewangan, pelaburan, dagangan atau jenis lain yang diberikan atau disahkan oleh TradingView. Baca lebih dalam Terma Penggunaan.