OPEN-SOURCE SCRIPT
Gold Trend Signal Indicator
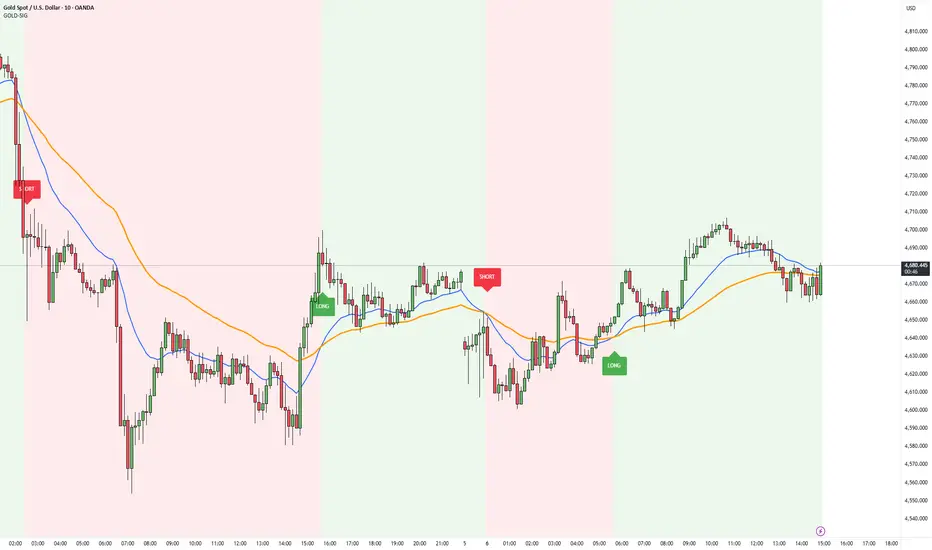
📋 Trading Rules (For XAUUSD M10 Chart)
1. Entry Rules
Long Entry: Enter a long position immediately when the green LONG label appears (20EMA crosses above 50EMA, uptrend confirmed).
Short Entry: Enter a short position immediately when the red SHORT label appears (20EMA crosses below 50EMA, downtrend confirmed).
2. Stop-Loss Rules
Long Stop-Loss: Place stop-loss order below the 50EMA line (adjust based on your risk tolerance, e.g., 0.5-1% below the line).
Short Stop-Loss: Place stop-loss order above the 50EMA line (adjust based on your risk tolerance, e.g., 0.5-1% above the line).
3. Take-Profit Rules (Optional)
Long Take-Profit: Set take-profit at 1.5-2x your risk (e.g., if you risk $100, target $150-$200 profit) or exit when 20EMA crosses back below 50EMA.
Short Take-Profit: Set take-profit at 1.5-2x your risk or exit when 20EMA crosses back above 50EMA.
4. Parameter Adjustment (Optional)
More Frequent Signals: Change Fast EMA Period to 10, Slow EMA Period to 30.
More Reliable (Less Frequent) Signals: Change Fast EMA Period to 50, Slow EMA Period to 100
Clear Visualization: Blue 20EMA, orange 50EMA, green LONG labels, red SHORT labels, and trend background color for instant trend identification.
The indicator is for reference only. The market may experience drastic changes at any time due to news events. When genuine trading opportunities arise in the market, I will also send you accurate trading signals for reference.
1. Entry Rules
Long Entry: Enter a long position immediately when the green LONG label appears (20EMA crosses above 50EMA, uptrend confirmed).
Short Entry: Enter a short position immediately when the red SHORT label appears (20EMA crosses below 50EMA, downtrend confirmed).
2. Stop-Loss Rules
Long Stop-Loss: Place stop-loss order below the 50EMA line (adjust based on your risk tolerance, e.g., 0.5-1% below the line).
Short Stop-Loss: Place stop-loss order above the 50EMA line (adjust based on your risk tolerance, e.g., 0.5-1% above the line).
3. Take-Profit Rules (Optional)
Long Take-Profit: Set take-profit at 1.5-2x your risk (e.g., if you risk $100, target $150-$200 profit) or exit when 20EMA crosses back below 50EMA.
Short Take-Profit: Set take-profit at 1.5-2x your risk or exit when 20EMA crosses back above 50EMA.
4. Parameter Adjustment (Optional)
More Frequent Signals: Change Fast EMA Period to 10, Slow EMA Period to 30.
More Reliable (Less Frequent) Signals: Change Fast EMA Period to 50, Slow EMA Period to 100
Clear Visualization: Blue 20EMA, orange 50EMA, green LONG labels, red SHORT labels, and trend background color for instant trend identification.
The indicator is for reference only. The market may experience drastic changes at any time due to news events. When genuine trading opportunities arise in the market, I will also send you accurate trading signals for reference.
Skrip sumber terbuka
Dalam semangat TradingView sebenar, pencipta skrip ini telah menjadikannya sumber terbuka, jadi pedagang boleh menilai dan mengesahkan kefungsiannya. Terima kasih kepada penulis! Walaupuan anda boleh menggunakan secara percuma, ingat bahawa penerbitan semula kod ini tertakluk kepada Peraturan Dalaman.

Penafian
Maklumat dan penerbitan adalah tidak bertujuan, dan tidak membentuk, nasihat atau cadangan kewangan, pelaburan, dagangan atau jenis lain yang diberikan atau disahkan oleh TradingView. Baca lebih dalam Terma Penggunaan.
Skrip sumber terbuka
Dalam semangat TradingView sebenar, pencipta skrip ini telah menjadikannya sumber terbuka, jadi pedagang boleh menilai dan mengesahkan kefungsiannya. Terima kasih kepada penulis! Walaupuan anda boleh menggunakan secara percuma, ingat bahawa penerbitan semula kod ini tertakluk kepada Peraturan Dalaman.
Penafian
Maklumat dan penerbitan adalah tidak bertujuan, dan tidak membentuk, nasihat atau cadangan kewangan, pelaburan, dagangan atau jenis lain yang diberikan atau disahkan oleh TradingView. Baca lebih dalam Terma Penggunaan.