OPEN-SOURCE SCRIPT
Telah dikemas kini GEX Levels ES Futures Only
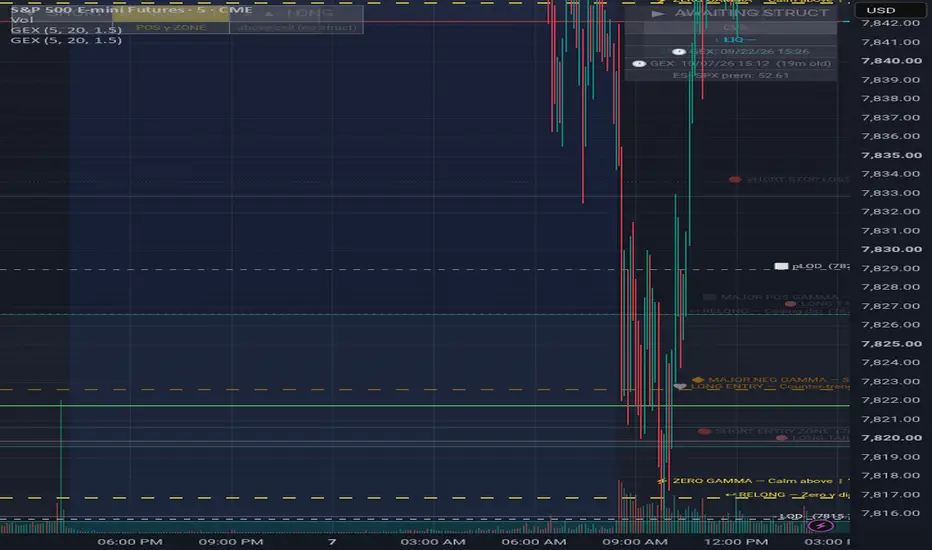
GEX Levels — Gamma Exposure Trading Map
This indicator overlays key Gamma Exposure (GEX) levels directly on your ES futures chart, giving you a real-time structural map of where dealer hedging creates predictable price behavior.
What it shows:
🟢 Ceiling (Major Positive Gamma) — The dominant gamma wall. Price gravitates toward this level and tends to reject hard. Strong resistance above, magnet from below.
⚡ Flip Line (Zero Gamma) — The regime boundary. Above it, dealers are long gamma — they buy dips and sell rips, keeping price range-bound. Below it, dealers are short gamma — momentum accelerates and stops get hunted. This is the most important level on the chart.
🔶 Speed Zone (Major Negative Gamma) — Once price enters here, dealer hedging amplifies moves. Expect fast, volatile price action in either direction.
🔴 Sell Zone — High-probability short entry area based on the current GEX structure. Wait for price to reach this zone before looking for a setup.
🎯 Goals 1 & 2 — Profit targets derived from the next significant gamma walls below.
🤍 Buy Zone — Potential long entry area, only valid on a strong bounce with momentum confirmation.
How levels are set:
Levels are updated manually based on fresh GEX data and price structure analysis. They reflect the current day's dealer positioning and are refreshed each session. The timestamp in the top-right corner shows when the levels were last updated.
Best used on: ES (S&P 500 E-mini Futures) — 5 minute chart
Data source: GEX analysis from options market maker positioning (SPX options flow)
Note: GEX levels work best during regular trading hours (9:30 AM – 4:00 PM ET). Always use in conjunction with your own price action analysis and risk management rules.
This indicator overlays key Gamma Exposure (GEX) levels directly on your ES futures chart, giving you a real-time structural map of where dealer hedging creates predictable price behavior.
What it shows:
🟢 Ceiling (Major Positive Gamma) — The dominant gamma wall. Price gravitates toward this level and tends to reject hard. Strong resistance above, magnet from below.
⚡ Flip Line (Zero Gamma) — The regime boundary. Above it, dealers are long gamma — they buy dips and sell rips, keeping price range-bound. Below it, dealers are short gamma — momentum accelerates and stops get hunted. This is the most important level on the chart.
🔶 Speed Zone (Major Negative Gamma) — Once price enters here, dealer hedging amplifies moves. Expect fast, volatile price action in either direction.
🔴 Sell Zone — High-probability short entry area based on the current GEX structure. Wait for price to reach this zone before looking for a setup.
🎯 Goals 1 & 2 — Profit targets derived from the next significant gamma walls below.
🤍 Buy Zone — Potential long entry area, only valid on a strong bounce with momentum confirmation.
How levels are set:
Levels are updated manually based on fresh GEX data and price structure analysis. They reflect the current day's dealer positioning and are refreshed each session. The timestamp in the top-right corner shows when the levels were last updated.
Best used on: ES (S&P 500 E-mini Futures) — 5 minute chart
Data source: GEX analysis from options market maker positioning (SPX options flow)
Note: GEX levels work best during regular trading hours (9:30 AM – 4:00 PM ET). Always use in conjunction with your own price action analysis and risk management rules.
Nota Keluaran
GEX LevelsMaps the three critical Gamma Exposure (GEX) price levels from the SPX options market onto ES futures (or any correlated instrument) in real time. Translates dealer hedging behavior into clearly labeled, actionable price zones updated each session.
─────────────────────────────────────
HOW IT WORKS
─────────────────────────────────────
Options market makers are always net short gamma. As price moves, they hedge by buying and selling the underlying — creating predictable, repeatable behavior around three key strikes:
• Major Positive Gamma (Ceiling) — Dealers sell rallies and buy dips here. Price gravitates to this level but faces strong resistance breaking through it.
• Zero Gamma (Flip Line) — The regime boundary. Above it: dealers dampen volatility, mean-reversion conditions. Below it: dealers amplify moves, trending and volatile conditions prevail. The most important level on the chart.
• Major Negative Gamma (Speed Zone) — Dealers accelerate with the move below this level. Fast, directional price action with little natural support.
─────────────────────────────────────
BIAS SYSTEM
─────────────────────────────────────
Three states — updated with each GEX refresh:
SHORT → Sell zone, ceiling, stop, and targets fully lit. Price at or near the ceiling — fade the rally.
LONG → Buy zone, long stop, and targets fully lit. Price bouncing off demand — buy the dip.
NEUTRAL → All levels visible but dimmed. Price at the flip line — no directional edge, wait for a regime break.
A status badge (top-right) shows the current bias and the timestamp of the last GEX data refresh.
─────────────────────────────────────
LEVELS DISPLAYED
─────────────────────────────────────
Ceiling — Maj Pos Gamma strike, primary dealer resistance
Sell Zone — ±2pt entry band around the ceiling
Short Stop — Stop loss above the ceiling
Flip Line — Zero Gamma, regime boundary
T1 — Short target at the flip line
Buy Zone — Support band near the flip line
Long Stop — Stop loss below the buy zone
Speed Zone — Maj Neg Gamma, fast-move acceleration level
T2 — Short target at the speed zone
─────────────────────────────────────
UPDATES
─────────────────────────────────────
GEX data is sourced externally (SpotGamma, SqueezeMetrics, or equivalent) and applied once or twice per session. Only 11 values change between updates — the three core GEX strikes, their derivative trade zones, and the bias state. The visual template never changes.
─────────────────────────────────────
INTENDED USE
─────────────────────────────────────
Built for discretionary intraday traders on ES, MES, SPX, and SPY who use gamma exposure as a macro filter alongside price action or structure-based entries (SMC, VWAP, order flow). Does not generate autonomous signals — provides the GEX framework within which traders evaluate their own setups.
Nota Keluaran
GEX Levels plots key Gamma Exposure levels derived from SPX options flow, converted to ES futures price equivalents. Levels are manually updated each session and define the structural framework for the trading day.LEVELS INCLUDED
🟦 Major Pos Gamma (Ceiling) — strongest positive gamma strike, price tends to stall or reverse
🔴 Short Entry Zone — high-probability short area near ceiling and zero gamma
🔴 Short Stop Loss — invalidation level for short trades
⚡ Zero Gamma (Flip Line) — regime boundary; calm and mean-reverting above, volatile and trending below
🔶 Major Neg Gamma (Speed Zone) — negative gamma acceleration zone, price moves fast through here
🎯 Short Target 1 / Target 2 — measured profit targets based on gamma structure
🤍 Long Entry Zone — counter-trend long area below speed zone
🤍 Long Stop Loss — invalidation level for counter-trend longs
BIAS TABLE
Automatically updates based on current price relative to Zero Gamma.
▼ SHORT — price below flip line (negative gamma, volatile regime)
▶ NEUTRAL — price between flip and ceiling (positive gamma, mean-reverting regime)
▲ LONG — price above ceiling (extended beyond major resistance)
TO UPDATE LEVELS
Edit the float variables at the top of the script (lines 4–14) with the new session values and save.
Nota Keluaran
Updated for todays closing GEX levelsNota Keluaran
GEX Levels — ES FuturesThis indicator plots key Gamma Exposure (GEX) levels directly on the ES (S&P 500 E-mini) chart, giving traders a structural map of where dealer hedging activity creates natural support, resistance, and volatility zones.
📐 What is GEX?
Gamma Exposure measures the net options gamma held by market makers. As price approaches high-gamma levels, dealers hedge in ways that suppress volatility (positive gamma). Below the Zero Gamma line, hedging flows amplify moves, creating faster and less predictable price action.
🗺️ Levels Plotted
🟦 Ceiling — Major positive gamma wall. Price tends to stall or reverse here
⚡ Zero Gamma (Flip Line) — The line between calm and volatile regimes
🔶 Speed Zone — Major negative gamma. Price accelerates through this area
🔴 Short Entry Zone — High-probability short setup area with defined risk
🤍 Long Entry Zone — Counter-trend long area for reactive bounces
🛑 Short & Long Stop Losses — Structural invalidation levels
🎯 Target 1 & Target 2 — GEX-based profit targets
🚦 Dynamic Bias System
Levels automatically highlight based on the current price regime:
🔴 SHORT bias (below Zero Gamma) — short-side levels light up, long-side dims
🟢 LONG bias (above Ceiling) — long-side levels light up, short-side dims
🟡 NEUTRAL (between flip and ceiling) — all levels dim, only Zero Gamma remains visible
📊 CVD Confirmation
A built-in Cumulative Volume Delta (CVD) row shows whether order flow is confirming or fighting the active bias — helping filter high-conviction entries from low-quality setups.
✅ CVD FAVORED — order flow aligns with the active bias
❌ CVD AGAINST — buyers or sellers are pushing back, use caution
📋 How To Use
Levels are updated manually based on end-of-day GEX data. Best used on the 1–15 minute ES chart during RTH sessions.
▶ Trade the Short Entry Zone when SHORT bias is active and CVD confirms
▶ Use the Long Entry Zone only as a reactive counter-trend play
▶ Respect stop loss levels — they define the point of structural failure
🕐 Levels refresh daily after market close
⚠️ Not financial advice. For educational purposes only.
Nota Keluaran
5/5 openNota Keluaran
11AM CST UpdateNota Keluaran
5.6 Update 10AM CSTNota Keluaran
5.7 Update 1020am CSTNota Keluaran
labels updatedNota Keluaran
5.8 UpdateNota Keluaran
5.11 UpdateNota Keluaran
5.12 updateNota Keluaran
5.13 updateNota Keluaran
5.15 updateNota Keluaran
6.1 updateNota Keluaran
6.3 updateNota Keluaran
6.3 updateNota Keluaran
6.4 updateNota Keluaran
6.5updateNota Keluaran
6.9 UpdateNota Keluaran
6.9 update 2pmNota Keluaran
6.10 updateNota Keluaran
6.11 updateNota Keluaran
fixNota Keluaran
12pm updateNota Keluaran
6.15 updateNota Keluaran
6.24 updateNota Keluaran
6.25 Nota Keluaran
6.26 updateNota Keluaran
7.2Nota Keluaran
7.10Nota Keluaran
7.22 updateNota Keluaran
7.23 updateNota Keluaran
7.24 updateNota Keluaran
7.27 updateNota Keluaran
7.28Nota Keluaran
8.11 updateNota Keluaran
8.13Nota Keluaran
9.16 updateNota Keluaran
Auto-updated GEX levels — 09/20/26 20:15Nota Keluaran
Auto-updated GEX levels — 09/20/26 15:52Nota Keluaran
Auto-updated GEX levels — 09/21/26 13:55Nota Keluaran
Auto-updated GEX levels — 09/21/26 13:55Nota Keluaran
Auto-updated GEX levels — 09/21/26 14:27Nota Keluaran
Auto-updated GEX levels — 09/21/26 12:12Nota Keluaran
Auto-updated GEX levels — 09/21/26 12:10Nota Keluaran
Auto-updated GEX levels — 09/21/26 12:44Nota Keluaran
Auto-updated GEX levels — 09/21/26 12:48Nota Keluaran
Auto-updated GEX levels — 09/21/26 12:54Nota Keluaran
Auto-updated GEX levels — 09/21/26 13:14Nota Keluaran
Auto-updated GEX levels — 09/21/26 13:26Nota Keluaran
Auto-updated GEX levels — 09/21/26 13:30Nota Keluaran
Auto-updated GEX levels — 09/21/26 13:44Nota Keluaran
Auto-updated GEX levels — 09/21/26 13:50Nota Keluaran
Auto-updated GEX levels — 09/21/26 13:54Nota Keluaran
Auto-updated GEX levels — 09/21/26 14:00Nota Keluaran
Auto-updated GEX levels — 09/21/26 14:04Nota Keluaran
Auto-updated GEX levels — 09/21/26 14:06Nota Keluaran
Auto-updated GEX levels — 09/21/26 14:12Nota Keluaran
Auto-updated GEX levels — 09/21/26 14:16Nota Keluaran
Auto-updated GEX levels — 09/21/26 14:22Nota Keluaran
Auto-updated GEX levels — 09/21/26 14:46Nota Keluaran
Auto-updated GEX levels — 09/21/26 14:54Nota Keluaran
Auto-updated GEX levels — 09/21/26 15:00Nota Keluaran
Auto-updated GEX levels — 09/21/26 15:24Nota Keluaran
Auto-updated GEX levels — 09/21/26 15:26Nota Keluaran
Auto-updated GEX levels — 09/22/26 09:34Nota Keluaran
Auto-updated GEX levels — 09/22/26 09:42Nota Keluaran
Auto-updated GEX levels — 09/22/26 10:12Nota Keluaran
Auto-updated GEX levels — 09/22/26 10:26Nota Keluaran
Auto-updated GEX levels — 09/22/26 10:42Nota Keluaran
Auto-updated GEX levels — 09/22/26 10:56Nota Keluaran
Auto-updated GEX levels — 09/22/26 11:12Nota Keluaran
Auto-updated GEX levels — 09/22/26 11:26Nota Keluaran
Auto-updated GEX levels — 09/22/26 12:06Nota Keluaran
Auto-updated GEX levels — 09/22/26 12:10Nota Keluaran
Auto-updated GEX levels — 09/22/26 12:26Nota Keluaran
Auto-updated GEX levels — 09/22/26 12:42Nota Keluaran
Auto-updated GEX levels — 09/22/26 12:56Nota Keluaran
Auto-updated GEX levels — 09/22/26 13:12Nota Keluaran
Auto-updated GEX levels — 09/22/26 13:24Nota Keluaran
Auto-updated GEX levels — 09/22/26 13:56Nota Keluaran
Auto-updated GEX levels — 09/22/26 14:12Nota Keluaran
Auto-updated GEX levels — 09/22/26 14:26Nota Keluaran
Auto-updated GEX levels — 09/22/26 14:42Nota Keluaran
Auto-updated GEX levels — 09/22/26 15:10Nota Keluaran
Auto-updated GEX levels — 09/22/26 15:26Nota Keluaran
Auto-updated GEX levels — 09/22/26 15:26Nota Keluaran
Auto-updated GEX levels — 09/22/26 15:26Nota Keluaran
Auto-updated GEX levels — 09/22/26 15:26Nota Keluaran
Auto-updated GEX levels — 09/22/26 15:26Nota Keluaran
Auto-updated GEX levels — 09/22/26 15:26Nota Keluaran
Auto-updated GEX levels — 09/23/26 09:34Nota Keluaran
Auto-updated GEX levels — 09/23/26 09:42Nota Keluaran
Auto-updated GEX levels — 09/23/26 09:56Nota Keluaran
Auto-updated GEX levels — 09/23/26 10:12Nota Keluaran
Auto-updated GEX levels — 09/23/26 10:26Nota Keluaran
Auto-updated GEX levels — 09/23/26 10:42Nota Keluaran
Auto-updated GEX levels — 09/23/26 10:56Nota Keluaran
Auto-updated GEX levels — 09/23/26 11:12Nota Keluaran
Auto-updated GEX levels — 09/23/26 11:26Nota Keluaran
Auto-updated GEX levels — 09/23/26 11:40Nota Keluaran
Auto-updated GEX levels — 09/23/26 11:56Nota Keluaran
Auto-updated GEX levels — 09/23/26 12:12Nota Keluaran
Auto-updated GEX levels — 09/23/26 12:26Nota Keluaran
Auto-updated GEX levels — 09/23/26 12:42Nota Keluaran
Auto-updated GEX levels — 09/23/26 12:56Nota Keluaran
Auto-updated GEX levels — 09/23/26 13:00Nota Keluaran
Auto-updated GEX levels — 09/23/26 13:14Nota Keluaran
Auto-updated GEX levels — 09/23/26 13:42Nota Keluaran
Auto-updated GEX levels — 09/23/26 13:48Nota Keluaran
Auto-updated GEX levels — 09/23/26 14:00Nota Keluaran
Auto-updated GEX levels — 09/23/26 14:26Nota Keluaran
Auto-updated GEX levels — 09/23/26 14:40Nota Keluaran
Auto-updated GEX levels — 09/23/26 15:52Nota Keluaran
Auto-updated GEX levels — 09/24/26 10:38Nota Keluaran
Auto-updated GEX levels — 09/24/26 11:12Nota Keluaran
Auto-updated GEX levels — 09/24/26 11:26Nota Keluaran
Auto-updated GEX levels — 09/24/26 11:40Nota Keluaran
Auto-updated GEX levels — 09/24/26 11:56Nota Keluaran
Auto-updated GEX levels — 09/24/26 12:16Nota Keluaran
Auto-updated GEX levels — 09/24/26 12:40Nota Keluaran
Auto-updated GEX levels — 09/24/26 13:12Nota Keluaran
Auto-updated GEX levels — 09/24/26 13:17Nota Keluaran
Auto-updated GEX levels — 09/24/26 13:56Nota Keluaran
Auto-updated GEX levels — 09/24/26 14:12Nota Keluaran
Auto-updated GEX levels — 09/24/26 14:26Nota Keluaran
Auto-updated GEX levels — 09/24/26 15:12Nota Keluaran
Auto-updated GEX levels — 09/24/26 15:24Nota Keluaran
Auto-updated GEX levels — 09/24/26 15:56Nota Keluaran
Auto-updated GEX levels — 09/25/26 09:42Nota Keluaran
Auto-updated GEX levels — 09/25/26 10:12Nota Keluaran
Auto-updated GEX levels — 09/25/26 10:32Nota Keluaran
Auto-updated GEX levels — 09/25/26 10:42Nota Keluaran
Auto-updated GEX levels — 09/25/26 10:56Nota Keluaran
Auto-updated GEX levels — 09/25/26 11:02Nota Keluaran
Auto-updated GEX levels — 09/25/26 11:14Nota Keluaran
Auto-updated GEX levels — 09/25/26 11:42Nota Keluaran
Auto-updated GEX levels — 09/25/26 11:46Nota Keluaran
Auto-updated GEX levels — 09/25/26 12:00Nota Keluaran
Auto-updated GEX levels — 09/25/26 12:26Nota Keluaran
Auto-updated GEX levels — 09/25/26 12:42Nota Keluaran
Auto-updated GEX levels — 09/25/26 12:56Nota Keluaran
Auto-updated GEX levels — 09/25/26 13:30Nota Keluaran
Auto-updated GEX levels — 09/25/26 13:32Nota Keluaran
Auto-updated GEX levels — 09/25/26 13:46Nota Keluaran
Auto-updated GEX levels — 09/25/26 14:12Nota Keluaran
Auto-updated GEX levels — 09/25/26 14:24Nota Keluaran
Auto-updated GEX levels — 09/25/26 14:30Nota Keluaran
Auto-updated GEX levels — 09/25/26 14:56Nota Keluaran
Auto-updated GEX levels — 09/25/26 15:10Nota Keluaran
Auto-updated GEX levels — 09/28/26 09:34Nota Keluaran
Auto-updated GEX levels — 09/28/26 09:40Nota Keluaran
Auto-updated GEX levels — 09/28/26 09:56Nota Keluaran
Auto-updated GEX levels — 09/28/26 10:12Nota Keluaran
Auto-updated GEX levels — 09/28/26 10:38Nota Keluaran
Auto-updated GEX levels — 09/28/26 10:40Nota Keluaran
Auto-updated GEX levels — 09/28/26 10:56Nota Keluaran
Auto-updated GEX levels — 09/28/26 11:26Nota Keluaran
Auto-updated GEX levels — 09/28/26 11:42Nota Keluaran
Auto-updated GEX levels — 09/28/26 11:56Nota Keluaran
Auto-updated GEX levels — 09/28/26 12:26Nota Keluaran
Auto-updated GEX levels — 09/28/26 12:54Nota Keluaran
Auto-updated GEX levels — 09/28/26 13:26Nota Keluaran
Auto-updated GEX levels — 09/28/26 13:42Nota Keluaran
Auto-updated GEX levels — 09/28/26 13:56Nota Keluaran
Auto-updated GEX levels — 09/28/26 14:26Nota Keluaran
Auto-updated GEX levels — 09/28/26 14:56Nota Keluaran
Auto-updated GEX levels — 09/28/26 15:10Nota Keluaran
Auto-updated GEX levels — 09/28/26 15:26Nota Keluaran
Auto-updated GEX levels — 09/28/26 15:50Nota Keluaran
Auto-updated GEX levels — 09/29/26 09:40Nota Keluaran
Auto-updated GEX levels — 09/29/26 09:56Nota Keluaran
Auto-updated GEX levels — 09/29/26 10:12Nota Keluaran
Auto-updated GEX levels — 09/29/26 10:26Nota Keluaran
Auto-updated GEX levels — 09/29/26 10:42Nota Keluaran
Auto-updated GEX levels — 09/29/26 10:54Nota Keluaran
Auto-updated GEX levels — 09/29/26 11:10Nota Keluaran
Auto-updated GEX levels — 09/29/26 11:26Nota Keluaran
Auto-updated GEX levels — 09/29/26 11:56Nota Keluaran
Auto-updated GEX levels — 09/29/26 12:12Nota Keluaran
Auto-updated GEX levels — 09/29/26 12:26Nota Keluaran
Auto-updated GEX levels — 09/29/26 12:42Nota Keluaran
Auto-updated GEX levels — 09/29/26 12:56Nota Keluaran
Auto-updated GEX levels — 09/29/26 13:32Nota Keluaran
Auto-updated GEX levels — 09/29/26 13:42Nota Keluaran
Auto-updated GEX levels — 09/29/26 14:06Nota Keluaran
Auto-updated GEX levels — 09/29/26 14:28Nota Keluaran
Auto-updated GEX levels — 09/29/26 14:44Nota Keluaran
Auto-updated GEX levels — 09/29/26 14:46Nota Keluaran
Auto-updated GEX levels — 09/29/26 14:56Nota Keluaran
Auto-updated GEX levels — 09/29/26 15:12Nota Keluaran
Auto-updated GEX levels — 09/29/26 15:26Nota Keluaran
Auto-updated GEX levels — 09/30/26 11:26Nota Keluaran
Auto-updated GEX levels — 09/30/26 11:42Nota Keluaran
Auto-updated GEX levels — 09/30/26 12:14Nota Keluaran
Auto-updated GEX levels — 09/30/26 12:20Nota Keluaran
Auto-updated GEX levels — 09/30/26 12:26Nota Keluaran
Auto-updated GEX levels — 09/30/26 12:28Nota Keluaran
Auto-updated GEX levels — 09/30/26 12:56Nota Keluaran
Auto-updated GEX levels — 09/30/26 13:28Nota Keluaran
Auto-updated GEX levels — 09/30/26 13:38Nota Keluaran
Auto-updated GEX levels — 09/30/26 13:42Nota Keluaran
Auto-updated GEX levels — 09/30/26 13:56Nota Keluaran
Auto-updated GEX levels — 09/30/26 14:26Nota Keluaran
Auto-updated GEX levels — 09/30/26 14:40Nota Keluaran
Auto-updated GEX levels — 09/30/26 14:56Nota Keluaran
Auto-updated GEX levels — 09/30/26 15:26Nota Keluaran
Auto-updated GEX levels — 10/01/26 09:34Nota Keluaran
Auto-updated GEX levels — 10/01/26 09:40Nota Keluaran
Auto-updated GEX levels — 10/01/26 11:06Nota Keluaran
Auto-updated GEX levels — 10/01/26 11:26Nota Keluaran
Auto-updated GEX levels — 10/01/26 11:42Nota Keluaran
Auto-updated GEX levels — 10/01/26 11:56Nota Keluaran
Auto-updated GEX levels — 10/01/26 12:10Nota Keluaran
Auto-updated GEX levels — 10/01/26 12:53Nota Keluaran
Auto-updated GEX levels — 10/01/26 13:11Nota Keluaran
Auto-updated GEX levels — 10/01/26 13:40Nota Keluaran
Auto-updated GEX levels — 10/01/26 14:26Nota Keluaran
Auto-updated GEX levels — 10/01/26 14:56Nota Keluaran
Auto-updated GEX levels — 10/01/26 15:12Nota Keluaran
Auto-updated GEX levels — 10/01/26 15:26Nota Keluaran
Auto-updated GEX levels — 10/02/26 11:30Nota Keluaran
Auto-updated GEX levels — 10/02/26 11:34Nota Keluaran
Auto-updated GEX levels — 10/02/26 11:42Nota Keluaran
Auto-updated GEX levels — 10/02/26 11:48Nota Keluaran
Auto-updated GEX levels — 10/02/26 11:56Nota Keluaran
Auto-updated GEX levels — 10/02/26 12:12Nota Keluaran
Auto-updated GEX levels — 10/02/26 12:26Nota Keluaran
Auto-updated GEX levels — 10/02/26 12:38Nota Keluaran
Auto-updated GEX levels — 10/02/26 12:54Nota Keluaran
Auto-updated GEX levels — 10/02/26 12:58Nota Keluaran
Auto-updated GEX levels — 10/02/26 13:12Nota Keluaran
Auto-updated GEX levels — 10/02/26 13:26Nota Keluaran
Auto-updated GEX levels — 10/02/26 13:42Nota Keluaran
Auto-updated GEX levels — 10/02/26 13:56Nota Keluaran
Auto-updated GEX levels — 10/02/26 14:12Nota Keluaran
Auto-updated GEX levels — 10/02/26 14:24Nota Keluaran
Auto-updated GEX levels — 10/02/26 14:42Nota Keluaran
Auto-updated GEX levels — 10/02/26 14:56Nota Keluaran
Auto-updated GEX levels — 10/02/26 15:10Nota Keluaran
Auto-updated GEX levels — 10/02/26 15:26Nota Keluaran
Auto-updated GEX levels — 10/05/26 10:26Nota Keluaran
Auto-updated GEX levels — 10/05/26 10:42Nota Keluaran
Auto-updated GEX levels — 10/05/26 10:54Nota Keluaran
Auto-updated GEX levels — 10/05/26 11:12Nota Keluaran
Auto-updated GEX levels — 10/05/26 11:26Nota Keluaran
Auto-updated GEX levels — 10/05/26 11:42Nota Keluaran
Auto-updated GEX levels — 10/05/26 11:56Nota Keluaran
Auto-updated GEX levels — 10/05/26 12:12Nota Keluaran
Auto-updated GEX levels — 10/05/26 12:42Nota Keluaran
Auto-updated GEX levels — 10/05/26 13:12Nota Keluaran
Auto-updated GEX levels — 10/05/26 13:39Nota Keluaran
Auto-updated GEX levels — 10/05/26 14:12Nota Keluaran
Auto-updated GEX levels — 10/05/26 14:42Nota Keluaran
Auto-updated GEX levels — 10/06/26 09:38Nota Keluaran
Auto-updated GEX levels — 10/06/26 10:12Nota Keluaran
Auto-updated GEX levels — 10/06/26 10:30Nota Keluaran
Auto-updated GEX levels — 10/06/26 11:12Nota Keluaran
Auto-updated GEX levels — 10/06/26 11:42Nota Keluaran
Auto-updated GEX levels — 10/06/26 12:12Nota Keluaran
Auto-updated GEX levels — 10/06/26 12:42Nota Keluaran
Auto-updated GEX levels — 10/06/26 13:12Nota Keluaran
Auto-updated GEX levels — 10/06/26 13:42Nota Keluaran
Auto-updated GEX levels — 10/06/26 14:12Nota Keluaran
Auto-updated GEX levels — 10/06/26 14:42Nota Keluaran
Auto-updated GEX levels — 10/06/26 15:10Nota Keluaran
Auto-updated GEX levels — 10/07/26 09:42Nota Keluaran
Auto-updated GEX levels — 10/07/26 10:12Nota Keluaran
Auto-updated GEX levels — 10/07/26 10:32Nota Keluaran
Auto-updated GEX levels — 10/07/26 11:11Nota Keluaran
Auto-updated GEX levels — 10/07/26 12:12Nota Keluaran
Auto-updated GEX levels — 10/07/26 12:42Nota Keluaran
Auto-updated GEX levels — 10/07/26 13:12Nota Keluaran
Auto-updated GEX levels — 10/07/26 13:42Nota Keluaran
Auto-updated GEX levels — 10/07/26 14:12Nota Keluaran
Auto-updated GEX levels — 10/07/26 14:40Nota Keluaran
Auto-updated GEX levels — 10/07/26 15:12Skrip sumber terbuka
Dalam semangat TradingView sebenar, pencipta skrip ini telah menjadikannya sumber terbuka, jadi pedagang boleh menilai dan mengesahkan kefungsiannya. Terima kasih kepada penulis! Walaupuan anda boleh menggunakan secara percuma, ingat bahawa penerbitan semula kod ini tertakluk kepada Peraturan Dalaman.

Penafian
Maklumat dan penerbitan adalah tidak bertujuan, dan tidak membentuk, nasihat atau cadangan kewangan, pelaburan, dagangan atau jenis lain yang diberikan atau disahkan oleh TradingView. Baca lebih dalam Terma Penggunaan.
Skrip sumber terbuka
Dalam semangat TradingView sebenar, pencipta skrip ini telah menjadikannya sumber terbuka, jadi pedagang boleh menilai dan mengesahkan kefungsiannya. Terima kasih kepada penulis! Walaupuan anda boleh menggunakan secara percuma, ingat bahawa penerbitan semula kod ini tertakluk kepada Peraturan Dalaman.
Penafian
Maklumat dan penerbitan adalah tidak bertujuan, dan tidak membentuk, nasihat atau cadangan kewangan, pelaburan, dagangan atau jenis lain yang diberikan atau disahkan oleh TradingView. Baca lebih dalam Terma Penggunaan.