Perpustakaan

Azrael Dealer Map (SPX Pattern)This TradingView indicator plots a pre-market dealer map for SPX based on the levels described by @azrael_options.
It draws the daily expected-move envelope from a reference close and the ATM straddle (1σ budget), the halfway shelves, the reference/magnet level, and two user-defined gamma walls (typically the nearest heavy-OI round strikes). A light box highlights the session range so you can see at a glance whether price is trading inside dealer parameters or outside them.
Each morning you update four numbers: previous close (or cash-converted overnight ES reference), ATM straddle points, lower gamma wall, and upper gamma wall. The script then draws the ±1σ walls, ±0.5σ shelves, and gamma levels automatically. A close beyond the outer walls is treated as the session invalidation.
The overlay is meant to replace discretionary chart lines with the same coordinates used in the five-minute open routine: mark the gap, price the straddle as the day’s budget, plot the boundaries, and size to 1R against those fixed levels. Penunjuk

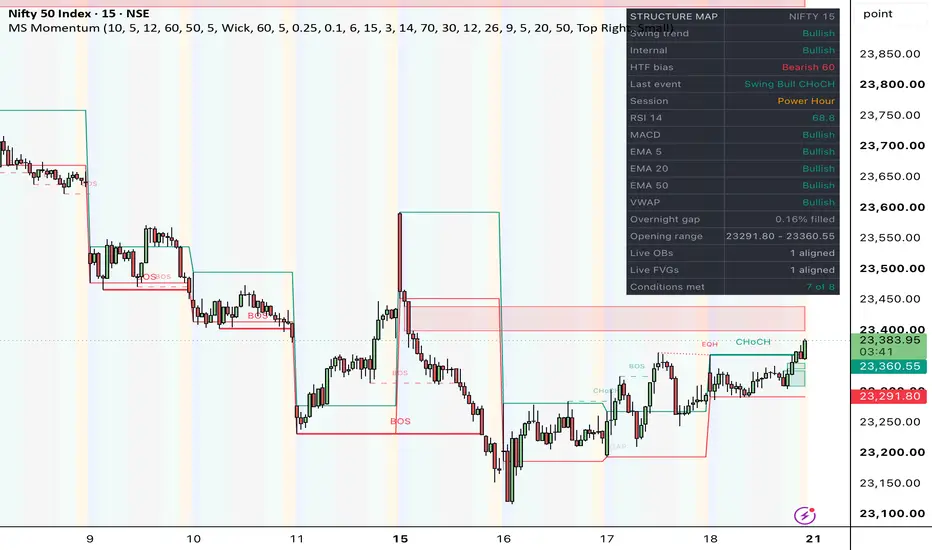
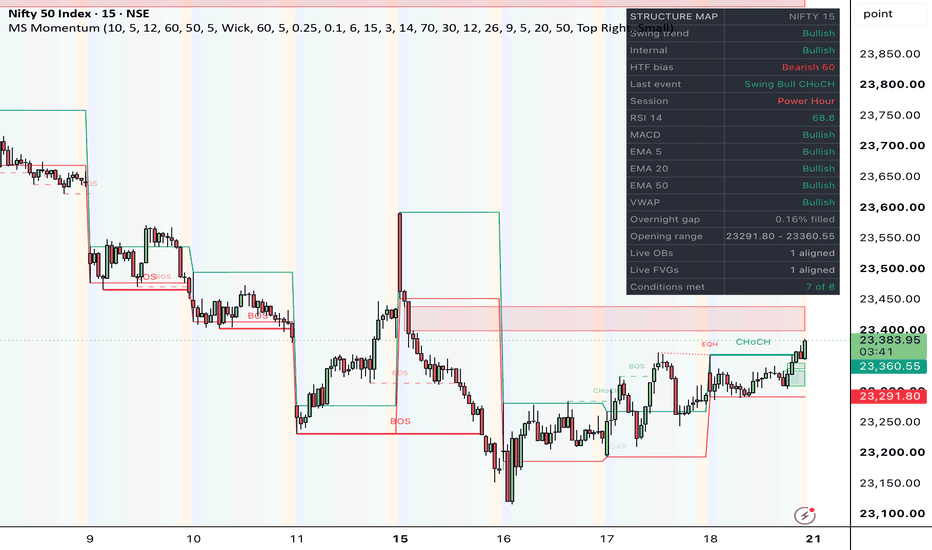
Market Structure & Momentum [India Chart School]What this does
This indicator tracks the shape of price and reports whether the rest of the chart agrees with it. It finds confirmed swing highs and lows, marks the bar that closes through one of them, and names that break as either a break of structure or a change of character. Around that core it draws the zone the break originated from, shades the part of the NSE trading day you are in, and grades the break against momentum read on the same timeframe.
How the structure engine works
Swing points are confirmed pivots found with TradingView's built-in pivot functions. A pivot high is recognised only after Swing Length bars have closed beyond it, so nothing is drawn before confirmation. Two passes run at once: a major pass at Swing Length, and a minor pass at Internal Length that describes the smaller swings inside the major ones.
When price closes through a confirmed swing point, the script labels it BOS if the break continues the prevailing direction, or CHoCH if it goes against it. CHoCH is the more informative of the two, since it is the first structural sign of a turn.
Order blocks
Rather than taking the extreme candle of the displacement leg, this script walks backwards from the breakout bar to the swing point it broke and takes the most recent candle that closed against the direction of the break. That candle's full range becomes the zone. Zones are removed on invalidation, either on a wick through the level or on a close beyond it, depending on the setting.
Fair value gaps and equal highs/lows
Fair value gaps are three-candle imbalances computed on the chart timeframe, filtered by a minimum size expressed in ATR. Equal highs and lows are consecutive swing points within an ATR-scaled tolerance, joined by a dotted line.
NSE session engine
On intraday charts the background is shaded by IST clock time into six windows: pre-open 09:00–09:15, opening drive 09:15–09:45, morning trend 09:45–11:30, lunch drift 11:30–13:30, afternoon 13:30–14:30, and power hour 14:30–15:30. Most structure tools shade London and New York hours, which describe a trading day unrelated to the NSE. The opening range high and low from the first N minutes are plotted for the rest of the session, and the overnight gap between the previous close and today's open is drawn as a zone that turns grey once filled.
Why RSI, MACD and EMAs are included
These are not signal generators here. They grade structure breaks. A change of character that fires while the higher timeframe, the EMA stack and MACD all disagree is a weaker event than the same break with all three behind it. The dashboard makes that difference visible in one place instead of requiring three additional panes. RSI, MACD and the EMAs 5/20/50 are all computed on the chart timeframe.
Dashboard
A two-column panel reporting swing trend, internal trend, higher-timeframe bias, the last structure event, the current session, RSI value with overbought/oversold tags, MACD direction, whether price sits above or below each of the three EMAs, VWAP side, overnight gap status, opening range, live order block and fair value gap counts, and a confluence count.
The confluence count
The bottom row counts how many of eight conditions currently agree with the swing trend: higher-timeframe bias, internal structure, the EMA stack, RSI side of 50, MACD, VWAP side, a live order block in direction, and whether the bar falls outside the lunch-drift window. This is a count of conditions that are true at this moment. It is not a probability, a win rate, or a forecast, and it should not be read as one. A low count usually means the chart is conflicted and there is no clean read available.
Settings worth knowing
Swing Length is the main control. Raise it on noisy charts before changing anything else. Internal structure can be switched off entirely if the chart feels crowded. Session tints, the opening range and the gap box switch themselves off above intraday timeframes, so the same script works on a daily equity chart without clutter.
Limitations
Confirmed pivots are recognised late by construction. With Swing Length at 10, a swing high is confirmed ten bars after it prints. The structure line is drawn back to where the pivot actually was, which can look like hindsight but is not, since nothing is drawn before confirmation.
In ranging markets, BOS and CHoCH alternate without much meaning. The equal-high and equal-low labels are usually the more honest reading there.
VWAP requires volume. Spot indices carry no volume on most feeds, so that row reads "no volume" and the corresponding confluence condition scores zero. Use the futures chart if VWAP matters to you.
The higher-timeframe bias is offset by one bar and requested with lookahead off. This is what prevents repainting, and it means the reading updates only when the higher-timeframe bar closes. It is the only higher-timeframe request in the script; everything else is computed on the chart timeframe.
Order block definitions vary between tools. The one used here is the last opposing candle before the move. Tools that use the extreme candle of the leg will draw different zones from identical price action. Neither definition is the correct one.
Credits
The visual language of market-structure indicators on TradingView was popularised by LuxAlgo's open-source Smart Money Concepts publication, which served as the reference for how this class of tool is presented on a chart. No code from that script is reused here — the structure engine is written from scratch on TradingView's built-in pivot functions, and the order block definition differs from that publication's approach.
Published open-source under the Mozilla Public License 2.0.
This indicator is educational. It is not investment advice, not a research recommendation, and not a solicitation to buy or sell any security. Penunjuk
Adaptive Statistical Location + Pressure Engine V1Adaptive Statistical Location + Pressure Engine — V1
ASLP describes where price sits relative to historical daily and session excursions, whether the current movement is directional or two-sided, and whether expansion is strengthening or deteriorating. When enough comparable resolved events exist, it also displays empirical first-touch outcome estimates.
Its distinguishing design combines separate upside/downside excursion distributions, independent daily/session context, non-overlapping pressure observations, and a causal event database. It keeps statistical location, movement consumption and future outcomes separate.
A high percentile describes an extended location. It does not, by itself, imply a reversal or provide a buy/sell instruction.
1. Reading the display
Teal curve: signed location relative to the selected session open.
Purple curve: signed location relative to the trading-day open.
Positive values: price is above the corresponding open; magnitude is its upper-excursion percentile.
Negative values: price is below the corresponding open; magnitude is its lower-excursion percentile. A reading of -90 means the 90th percentile of downside excursion, not the 10th percentile of a symmetric price distribution.
Zero: the corresponding open. Location is not a distance scale: a 10-point change on the pane does not mean a fixed price change.
State ribbon: green indicates expansion, darker green strong expansion, gold two-sided volatility, blue an extreme state, orange/red an exhaustion candidate, and purple reversion in progress. Gray shades represent normal, compressed or unavailable context. The ribbon's vertical position is a layout choice, not a score.
Small pane markers: circles identify extreme entries; red diamonds identify exhaustion candidates. Price-chart text and event paths are off by default.
Dashboard: Compact emphasizes location, state, pressure and the most recent event forecast. Detailed and Research expose additional diagnostics.
Curves deliberately break when their session/day reference changes or a valid estimate is unavailable. Connecting different opens would imply continuity that does not exist. The subtle daily boundary tint appears in the indicator pane.
2. What location measures
For each completed historical period, the engine stores percentage Open-to-High and Open-to-Low excursions separately. During an active period it compares the current close's displacement from that period's open with the appropriate historical distribution.
Upper location = 100 × fraction of matched historical upper excursions less than or equal to the current upward displacement.
Lower location = 100 × fraction of matched historical lower excursions less than or equal to the current downward displacement.
For example, an upper reading of 90 means the current upward displacement equals or exceeds 90% of sampled historical upper excursions. It does not mean a 90% chance of continuation or reversal. Finite-sample readings can reach 100 without imposing a price ceiling.
Movement matching uses weekday, session, completed-day volatility regime and previous completed-period state where supported, then relaxes conditioning when samples are sparse. The selected historical distributions are frozen at the start of the active period.
Default location regions
Below 25: Central.
25 to below 75: Normal.
75 to below 90: Stretch.
90 to below 95: Extreme.
95 and above: Tail.
The direction is reported separately as Upper or Lower. These are empirical descriptive regions, not fair-value estimates. Daily and session location use independent opens and distributions; a stretched session can coexist with a normal daily reading. Benchmarks are completed-period distributions, not same-minute-of-session distributions, so an early session can naturally look compressed.
3. Range, efficiency and pressure
Range percentile: ranks the active High-Low range against historical completed ranges. It measures total movement, not where the close sits.
Consumption: current range divided by historical Q50, Q75 or Q90 range. Consumption above 100% means that historical quantile has been exceeded; it does not mean price has exhausted a fixed allowance.
Directional efficiency: abs(Close-Open)/(High-Low). High values indicate net displacement accounts for much of the observed range.
Close Location Value: ((Close-Low)-(High-Close))/(High-Low). Its -1 to +1 scale identifies where the close sits inside the active range. A separate direction-adjusted close rank evaluates proximity to the movement's own extreme.
Marginal progress: over completed non-overlapping blocks, the engine divides signed close progress by incremental range, with a denominator floor of 0.05 × frozen Q50 by default. This limits instability when range barely grows. The value can exceed 1 and is not a probability.
Marginal progress is ranked against historical blocks from the same session and elapsed-age bucket. The direction must remain consistent across the block. Default blocks are 30 minutes.
Pressure categories
Strengthening: efficiency and direction-adjusted close ranks are at least the 75th percentile, marginal progress rank is at least the 50th percentile, signed progress is positive, and price extends the directional extreme.
Weakening: efficiency declines, price retreats from the directional extreme, and either marginal rank is at or below the 25th percentile or signed progress is negative.
Stable: a rated block meets neither condition.
Unrated: insufficient valid block history. This is not evidence of stable pressure.
Pressure reflects completed blocks and can remain unchanged between them. Efficiency and close ranks use completed-period benchmarks; they are descriptive comparisons, not calibrated future-outcome probabilities.
4. State and exhaustion logic
Compressed so far: range percentile is below the Central boundary. This does not predict that the completed session will remain compressed.
Directional expansion: range percentile reaches the Stretch threshold, while efficiency and directed-close ranks both reach 75.
Strong expansion: directional expansion plus strengthening pressure.
Two-sided volatility: range reaches the Stretch threshold while efficiency rank is 25 or lower.
Statistical extreme: location reaches the Extreme threshold when a higher-priority state does not apply.
Exhaustion candidate: the same direction previously expanded during this session, location remains extreme, range reaches the Stretch threshold, and pressure weakens.
Reversion in progress: after an exhaustion candidate, price crosses the session open in the opposing direction.
States follow an explicit precedence rather than displaying overlapping categories. Exhaustion requires deterioration after expansion. The separate toward-open event outcome below can occur before any cross of the session open.
5. Empirical first-touch outcomes
Eligible observations come from expansion, extreme-entry and post-expansion weakening states. Their forecasts and barriers are frozen at the confirmed entry close. Observation starts on the following candle.
With default settings, an event records which of these happens first:
Continuation first (C): price travels another 0.25 × frozen session Q50 in the event direction.
Toward-open first (R): price travels 0.35 × Q50 against that direction, capped at the distance back to the session open. R means a retracement toward the open, not necessarily a full trend reversal.
Timeout: neither barrier is reached within 120 minutes or before the source session ends, whichever comes first.
Ambiguous: both barriers are touched in the same candle and OHLC cannot establish their order. If the candle opens beyond a barrier, that known first observation is used; otherwise the event remains a separate ambiguous class.
Invalid/gapped observations can be censored and excluded from outcome training. There is one pending event across the engine at a time. Each session instance can admit each direction/family combination only once, with optional admission at completed-block checkpoints. This prevents repeatedly labeling every candle of one sustained condition.
The dashboard percentages belong to the timestamped last admitted event. They are not continuously recalculated predictions for the latest candle. Compact shows C and R; Detailed also shows Timeout and Ambiguous. The four classes sum to 100% before display rounding.
6. Samples, fallback and uncertainty
A forecast requires at least 40 resolved events in its selected bucket by default. Total learned events can be much larger than the number matching a particular state.
Core matching uses session, location and pressure, while always preserving direction, elapsed-age bucket and event family. Fallback progressively removes session, pressure and location. The optional broadest fallback also pools event families while retaining direction and age. Such estimates are explicitly labeled broad/pooled; they are not precise forecasts for one narrow state.
When at least 20 records exist in the broader parent group outside the selected bucket, estimates are shrunk toward that disjoint group's frequencies. The default prior weight is 20. Otherwise raw frequencies are used. Prior weight never increases the reported observed sample count.
Optional regime, weekday or previous-state refinement is selected only when supported by paired historical forecast errors: at least 60 evaluations and mean Brier improvement greater than 2.4 estimated standard errors. Only one additional feature is selected at a time. This is a practical screening rule, not proof that a feature will remain useful.
Reliability labels follow explicit rules:
Insufficient: fewer observations than Minimum outcome bucket n.
Low / broad fallback: location-only, family-base or pooled-family matching.
Moderate: a more specific bucket with at least 80 events and maximum raw class-wise Wilson interval width no greater than 22 percentage points.
Good (nominal): a more specific bucket with at least 160 events and maximum interval width no greater than 16 percentage points.
Low: other supported forecasts.
Research mode reports raw 95% Wilson intervals for C and R. These are nominal binomial intervals around unshrunk class frequencies, not posterior intervals around the displayed shrunk probabilities. Serial dependence and market change can make actual uncertainty larger.
7. Setup and daily/session timing
Use standard time-based candles on a positive-priced instrument. Start with 5-minute or 15-minute charts. The script accepts 1–30 minutes; pressure blocks and outcome horizons must be exact multiples of the selected timeframe.
Leave Daily reset reference at Symbol trading day to follow the data feed's daily-bar boundaries. Use Custom timezone boundary only when a different analytical day is intended. DAY START shows the active anchor and its timezone.
Configure sessions to match available trading hours. Session candles must not straddle configured boundaries. Each session's IANA timezone handles its own daylight-saving changes; changing the chart's display timezone does not redefine these sessions.
For 24/7 crypto, enable Include weekends. Defaults exclude weekends.
Wait for movement and event warm-up. Start with Compact, then use Detailed to inspect consumption and Research to inspect forecast evidence.
Default independent session windows:
Asia: 09:00–17:00, Asia/Tokyo.
London: 08:00–12:00, Europe/London.
London/NY overlap: 12:00–16:00, Europe/London.
New York: 09:00–15:00, America/New_York.
NY PM: 15:00–17:00, America/New_York; disabled by default.
These are configurable analytical windows, not universal exchange definitions. The overlap window is London-timed and does not automatically recalculate the true intersection of London and New York hours during differing DST transition weeks. Auto priority selects the highest-numbered enabled active session: NY PM, New York, overlap, London, then Asia. Independent session statistics continue to update, but event admission follows the focus session.
8. Parameter guide
Sampling: completed session/day/block caps default to 1200/500/2400. Minimum distribution n is 30. These caps bound retained records, not how much data TradingView loads. Completed-day regime mean length defaults to 10; the period-range data guard is 50%. Regime and previous-state movement conditioning are enabled.
Daily gap treatment: Observed feed permits maintenance closures inside daily aggregation. Strict contiguous rejects gaps. The default cannot distinguish planned closures from missing data; analytical sessions, pressure blocks and outcome labels still apply gap checks.
Location / pressure: Central/Stretch/Extreme/Tail boundaries default to 25/75/90/95. Pressure blocks default to 30 minutes; the marginal denominator floor is 0.05 × Q50. These thresholds are explicit model choices, not statistically optimized constants.
Outcome storage and support: retain up to 1200 resolved events; minimum bucket size 40; prior strength 20. Pooled-family fallback and completed-block checkpoint admission are enabled by default.
Outcome definition: horizon 120 minutes, continuation distance 0.25 × Q50, toward-open distance 0.35 × Q50, minimum entry displacement 0.10 × Q50. Changing these settings changes the question being estimated and rebuilds the historical labels.
Optional feature gate: enabled by default; paired evaluation window 200 and minimum evaluations 60. Turning it off uses the core/fallback model rather than forcing every optional feature into conditioning.
Probability alerts: default threshold 60%. These can fire only on a newly admitted event with sufficient empirical support.
Display: Compact, Detailed or Research; Light/Dark theme; Small/Normal/Large font. Dashboard, historical location and state ribbon are enabled by default. Price labels, nearest-level tags, active price zone and event paths are optional.
Label controls: text on price requires the master Research: allow text labels on price switch plus the relevant marker/path option. Marker cap defaults to 100; event-path retention defaults to 70. These affect drawing retention, not learning.
Historical research / audit: defaults to the last 300 eligible resolved observations. Entry-from and resolution-through timestamps filter audit inclusion, not the underlying training history. The audit table appears only in Research mode. Session-reset dots can be enabled independently.
9. Historical evaluation and alerts
Research mode compares forecasts frozen at entry with later first-touch outcomes. It reports model and broader-base Brier loss on the same supported events, Brier skill, most-likely-class accuracy, and mean predicted versus observed R frequency. Lower Brier loss is better. Zero skill means no improvement over the baseline; negative skill means worse performance. This is a forecast-quality audit, not a trading strategy backtest: it has no entries/exits, costs, slippage or portfolio P&L.
Supported historical entry forecasts, barrier prices and entry/result timestamps are available in the Data Window. Use the entry timestamp to associate an outcome with its original forecast. Unscored warm-up observations are not retroactively assigned predictions using later data.
Available alerts cover upper/lower extreme entry, strong expansion, weakening pressure, upper/lower exhaustion candidates, empirical C/R thresholds, and resolved C/R outcomes. Configure alerts for Once Per Bar Close. Statistical alerts describe observed conditions or empirical event forecasts; they are not order instructions.
10. Training and limitations
State changes use confirmed chart bars. Resolved outcomes enter training only on a later bar, never while their future outcome is unknown.
Training is reconstructed from the chart data available on each execution. There is no persistent external model, imported pretrained weights, or hidden additional intraday history.
A historical lookup buffer is different from the total number of executed chart bars. Increasing record caps cannot manufacture older candles or independent events.
Session coverage, symbol feed, chart timeframe and loaded start date affect samples and results. Some instruments cannot supply complete coverage for the default sessions.
Incomplete starting periods and invalid observations are excluded where applicable. Missing estimates remain unavailable instead of being filled with invented values.
No lower-timeframe reconstruction is used to resolve within-candle ordering. Ambiguous outcomes remain visible as their own class.
Changing parameters, chart history or feed data rebuilds the study and can change results. Confirmed-bar processing does not make the study invariant to those changes.
Adjacent events can remain dependent despite de-duplication. Small samples, feature selection and changing market structure limit inference. No predictive advantage or profitability is claimed.
Author and license
V1 is the first public release by uPaSKaL. Source code is distributed under the Mozilla Public License 2.0. Penunjuk

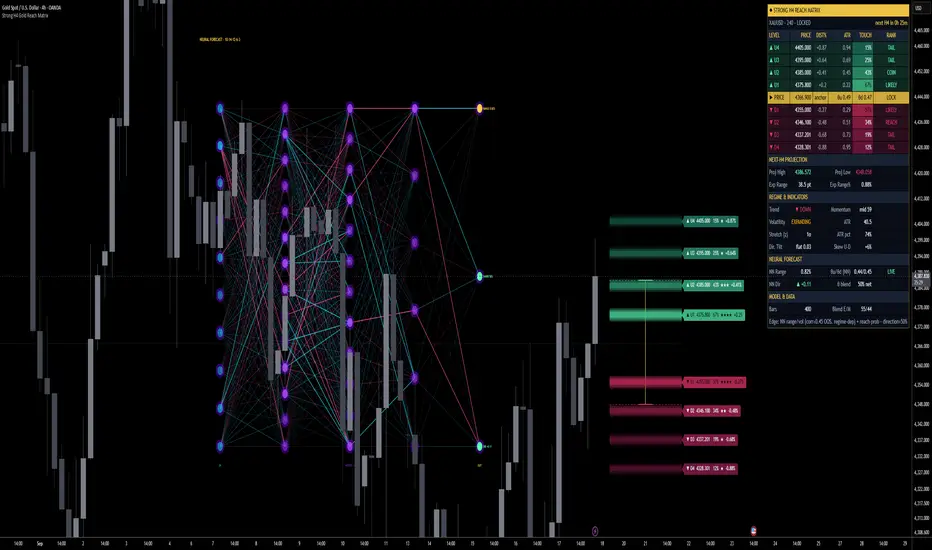
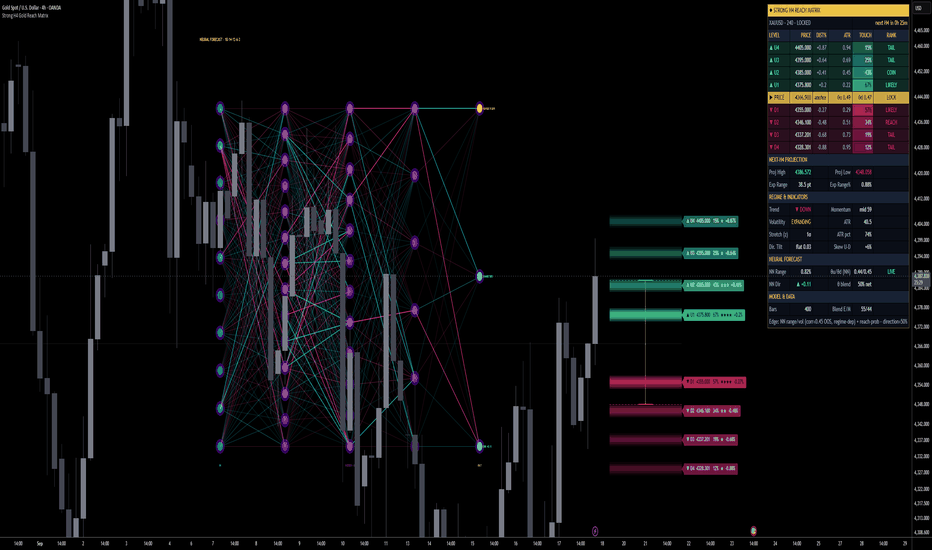
Strong H4 Gold Reach Matrix | ProjectSyndicateStrong H4 Reach Matrix Gold answers the one question a discretionary gold trader asks before every H4 bar: where is the next candle likely to trade, and with what odds? It is not a restyled oscillator with an arrow bolted on. It projects the next H4 candle as eight distinct price levels — four above, four below — each carrying a calibrated touch probability, placed by a live volatility-scaled excursion model, cross-checked against the raw empirical behaviour of your own chart, and sharpened by a genuine neural network whose weights were trained offline on XAUUSD H4 and whose forward pass runs live on every bar. The whole network is drawn on the chart as an inspectable diagram, and the projection freezes at each close so it never repaints. You are shown the odds, the model that produced them, and the assumptions behind them — not a single line that quietly redraws as the bar plays out.
⚠️ Gold H4 Only!!! networks was trained on gold H4 data.
🎯 Reach Engine — the core idea. For each new H4 bar the script asks how far price is likely to stretch from the last close, up and down, and converts that into probabilities. The excursion of a bar beyond the prior close, measured in ATR, follows an approximately exponential survival law: the chance of reaching a distance of k·ATR is close to e^(−k/θ), where θ is the typical (mean) ATR-excursion estimated live from a rolling window. Invert it — k = −θ·ln(p) — and any target probability p maps to a precise distance. Four upside and four downside probability targets therefore become eight price levels, each an honest "odds of touching this in the next bar" rather than a round-number guess.
📊 Empirical Survival Cross-Check. A pure model can be elegant and still wrong for the instrument in front of you, so the engine never trusts the formula alone. On every bar it walks the last N completed bars and directly counts how often price actually reached each of the eight thresholds — the raw empirical survival curve of your chart — and blends that with the smooth exponential tail (55/45 by default, fully adjustable from pure-empirical to pure-model). The displayed percentage is this blended, calibrated figure, not the target you dialled in.
🧠 Neural Core. Sitting on top of the statistical engine is a real multi-layer perceptron — 10 inputs, three hidden layers of 14, 12 and 6 tanh neurons, and three linear outputs, for 398 trained weights and 35 biases. It was trained offline by backpropagation on XAUUSD H4 history; the learned matrices are embedded directly in the script, and the on-chart forward pass — weighted sums, biases and tanh activations, layer by layer — reproduces the trained model exactly. Nothing is trained on your chart, so the mapping is fixed and deterministic. Its lifecycle each bar is FEATURE ▸ STANDARDISE ▸ FORWARD ▸ APPLY: the network predicts the next bar's range, its up/down split and its direction, and those outputs feed straight back into the projection — the range forecast sharpens θ (and therefore the spacing of all eight levels and the expected-range box), the split skews the up-vs-down odds, and the direction feeds the secondary tilt.
🔢 Feature Anatomy. The fingerprint is ten causal, percentage-based ingredients read only from completed bars: 5-bar momentum, stochastic range position (14), RSI(14), 5-bar average range %, 5-bar average body %, a short-vs-medium momentum acceleration, ATR %, the ATR(14)/ATR(50) volatility-regime ratio, distance from the EMA(20) expressed in ATR units, and a volume ratio. Working in ratio and percentage space rather than raw price is what lets a single learned mapping run on a market that travelled from the 2,000s into the 4,000s without the price level itself swamping the signal.
📐 Fixed Standardisation — deliberately, not by accident. Each feature is standardised against baked-in training statistics rather than a rolling window. This is a considered choice: the forecastable part of next-bar behaviour lives in the level of volatility, and rolling z-scoring silently erases exactly that level. Standardising against the training distribution preserves it, so the network can actually respond to whether the market is calm or violent right now.
🧊 Frozen at the Close — non-repaint by default. Every input is read from candles that have already closed, and the projection is anchored to the last completed H4 close. The eight levels, their probabilities, the expected-range box and the network's outputs are computed once when the bar opens and stay fixed until it closes — no sliding lines, no intrabar drift, no numbers that quietly improve as the session plays out. A "Live price (intrabar)" anchor is available for those who explicitly want a conditional, moving read.
🧭 No-Lookahead. Every network feature is lagged to the last closed bar and every excursion statistic is causal, so the value printed on any historical bar is identical whether or not the bars after it exist. On-chart machine learning most often fails here; this is built to avoid it.
🧱 Structural Snap + Minimum Spacing. Levels can optionally seat themselves on nearby swing-pivot liquidity or round numbers when one lies within tolerance, so they sit where price actually reacts rather than at arbitrary decimals — and probabilities recompute from the snapped distance. A hard minimum-spacing floor then guarantees the eight levels never glue together near the anchor or after snapping; each is separated from its neighbour by a set fraction of ATR, so every level is distinct and every probability is meaningful.
🧭 Directional Tilt — secondary by design. A small continuation tilt from trend (EMA20/50), momentum (RSI), short-horizon velocity and the network's own direction output shifts the up-vs-down odds. It is deliberately mild and clearly labelled: next-bar direction on gold is close to a coin flip, and the tool treats it that way rather than dressing it up as a signal.
🕸️ Live Network Map. The model is not a black box. The full network is drawn on the chart — an input column tagged with each feature, three hidden columns and an output column carrying RANGE, UP-SHARE and DIRECTION — with every node shaded by its live activation and every connection coloured by weight sign and brightened by the signal actually passing through it. Placement is deterministic (a bars-back offset that drops it cleanly into view, or out past the projection), so it renders exactly where you put it and never wanders off-screen.
📋 Dashboard. A compact panel reports, in real time: symbol/timeframe and lock state, the anchor close, the full 4×4 ladder (price, distance %, distance in ATR, calibrated touch %, and a PRIME/LIKELY/COIN/REACH/TAIL rank per level), the projected High/Low/expected range, a regime read (trend, momentum, volatility state, ATR percentile, stretch, tilt), and a dedicated Neural Forecast block showing the network's range output, its θ contribution, its direction call and the blend weight — with a standing one-line note on where the edge actually is.
🎚️ Controls. The history window and volatility length, the four probability bands, the minimum spacing, the empirical/model blend, the tilt weights, the snap behaviour, the network blend weights, and every visual element — beams, labels, projected candle, the network map's placement, size, connector style and theme, and the dashboard — are all adjustable. None of them change the trained model; they change how you read it.
🎯 Why this is different. Most "AI" indicators restyle an oscillator; most that claim a neural network never show one. This runs an actual trained MLP, draws it live, standardises its inputs so there is no lookahead, freezes each projection at the close so it cannot repaint, cross-checks its probabilities against your own chart's realised behaviour, and states plainly where its edge is and is not.
🚀 Where to use it. The model and calibration were built specifically for XAUUSD on the H4 timeframe, and that is where it is designed to run; the dashboard flags any mismatch. The first bars of a chart are a warm-up while the causal windows fill, after which the projection and dashboard come alive.
🎯 How to trade it
Apply it to XAUUSD H4 and let the windows warm up until the dashboard reads a live projection.
At each new H4 candle, read the eight levels and their calibrated touch probabilities — locked at the open, they will not move. Treat the PRIME/LIKELY levels as high-odds reach zones and the COIN/REACH/TAIL levels as progressively lower-odds stretches.
Use the expected-range box and projected High/Low as context for where the bar may reach — a reference for targets, fades and stop placement — not as an automatic entry.
Glance at the network map and the Neural Forecast block to see whether the model reads the coming bar as expansion or contraction, and whether volatility is being sharpened up or down.
Combine it with your own structure, levels and risk. It describes a likely next-bar envelope with odds; it is not an entry-and-exit system on its own.
⚠️ Important. This is a decision-support tool, not a standalone buy/sell system, and it makes no performance guarantees. Its honest edges are reach probability and volatility, not direction. In leakage-free testing the calibrated bands held up out-of-sample — target reach rates of roughly 85 / 65 / 45 / 25 % realised at about 83–87 / 64–70 / 44–49 / 23–25 % — and next-bar range correlates with current volatility at around 0.57. That range signal is real but regime-dependent: it is strong in trending/clustered-volatility periods and can fall close to zero in quiet stretches (in recent-quarter testing it did exactly that), and the network's out-of-sample range correlation of roughly 0.44 reflects the same regime dependence. Next-bar direction is treated as a coin flip because that is what it is — the up/down split stays near-symmetric and the tilt is a small adjustment, never a signal. The model is fixed and pre-trained, so bars inside its training period are in-sample by nature; genuine out-of-sample behaviour is what you see going forward. It is deliberately a modest network — larger nets overfit this much H4 data and test worse. Always let the candle open so the projection is frozen, and test it on your own data before trading it live.
Penunjuk
RSI Signals EntriesRSI Signals Entries — Publish Description
What This Indicator Is
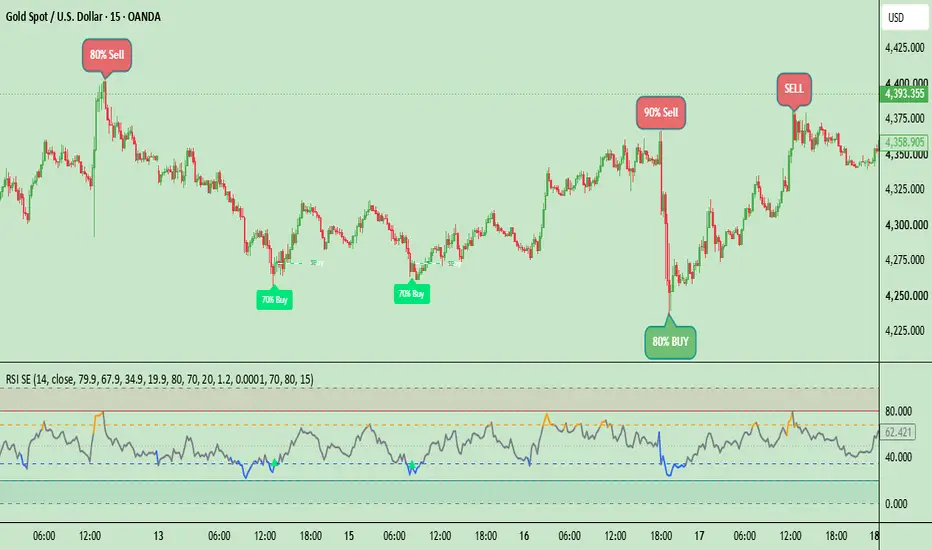
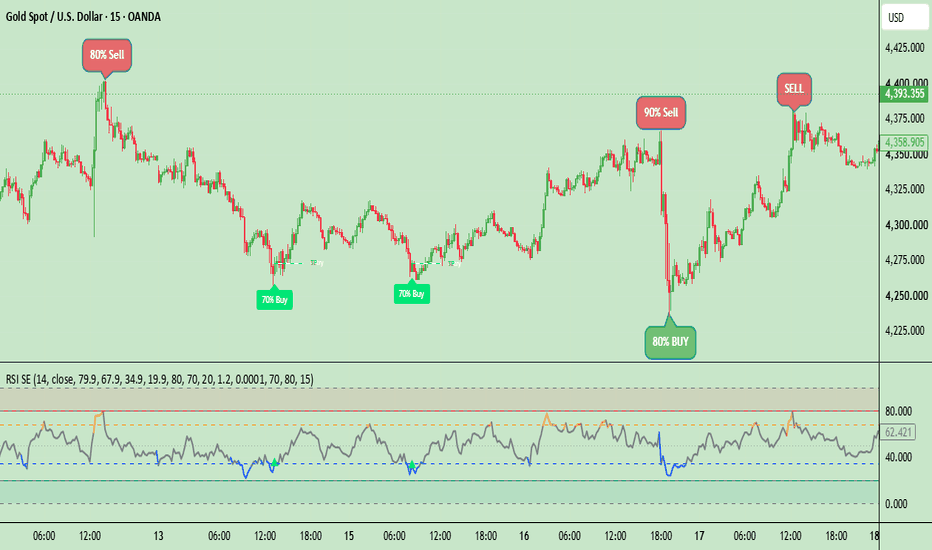
RSI Signals Entries is a four-level Relative Strength Index (RSI) tool built to turn the classic overbought/oversold RSI reading into a clear, actionable signal system. Instead of a plain single-line RSI, it plots a colour-coded RSI with four defined levels — Over Buy, Resistance, Support, and Over Sold — and automatically marks potential Sell and Buy opportunities both on the RSI pane itself and directly on the price candles, together with a fixed confidence "Strength %" label for every signal.
Why It Was Built
Reading raw RSI values and deciding when a reading is "extreme enough" to act on is subjective and inconsistent from one trader to another. This script removes that guesswork by defining four fixed levels up front and applying two distinct, repeatable rules on top of them: a pure RSI-extreme rule for the strongest, highest-confidence reversals, and a level-plus-candle-confirmation rule for slightly less extreme readings that still show real rejection at a key zone. Every signal is labelled with the same fixed strength value every time it appears, so the trader always knows which of the two rules produced it.
How It Works
The four RSI levels
Over Buy: 79.90
Resistance: 67.90
Support: 34.90
Over Sold: 19.90
The RSI line itself changes colour depending on which zone it is currently in (Over Buy, Resistance, neutral, Support, or Over Sold), so the current market condition is visible at a glance without reading the exact number.
The strong-candle filter
A candle only counts as "strong" when its body (the distance between open and close, not counting wicks) is at least a chosen multiple of the average candle body size over a recent lookback period. This stops the indicator from reacting to small, indecisive candles.
The two signal rules
Extreme rule (Over Buy / Over Sold): whenever RSI reaches the Over Buy or Over Sold level, a signal fires immediately with a fixed Strength of 80%. No candle confirmation is required, because the RSI reading itself is already at its most extreme.
Zone-confirmation rule (Resistance / Support): whenever RSI is sitting inside the Resistance zone (between Resistance and Over Buy) or the Support zone (between Over Sold and Support) and a strong candle closes in the reversal direction, a signal fires with a fixed Strength of 70%. This rule needs the extra candle confirmation because the RSI reading on its own is not yet at a true extreme.
Every signal is plotted twice: once on the RSI pane at the exact RSI value where it fired, and once on the price chart directly above or below the triggering candle, so the same event can be read from either view. Each chart-side signal also draws an Entry line, a Stop-Loss line, and a Take-Profit line at a configurable pip distance, so the trade plan is visible the moment the signal appears.
Step-by-Step: How to Take Each Entry
1. Over Buy entry (Sell, 80% strength)
Watch the RSI line rise into the Over Buy zone (79.90 and above).
The moment RSI reaches this level, a red downward triangle appears both on the RSI pane and above the corresponding candle on the price chart, labelled "80% Sell".
Enter a Sell position at or near the close of that candle.
Use the auto-plotted Entry / Stop-Loss / Take-Profit lines as your reference levels, or set your own stop just above the recent swing high and your target using your own risk-reward preference.
2. Resistance entry (Sell, 70% strength)
Watch the RSI line move up into the Resistance zone (between 67.90 and 79.90), without yet reaching Over Buy.
Wait for a strong bearish candle to close while RSI is still inside this zone — this is the rejection confirmation the rule requires.
Once that candle closes, a red downward triangle appears on both the RSI pane and the price chart, labelled "70% Sell".
Enter a Sell position at or near the close of that confirming candle, using the plotted Entry / Stop-Loss / Take-Profit lines as your reference.
3. Over Sold entry (Buy, 80% strength)
Watch the RSI line fall into the Over Sold zone (19.90 and below).
The moment RSI reaches this level, a green upward triangle appears both on the RSI pane and below the corresponding candle on the price chart, labelled "80% Buy".
Enter a Buy position at or near the close of that candle, using the plotted Entry / Stop-Loss / Take-Profit lines as your reference.
4. Support entry (Buy, 70% strength)
Watch the RSI line move down into the Support zone (between 19.90 and 34.90), without yet reaching Over Sold.
Wait for a strong bullish candle to close while RSI is still inside this zone — this is the rejection confirmation the rule requires.
Once that candle closes, a green upward triangle appears on both the RSI pane and the price chart, labelled "70% Buy".
Enter a Buy position at or near the close of that confirming candle, using the plotted Entry / Stop-Loss / Take-Profit lines as your reference.
Settings Worth Knowing Before Use
All four RSI levels, the RSI length and source, the strong-candle lookback and multiplier, the two fixed strength percentages, the pip size, and the Stop-Loss/Take-Profit pip distances are all adjustable from the indicator's settings panel to suit different instruments and trading styles.
The indicator calculates on any timeframe, but the default settings are tuned for fast, short-term signals on 1-minute and 5-minute charts. On higher timeframes, the pip-based Stop-Loss/Take-Profit distances should be widened accordingly.
"Wait for Candle Close" is enabled by default so that every signal shown is fully confirmed and will not repaint; disabling it produces faster but less reliable real-time signals.
Disclaimer
This indicator is a technical analysis tool and does not constitute financial advice. The Strength % values are fixed confidence labels describing which internal rule produced a given signal, not a statistical win-rate or a guarantee of outcome. All trading involves risk, and past performance of any signal or pattern does not guarantee future results. Always use proper risk management and combine this tool with your own analysis before entering any trade.
Original Script Declaration
Script Name: RSI Signals Entries
Author: Michael_Fx_Trader
Publisher: Michael_Fx_Trader
Rights: © Michael_Fx_Trader. All rights reserved.
Originality Statement: This is an original work, designed and coded from scratch by Michael_Fx_Trader. The 4-level colored RSI zone engine, the zone-entry armed/fired signal state machine, the fixed-confidence Strength % labeling system, the dual chart + RSI-pane signal display, and the pip-based Entry / Stop-Loss / Take-Profit level drawing engine were all independently conceived and implemented for this publication. No proprietary source code, private scripts, or copyrighted material belonging to any other author has been copied, mashed-up, or reused in any part of this script.
Author Verification / Declaration: I, Michael_Fx_Trader, am the sole author and publisher of this script. I hold full authorship rights over its source code, its underlying logic, and its visual presentation. The Relative Strength Index (RSI) itself is a well-known, generic public-domain technical indicator (J. Welles Wilder) and is not owned by any individual author; only the zone/signal/labeling logic built around it here is original to this script. Penunjuk
Historical Context LevelsHistorical Context Levels displays supplied distributions of high, low and finishing moves as reference levels on a compatible chart. It separates the research sample from chart placement: change the anchor to translate the levels, while keeping their sample counts unchanged.
The indicator does not discover patterns or calculate conditional history from TradingView bars. It reads an explicitly supplied data snapshot. The default demonstration uses ten invented observations and is marked SYNTHETIC DEMO; it is provided so anyone can explore the controls without an account or external data purchase.
Inputs and use
Choose Synthetic demo to explore the example. For your own research, choose Imported data and paste compatible MLV4 or MLV5 text into Research data. Set the chart anchor and check the product and source information. US500 data requires a chart quoted in compatible index points; an ETF price is not interchangeable. The recognised product families are US500, AUS200, UK100, BTC and VIX. Recognition does not eliminate provider basis differences.
The three layers measure different things:
- HIGH: proportion of supplied observations whose high was at or above the offset.
- LOW: proportion whose low was at or below the offset.
- EDGE: proportion whose finish was at or above a nonnegative offset, or at or below a negative offset. At zero both inclusive counts are displayed.
These are frequencies from the supplied sample, not estimated future touch probabilities. A finish is different from an intraday excursion. Source window, anchor and filter definitions must be read alongside any percentage.
Select Levels to see each observation or five supplied percentile placements. Compact labels combine nearby text while retaining the individual lines. Hover to inspect individual values and counts. MLV5 adds Profile and Levels + Profile: these show sample frequencies in bands, not volume or cumulative reach.
Worked synthetic example
The ten demonstration offsets are -20, -10, 0, 10, 20, 30, 40, 50, 60 and 70 points. Seven finish at or above +10, so the +10 level displays 70%. Two finish at or below -10, so the -10 level displays 20%. The demo reference is 7,633; changing it does not change the observations or these fractions.
Distinct functionality
The renderer carries separate sample sizes and inclusive counts for high, low and finishing distributions, explicit source references, product-scale checks and frequency profiles. It supports re-anchoring and dense-label grouping without changing supplied statistics. Its role is transparent display of externally prepared research, not a conventional price-derived indicator.
Limitations
Inputs are author-supplied and not independently authenticated. Structural validation cannot prove that research conditions, sample counts or outcomes are correct. Data does not refresh automatically. Replacing the data does not replace the chart anchor or display settings. Displayed chart prices are tick-rounded; counts refer to original offsets. Lines extend from the latest bar, and optional backward extension does not mean the information was available on earlier bars. There is no strategy backtest or automated trading functionality. Profiles require MLV5. Range-width payloads are unsupported.
Before using real research, specify its instrument, sample window, outcome period, reference and conditions. Historical observations do not guarantee future outcomes.
Penunjuk

Day/Session Separator for TTWTTW — Session Ranges, Opens & Border Suite
Overview
Introducing TTW, an all-in-one session and range-mapping toolkit built on ICT-style concepts such as Killzones, CBDR, the Asian Range, and Flout, alongside key opening price references. Rather than stacking several separate scripts on your chart, TTW consolidates the session structure most day-to-day price action traders reference into a single, configurable indicator.
Features
Session Highlighting — Toggle background highlighting and vertical session boundary lines for London, New York, London Close, PM, Asia, and a fully custom "Free Session," each with independently adjustable start/end times and colors.
Session High/Low Border Lines (Asia, London, NY) — Draws a running high line, low line, and optional range fill for the Asia, London, and New York sessions using a robust hour-based session engine, so each session's range is fully self-contained and never bleeds into the next day's session across the midnight boundary. Colors, line width, and fill are shared across all three sessions so they read as one congruent system.
CBDR, Asia & Flout Range Boxes — Auto-plots the high/low box for the Central Bank Dealer's Range, Asian Range, and Flout, each with optional text labels and up to 4 standard deviation projection lines (upside only, downside only, or both directions).
Auto Standard Deviation Table — An optional table compares the CBDR and Asian Range pip counts on forex pairs and recommends which range's standard deviation projections are best suited for the session, based on typical range-size thresholds.
Opening Price Lines — Plots Midnight, New York, Equities, and Afternoon opening price levels, each with an optional label showing the time or a custom description, with price values shown or hidden.
HTF Weekly & Monthly Opens — Displays the current week's and month's opening price as a horizontal reference line with an optional label.
Historical Session Control — Choose to display only today's sessions, the current week's sessions, or the last four weeks of sessions, with automatic cleanup of older drawing objects to keep the chart light.
Day-of-Week Labels — Optional labels marking each day of the week at a chosen hour and chart location.
Bias & Notes Tables — Optional, fully customizable tables for logging directional bias on key correlated markets and freeform session notes, positionable anywhere on the chart.
Global Timezone Selection — All sessions, opens, and labels shift together based on a single timezone input covering all standard UTC offsets, so the whole indicator stays aligned regardless of your exchange's default timezone.
Auto-Interval Guard — Automatically hides session/box drawing above a configurable timeframe so the chart doesn't become cluttered on higher timeframes. Penunjuk

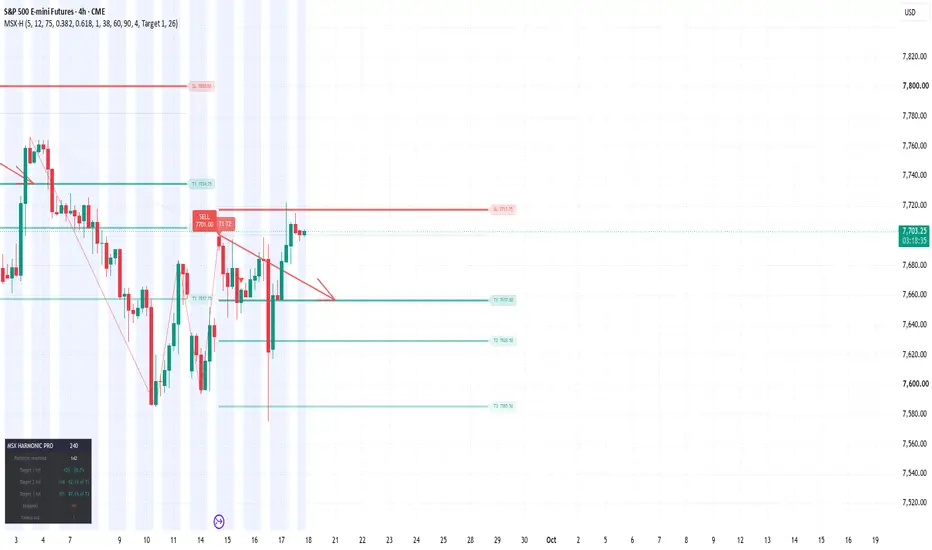
MSX Harmonic ProMSX HARMONIC PRO — XABCD Pattern Detection with Scored Entries and 3 Targets
OVERVIEW
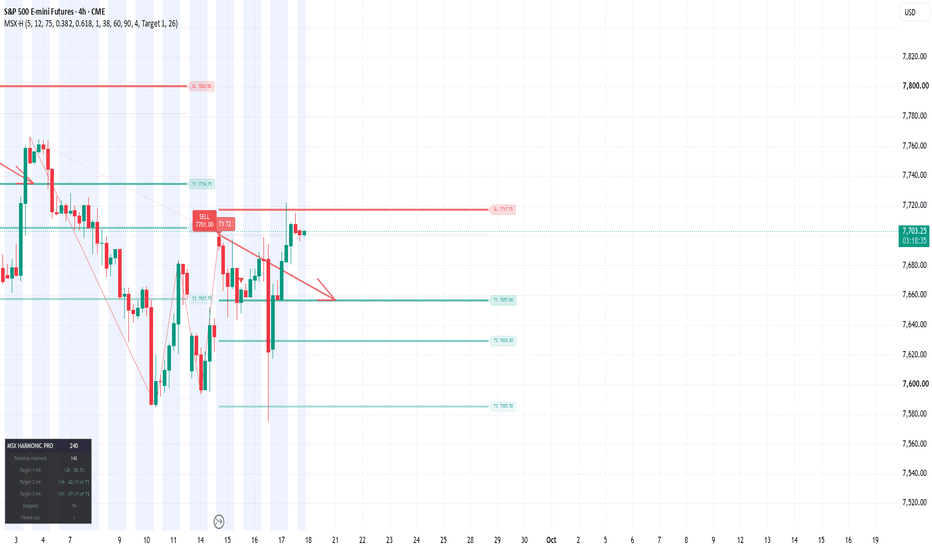
MSX Harmonic Pro detects five-point XABCD harmonic patterns, scores each one on how closely its legs match the ideal Fibonacci proportions, and projects a complete trade plan from the completion point: entry, stop loss, and three take-profit levels drawn as horizontal price lines.
Every pattern is then tracked to resolution. The stats table reports the measured hit rate for each target on your symbol and timeframe — not a claimed rate, but what actually happened on the chart in front of you.
Nothing else is plotted. No moving averages, no oscillators, no bands, no fills.
HOW IT WORKS
PIVOT LADDER Swing highs and lows are detected with a configurable pivot length and pushed into an alternating ladder. When two consecutive pivots are the same type, only the more extreme one is retained, so the X-A-B-C-D sequence always alternates direction and never collapses into noise.
PATTERN MATCHING Each new five-pivot sequence is measured against six harmonic types:
Gartley AB/XA 0.618 · BC/AB 0.382-0.886 · CD/BC 1.13-1.618 · AD/XA 0.786 Bat AB/XA 0.382-0.5 · BC/AB 0.382-0.886 · CD/BC 1.618-2.618 · AD/XA 0.886 Butterfly AB/XA 0.786 · BC/AB 0.382-0.886 · CD/BC 1.618-2.24 · AD/XA 1.27-1.618 Crab AB/XA 0.382-0.618 · BC/AB 0.382-0.886 · CD/BC 2.618-3.618 · AD/XA 1.618 Shark AB/XA 0.382-0.618 · BC/AB 1.13-1.618 · CD/XC 0.886 Cypher AB/XA 0.382-0.618 · BC/AB 1.13-1.414 · CD/XC 0.786
Ratios defined as a single value are scored by proportional distance from that value. Ratios defined as a range score zero error anywhere inside the range and are penalised only for how far outside it they fall. The four leg errors are averaged and converted to a 0-100 score, where 100 is a geometrically perfect pattern. The best-scoring type wins the sequence; patterns below your minimum score are discarded and never drawn.
TRADE LEVELS Entry the D point, drawn as a grey dotted line Stop a percentage of the D-to-T1 distance placed beyond D, drawn as a thick red line Target 1 0.382 of the AD leg, measured back from D Target 2 0.618 of the AD leg Target 3 1.000 of the AD leg — a full retracement, which lands at point A
All four extend to the right of D and carry a price-tagged label.
PROJECTION ARROW A drawn arrow runs from the D point to your chosen target, showing the measured move the pattern's geometry implies. Select T1, T2 or T3 as the destination.
OUTCOME TRACKING Targets must be reached in order — T2 only registers after T1, T3 only after T2 — so a candle that spans several levels at once does not inflate the record. The score label at D builds up as the trade resolves:
82.4 still open 82.4 T1 reached target 1 82.4 T1 T2 T3 reached all three 82.4 X stopped out
Patterns that neither hit T1 nor stop within the timeout period are recorded separately as timed out and excluded from the hit rate.
STATS TABLE Patterns resolved completed trades with a definite outcome Target 1 hit count and percentage of resolved patterns Target 2 hit count and percentage of patterns that reached T1 Target 3 hit count and percentage of patterns that reached T2 Stopped count of losses Timed out expired without resolution
SETTINGS
PATTERNS Pivot length swing sensitivity. Lower finds more, smaller patterns. Allowed fib error % how far a ratio may deviate and still qualify. Minimum pattern score the main quality filter. Raise it for fewer, cleaner setups. Pattern toggles enable or disable each of the six types, and each direction.
ENTRY / STOP / TARGETS Target 1 / 2 / 3 Fibonacci multiples of the AD leg. Stop percentage of the D-to-T1 distance, placed beyond D. Level length how far the price lines extend right of D. Pattern timeout bars before an unresolved pattern expires. Patterns tracked how many run concurrently.
PROJECTION ARROW Arrow points to T1, T2 or T3. Arrow length horizontal reach in bars.
SIGNALS Buy / Sell labels at D, with the completion price shown on the label.
HOW TO USE IT
Start with the defaults and let the stats table fill on your symbol and timeframe. The three rates read together tell you where patterns stop working: if T1 converts well but T2-to-T3 conversion is weak, close the remainder at T2 rather than holding for a target the market is not reaching.
Minimum pattern score is the dial that matters. Raising it reduces signal count and raises average quality. Lower pivot length for intraday charts, higher for swing.
Harmonic completion points are reversal zones, not guarantees. The script is a structure and level tool — it identifies where a reversal is geometrically expected and what the measured move would be if it happens. Combine it with your own read of trend, session and higher-timeframe context.
ON THE SCORE
The number at the D point is Fibonacci ratio accuracy — how closely that pattern's legs match the textbook proportions of its type. It is a measure of geometric quality, not a probability of success. A 95-scoring pattern is a well-formed pattern; it can still fail. The stats table is the separate and more useful number, because it reports what actually happened rather than how good the shape looked.
NOTES
Original implementation. Pattern detection, scoring, level projection and outcome tracking are written from scratch — no external libraries, no reused code.
Harmonic pattern theory itself is public domain, developed through the work of H.M. Gartley, Larry Pesavento and Scott Carney.
This indicator is a technical analysis tool for study and planning. It is not financial advice and does not predict future price movement. Trading carries substantial risk of loss. Test any approach thoroughly before committing capital. Penunjuk
Quad Stochastic Divergence Toolkit# Quad Stochastic Divergence Toolkit
## Short Description
A four-stochastic divergence toolkit designed to streamline the identification of bullish and bearish stochastic divergences across multiple stochastic speeds.
Inspired by concepts taught in Day Trading Rock Star's Quad Rotation Stochastic Divergence methodology.
---
# Full Description
## Quad Stochastic Divergence Toolkit
The **Quad Stochastic Divergence Toolkit** is a visual trading indicator designed to make it easier to monitor divergence across four stochastic oscillators simultaneously.
The indicator was created to streamline the process of identifying potential bullish and bearish stochastic divergences when using a multi-stochastic approach.
It is inspired by concepts I learned from **Day Trading Rock Star and the Quad Rotation Stochastic Divergence methodology**.
This is an independently developed TradingView tool and is **not an official Day Trading Rock Star indicator, product, or publication**.
### What the Indicator Shows
The indicator displays four independently configured stochastic oscillators in one pane.
Each stochastic can identify two types of regular divergence:
**Bullish / Long Divergence**
Price makes a **lower low** while the corresponding stochastic makes a **higher low**.
This can indicate that downside momentum is weakening even though price has continued lower.
**Bearish / Short Divergence**
Price makes a **higher high** while the corresponding stochastic makes a **lower high**.
This can indicate that upside momentum is weakening even though price has continued higher.
The indicator is intended as a visual analysis tool. A divergence is not, by itself, a trade entry or exit signal.
---
## Four Stochastic Speeds
The toolkit contains four stochastic oscillators with separate settings.
The default configuration uses:
**Stochastic 1**
Length: 9
K Smoothing: 1
D Smoothing: 3
**Stochastic 2**
Length: 14
K Smoothing: 1
D Smoothing: 3
**Stochastic 3**
Length: 40
K Smoothing: 1
D Smoothing: 4
**Stochastic 4**
Length: 60
K Smoothing: 1
D Smoothing: 10
Each oscillator is vertically offset so all four can be viewed clearly within the same indicator pane.
Users can modify the stochastic settings if they prefer a different configuration.
---
## Independent Long and Short Divergence Settings
One of the main purposes of this toolkit is to allow bullish and bearish divergence detection to be tuned independently.
Each stochastic contains two divergence detection groups:
**Div A** — shorter/smaller pivot structure
**Div B** — longer/larger pivot structure
For both Div A and Div B, bullish and bearish divergences have separate pivot settings.
For example:
Long Left A
Long Right A
Short Left A
Short Right A
This allows the user to use different pivot sensitivity for long and short divergences rather than forcing both directions to use identical settings.
The same independent controls are available for all four stochastic oscillators.
---
## Divergence Display
Bullish divergence lines are displayed in green/lime by default.
Bearish divergence lines are displayed in red/maroon by default.
Both the price divergence and the corresponding stochastic divergence are drawn so the relationship between price and momentum can be visually compared.
Div A and Div B can also use different:
* Colors
* Line widths
* Line styles
* Pivot sensitivities
This helps distinguish shorter-term divergence structures from larger ones.
---
## Value Labels
Each stochastic has a current-value label displayed near the right side of the oscillator.
The user can independently control:
* Whether the label is shown
* How many bars to the right of the current bar it appears
* The number/text color of the label
This helps keep the current stochastic readings visible without requiring the labels to sit directly on the most recent candle.
---
## Important: Pivot Confirmation
Divergences in this indicator are based on **confirmed pivot highs and pivot lows**.
A pivot cannot be confirmed until the selected number of **Right** bars has occurred.
For example, if a divergence uses a Right setting of 3, the pivot is not known until three bars after the actual pivot bar.
Once confirmed, the divergence line is drawn back to the originating pivot.
Therefore, a historical divergence line appearing on an earlier candle **does not mean the divergence was known on that candle in real time**.
The actual confirmation occurs only after the required right-side bars have completed.
Increasing the Right setting generally produces more selective pivot structures but also increases the amount of time required before a divergence can be confirmed.
---
## How I Use the Toolkit
The purpose of the indicator is to quickly see whether momentum across multiple stochastic speeds is diverging from price.
Rather than treating every divergence as a trade signal, I use the toolkit as a way of identifying areas that may deserve additional attention.
Possible additional considerations include:
* Market structure
* Support and resistance
* Trend direction
* Higher-timeframe context
* Price action
* Volume
* Session timing
* Risk/reward
* Other confirmation methods used in the trader's own process
Different traders may interpret stochastic divergence differently, so the indicator intentionally provides extensive configuration options rather than prescribing a single trading method.
---
## Customization
Each stochastic can be independently configured, including:
* Enable/disable oscillator
* Stochastic length
* K smoothing
* D smoothing
* Vertical offset
* Stochastic line color
* Value label visibility
* Value label horizontal offset
* Value label number color
* Bullish divergence enable/disable
* Bearish divergence enable/disable
* Independent Long Left/Right pivot settings
* Independent Short Left/Right pivot settings
* Div A settings
* Div B settings
* Divergence line colors
* Divergence line widths
* Divergence line styles
This makes it possible to use the indicator as a starting framework and then adapt it to a trader's own divergence methodology.
---
## Attribution
This indicator was independently developed as a tool to help streamline concepts I learned from **Day Trading Rock Star**, particularly the **Quad Rotation Stochastic Divergence** approach.
Credit for those educational concepts belongs to Day Trading Rock Star.
This TradingView implementation is my own tool for visualizing and organizing stochastic divergence and is not presented as an official Day Trading Rock Star product, indicator, endorsement, or publication.
Users interested in the original trading methodology should refer to Day Trading Rock Star's own educational material for his explanation and application of the strategy.
---
## Disclaimer
This indicator is provided for educational and analytical purposes only.
Divergence does not guarantee a market reversal and should not be interpreted as a prediction of future price movement.
Historical examples are not evidence of future performance.
The indicator does not provide investment advice, financial advice, or individualized trading recommendations.
Trading involves risk. Users are responsible for their own trading decisions, position sizing, risk management, and evaluation of any trading methodology.
# Release Notes — Version 1.0
**Quad Stochastic Divergence Toolkit — Initial Release**
Version 1.0 includes:
* Four independently configurable stochastic oscillators
* Vertically stacked stochastic display
* Bullish regular divergence detection
* Bearish regular divergence detection
* Separate Div A and Div B pivot structures
* Independent Long Left/Right pivot settings
* Independent Short Left/Right pivot settings
* Separate bullish and bearish divergence styling
* Price-chart divergence lines
* Stochastic-pane divergence lines
* Adjustable stochastic value-label positioning
* Selectable hover-label number colors
* Independent controls for all four stochastic oscillators Penunjuk

Penunjuk

Penunjuk

Pressure Release Confirmation Engine [PhenLabs]📊 Pressure Release Confirmation Engine
Version: PineScript™ v6
📌 Description
Pressure Release Confirmation Engine waits for trend-pressure to print a real extreme, then it does nothing until that pressure releases back through a hysteresis band on a closed bar. That release is the trade decision: fade a divergent extreme, or (optionally) take an aligned capitulation/extension release.
It is built for the exhaustion / trend-pressure workflow traders are actually using right now — without another locked-in oscillator recipe and without a Premium data gate. Use the built-in Range Position Pressure, or point Source at any plot you already trust (RSI, MACD, WaveTrend, a paid oscillator). Same arm → release → divergence gate either way. Markers print on price from this pane script, alerts fire both directions, and two numeric plots are Pine Screener columns.
🚀 Points of Innovation
Discrete release trigger, not a paint-the-trend oscillator. Nothing fires at the extreme. The signal is the closed-bar hysteresis cross that ends the extreme.
Any-source engine via input.source — run the same gate on built-in pressure or on an oscillator you already have on the chart.
Divergence quality at the trigger, not as a second indicator. DIVERGENT = price refused to confirm the pressure extreme (higher-low / lower-high). ALIGNED = price confirmed it.
One live arm at a time, timeout expiry, no same-bar arm-and-release, no dual-direction fire.
Pane oscillator plus force_overlay price markers from a single script — no second indicator to add.
Full value on every TradingView plan. No footprint, no tick chart, no lower-timeframe request as a requirement.
Pine Screener columns (PRCE Signal, PRCE State) plus four alertconditions.
🔧 Core Components
Range Position Pressure: close located inside the N-bar high/low, EMA-smoothed to 0–100. External mode replaces this with your selected plot (optionally min-max normalized so 80/20 still mean something).
Extreme arm: pressure must be the lookback highest/lowest and through Overbought/Oversold. The engine stores the arm-bar high or low as the price-confirmation reference.
Hysteresis release: bullish cross of Oversold+Hysteresis, bearish cross of Overbought−Hysteresis, evaluated only on barstate.isconfirmed.
Quality gate: while armed, a new price low (bull) or new price high (bear) marks ALIGNED. No new extreme marks DIVERGENT. Default markers show divergent releases only.
Dashboard: source mode, pressure, phase, quality, bars armed, last signal, screener codes.
🔥 Key Features
Built-in and External source modes with progressive disclosure (dependent inputs stay inactive until External is selected).
Readable defaults: divergent triangles only, arm dots off, short dashboard, no extra labels on price.
Timeout so stale arms die instead of lingering into the next swing.
Named alerts for divergent-only and any-release, both directions, plus alert() on the close.
Screener-ready numeric plots hidden from the pane (data window / screener only).
Armed-state background and dashed/dotted level plots so the hysteresis band is visible.
🎨 Visualization
Pressure line (pane): colored by live arm. Green = bull arm, red = bear arm, gray = idle.
Dashed Overbought/Oversold, dotted mid-line and release levels.
Green triangle below the bar = bullish divergent release (force_overlay on price).
Red triangle above the bar = bearish divergent release.
Optional tiny circles = aligned releases (off unless Price Markers = All releases).
Top-right dashboard: Source, Phase, Quality, Bars Armed, Last Signal, Screener codes. Hover any value cell for the definition.
📖 Usage Guidelines
Pressure Source — Default: Built-in Pressure — Built-in uses this chart. External applies the identical gate to another indicator’s plot.
External Plot — Default: close — Active only in External mode. Add your oscillator first, then pick its plot here.
Normalize External to 0–100 — Default: true — Leave on for MACD, delta, unbounded sources. Off if the source is already 0–100 (RSI, Stochastic, %R flipped).
Pressure Length — Default: 14 — Range: 3–100 — Lookback of built-in range-position pressure.
Pressure Smooth — Default: 3 — Range: 1–30 — EMA on the raw pressure series (both modes).
Extreme Lookback — Default: 10 — Range: 3–50 — Highest/lowest test that qualifies an arm.
Overbought / Oversold — Default: 80 / 20 — Arm thresholds.
Hysteresis — Default: 10 — Range: 1–25 — Release band. Bull fires on a close-bar cross of 30 with defaults; bear on a cross of 70.
Arm Timeout — Default: 25 bars — Armed extremes that never release expire with no signal.
Price Markers — Default: Divergent only — Divergent only / All releases / Hide shapes.
Show Arm Markers — Default: false — Tiny pane dots at the arm bar.
Table Size — Default: Small — Tiny / Small / Normal / Large.
✅ Best Use Cases
Intraday and swing fade of exhausted pressure on indices, FX, gold, and crypto — the engine is asset-agnostic.
Traders who already have a favorite oscillator and want a closed-bar trigger instead of reading slope by eye.
Screening a watchlist for PRCE Signal = 2 (divergent bull) or −2 (divergent bear) on the Pine Screener.
Pairing Built-in Pressure with a higher-timeframe chart for swing, then dropping External Source onto an RSI/MACD on the execution timeframe.
⚠️ Limitations
This is a confirmation engine, not a full system. It does not size positions or place stops. Use your own invalidation (arm-bar extreme is the natural reference).
External mode is only as honest as the plot you feed it. If that plot repaints, PRCE will inherit it. Built-in pressure does not.
Hysteresis will miss V-reversals that never cross the release level before timeout. That is intentional.
One live arm. A new opposite extreme cancels the previous arm.
Not financial advice. Past pressure releases do not guarantee future results.
💡 What Makes This Unique
The product is the release gate , not a new oscillator brand. Removing the arm → hysteresis → divergence sequence removes every signal.
Works as a standalone pane tool and as a meta-tool on any other plot, without a Premium data dependency.
Default chart shows only the higher-quality divergent events, so the picture stays readable.
⚙️ Under the Hood
input.source() : the same extreme/release/divergence state machine can run on close-derived Range Position Pressure or on any other script’s plot. That is the core method — not a decorative source picker. Built-in mode is the default so the script is complete on a blank chart.
input.enum + active : External Plot and Normalize stay inactive until Source = External. Progressive disclosure, not a 40-input wall.
force_overlay on plotshape : a pane oscillator that still marks the price candle from one script. Solves the “add two indicators” friction.
plot() linestyle : dashed thresholds and dotted release/mid levels with zero drawing-object budget.
Closed-bar gate : ta.crossover / ta.crossunder and all arm/release mutations sit behind barstate.isconfirmed. Historical and realtime agree. No lookahead.
Data mode / plan note : no plan-gated APIs. Dashboard row Source = BUILT-IN or EXTERNAL is the only mode flag, and both modes are available on every plan.
Screener & alerts : PRCE Signal (2 divergent bull, 1 aligned bull, −1 aligned bear, −2 divergent bear) and PRCE State (1 armed bull, −1 armed bear, 0 idle) are data-window plots. alertcondition exists for divergent and any-release, both directions.
🔬 How It Works
Pressure is computed (or ingested) onto a 0–100 scale and smoothed. Overbought/Oversold are the arm lines; hysteresis sits inside them as the release line.
On a confirmed bar, if pressure is the lookback extreme and through the arm line, the engine stores that bar’s low (bull) or high (bear) and waits. Opposite arms cancel each other.
While armed, any new price low/high versus the arm reference flips quality from DIVERGENT to ALIGNED. If the hysteresis line is not crossed before timeout, the arm expires silent.
A closed-bar crossover of Oversold+Hysteresis (bull) or crossunder of Overbought−Hysteresis (bear) consumes the arm and emits the signal, quality tag, price marker (if enabled), screener value, and alerts.
Read the dashboard: Phase tells you whether to wait or act; Quality tells you whether price confirmed the extreme; Source tells you which series the gate is running on.
💡 Note:
Add the script, leave defaults, and wait for a triangle. Hover the dashboard cells the first time — they are the legend. For External mode, add your oscillator first, switch Pressure Source, pick its plot, and keep Normalize on unless that plot is already 0–100. Alerts: use “PRCE Bull/Bear Divergent Release” unless you explicitly want aligned events. Screener: filter PRCE Signal = 2 or −2.
This is an analytical aid, not financial advice. You are responsible for risk, execution, and whether a release is worth taking in the current market. Penunjuk

Penunjuk

RedK Multi-Modal TrailingStop (RedK MMTStop)█ RedK MMTStop - Release Notes
Introduction & background
RedK MMTStop is a Multi-Modal Trailing Stop indicator - Let's quickly explore the "trailing stop" concept first as a refresher - then explain what a multi-modal trailing stop indicator does.
A "Trailing Stop" is what helps traders avoid giving back profit because they held an open position for too long. A trailing stop follows (trails) the price movement in the trade direction - never moves in the opposite direction - as long as the position moves in the trade direction, the trader is watching a growing "unrealized profit".
The Trailing Stop will then alert the trader when the move is weakening, or is over (reversing). The position is then closed (automatically if the platform provides that feature, or manually by the trader) to "realize" the maximum profit.
Read more about this concept in TradingView's own support guide on Trailing Stops
A Trailing Stop is a core function for effective position & risk management, and there are various methods to implement a trailing stop. Regardless of the trailing stop method, the basic premise is the same: this mechanism is what enables the trader to maximize their position profit, and is the key to avoiding situations where profitable positions reverse into losses - which can happen to any trader, regardless of experience level - it's just the nature of trading. For that reason, there are so many Trailing Stop indicators out there, and many of them are of high quality.
What makes RedK Multi-Modal TrailingStop (RedK MMTStop) different, is that it provides traders with 5 of the most-common trailing stop methods, and packages these 5 methods into the same insights, visuals and alerts engines - in an attempt to deliver maximum trade management support with the utmost flexibility in the choice of trailing stop method - The result is a tool that can work for any style of trading (scalping, swing, position/trend...), for any timeframe, and for any traded instrument, be it FOREX, Crypto, Futures, Stocks, CFDs ...etc.
█ RedK MMTStop: Indicator Components
Below we explore the 5 trailing stop methods, the trader's insights (info panel), the visuals (the safe zone / bands) and the alerts.
The below screenshot shows the main elements of the RedK MMTStop
🔷1. The 5 Trailing Stop Methods
ATR / Supertrend: trails a volatility-based distance from price. The classic all-purpose stop.
Chandelier: hangs an ATR distance off the recent swing high (long) or low (short).
Donchian: trails to the recent swing low (long) or high (short). Turtle-style, structure-based.
StdDev Channel: trails a standard-deviation / statistical (Bollinger-style) distance.
Fixed %: trails a set percentage of price. Simple and predictable.
Switching method never changes the insights, the visuals or the alerts. Every method feeds the same stop line, the same flip logic, and the same five alerts — so your setup keeps working as you adjust to find the method that works best for a specific setup.
🔷 2. The Critical & Safe Zones
The stop line tells you where to exit. The Status line (along with the Critical / Safe bands) tells you how close you are.
The "Status Line" measures the gap between price and the stop in ATR units, then colors it:
🟢 Safe — plenty of room. Let it run.
🟡 Watch — getting close. Pay attention.
🔴 Critical — price is near the stop line. Decide now.
The colored bands sit between the stop and price on the chart. Band borders can be shown or hidden separately from the colored fill. The Safe Zone is calculated based on (user-adjustable) ATR value, so it is "volatility-aware" - It uses its own ATR setting (regardless of the selected Trailing Stop method) to ensure it works the same across all five methods — including the ones with no ATR setting of their own.
🔷3. The Info Panel
A compact panel showing the live state at a glance (some elements will update in real time):
Active trailing stop method and its key setting - color coded for direction
Current stop price and trade side
Distance from price to stop
Color-coded Status Line (Safe / Watch / Critical) with distance to stop in ATR units
The exact prices where the colors (zones) transition
For the Info Panel, text size (Small / Normal / Large) and position (Top / Middle / Bottom Right) are selectable.
🔷4. RedK MMTStop Alerts
There are 5 alerts introduced in this version to help maximize the use of the RedK MMTStop - These alerts work the same regardless of which trailing stop method is selected and the associated settings - They will also work regardless of the visual or the info panel settings.
Trend flipped up
Trend flipped down
Close crossed below the stop
Close crossed above the stop
Price entered the Critical zone
Note: A numeric flip signal is also exposed in the Data Window for use with the Pine Screener.
The below screenshot shows the 5 alerts provided by RedK MMTStop
==================================================================================
█ RedK MMTStop Indicator Settings & Usage Examples
The screenshot below shows the RedK MMTStop indicator settings box, split into 3 sections, and what each section does.
The below screenshot shows a "position trader" using RedK MMTStop on 1D timeframe to manage 5% -based trailing stops on NASDAQ:NVDA - showing examples for both a long and a short positions and how to use the indicator to identify critical zones for exit.
The below screenshot shows a swing trader using RedK MMTStop on 30min timeframe to track an ATR / SuperTrend -based trailing stop on an open long position in OANDA:XAUUSD - the position is getting an amber "Watch" alert in the Info Panel
With the way RedK MMTStop is built, the scenarios are unlimited - Please note that while every effort was made to provide the most commonly used settings for each method as default - they are not suggestions or advice - You need to adjust your trailing stop method and settings to what suits your style of trading, your timeframe and your own risk tolerance. This is critical for the proper use of this, or any other, indicator.
==================================================================================
📝 Notes on Use and Limitations
==================================================================================
This is an analysis and risk-management tool, not a signal service and not trade advice. Also a trailing stop is a mechanism that helps you manage an existing position — it does not tell you what or when to buy or sell. Test any settings on your own instruments and timeframes before trading them.
The markers and alerts here describe price action readings. They are not advice to enter or exit any position, and the indicator does not claim predictive accuracy.
==================================================================================
⚠️ Important Notes & Disclaimer
==================================================================================
Using this indicator means you have read and agreed to the following:
Not Advice. This indicator, and other work of this author, represent analytical studies of price and volume behavior. No parts should be considered buy/sell recommendations or signals — “Bulls” and “Bears” describe measured states only. Nothing here is financial, investment, or trading advice.
Risk & Responsibility. Trading involves substantial risk of loss and is not for everyone. All decisions, interpretation, and risk and money management are yours alone. Past behavior does not predict future results. The author accepts no liability for any loss or consequence arising from use of this tool.
Indicator Provided As-Is. Feature requests are welcome and can be shared with the author, but whether or when any request is implemented cannot be promised or guaranteed.
Penunjuk

Penunjuk

Ichimoku 5 Rules BacktestICHIMOKU 5/5 BACKTEST STRATEGY
This strategy is a rule-based, long-only backtesting framework designed specifically for the 1-hour timeframe.
Its purpose is to evaluate the historical behavior of a five-condition Ichimoku-based setup under predefined risk, reward, and holding-time rules.
The strategy does not attempt to predict future prices. It is designed to test whether a clearly defined technical setup produces repeatable historical outcomes across a sufficiently large sample of trades.
HOW THE STRATEGY WORKS
A potential long setup requires all five conditions to be simultaneously satisfied and confirmed.
1. CHIKOU CONFIRMATION
Current price must be above the price from 26 bars ago.
This condition is used as a historical price-structure confirmation.
2. TENKAN / KIJUN STRUCTURE
Tenkan-sen must be above Kijun-sen.
This represents bullish short-term versus medium-term Ichimoku structure.
3. MACD MOMENTUM STRUCTURE
The strategy evaluates bullish MACD and/or Signal Line divergence or convergence using confirmed price pivot lows.
The pivot comparison can identify:
- Lower Low in price with Higher Low in momentum
- Higher Low in price with Higher Low in momentum
The MACD, Signal Line, or both can be selected through the strategy inputs.
Because pivots require right-side confirmation bars, this condition only becomes available after the relevant pivot has been confirmed.
4. KUMO BREAKOUT + PULLBACK CONDITION
Price must be above the relevant Kumo reference after having traded below or inside the cloud during the selected historical lookback period.
This condition is intended to identify a transition from weaker price structure into a confirmed position above the cloud.
5. BULLISH KUMO
Senkou Span A must be above Senkou Span B.
This represents bullish future-cloud structure.
ENTRY LOGIC
A trade is generated only when a NEW confirmed 5/5 setup appears.
If all five conditions remain true for several consecutive bars, the strategy does not repeatedly generate additional entries.
Pyramiding is disabled.
The setup is confirmed using completed bars.
Because process_orders_on_close is disabled, a confirmed signal is submitted after the signal bar closes and is normally filled according to TradingView's broker-emulator execution model on the following bar.
DEFAULT CAPITAL AND POSITION SETTINGS
Initial capital:
USD 3,000
Position size:
10% of current equity
Pyramiding:
0
The strategy is intended to simulate relatively small position exposure while separating position size from the maximum intended capital risk.
RISK MANAGEMENT
Default maximum intended risk per trade:
1% of current equity
Default target:
3.5R
The initial risk amount is calculated from current strategy equity.
The stop distance is then derived from:
Initial Risk Cash / Position Size
For a long trade:
Stop Price =
Entry Price - Risk Per Share
Target Price =
Entry Price + (Risk Per Share × Reward/Risk Multiple)
The default reward/risk multiple is 3.5R but can be modified through the strategy inputs.
TRADING COSTS
The strategy uses a fixed commission of:
USD 0.10 per executed order
Under the normal one-entry / one-exit structure:
Entry commission:
USD 0.10
Exit commission:
USD 0.10
Approximate total commission for a completed trade:
USD 0.20
The commission is fixed per order and does not vary with position value.
The TRIM marker is visual only and therefore does not generate an additional order or commission.
Slippage and bid/ask spread can vary substantially by instrument, liquidity, market conditions, and order type. They should be considered when interpreting historical results. Users should apply assumptions appropriate to the instrument being tested.
MAXIMUM HOLDING TIME
Default maximum holding period:
15 trading sessions
Default 1-hour bars per session:
7
Equivalent maximum:
105 one-hour bars
If neither the stop nor the target has been reached by the maximum holding period, the position is closed using a TIME EXIT.
Both values can be modified through the strategy inputs.
TRIM REFERENCE
The strategy includes an optional TRIM marker intended to identify when price has completed a selected percentage of the theoretical Entry-to-Target distance.
Default TRIM level:
75%
The percentage is configurable.
For example, with a 3.5R target:
75% × 3.5R = 2.625R
Therefore, under the default parameters, the TRIM reference corresponds to approximately +2.625R from the entry.
IMPORTANT:
TRIM is a visual reference only.
It does NOT:
- reduce the position
- execute a partial exit
- modify the stop
- change the profit target
- affect strategy performance
- generate additional commissions
TRIM GAP HANDLING
Two different situations are considered.
NORMAL PRICE MOVEMENT
If price trades normally through the calculated TRIM level, the TRIM label is placed at the theoretical TRIM price.
GAP ABOVE TRIM
If the market opens above the calculated TRIM level, the label is placed at the opening price of that bar.
This is intended to avoid visually marking an execution at a theoretical price that was skipped by the gap.
The marker remains informational only.
BACKTEST TABLE
The strategy includes an on-chart statistical table containing:
- Closed Trades
- Wins
- Losses
- Win Rate
- Profit Factor
- Expectancy
- Net P&L
- ROI
- Maximum Drawdown
- Average Holding Period
- Target Exits
- Stop Exits
- Time Exits
- Realized R Distribution
- Mean R
- Standard Deviation of R
REALIZED R DISTRIBUTION
Each completed trade is measured relative to its initial planned risk.
Realized R is calculated as:
Trade Profit / Initial Risk Cash
For visualization, outcomes are grouped into 0.5R distribution ranges.
The distribution includes:
<= -1.0R
-0.5R
0.0R
+0.5R
+1.0R
+1.5R
+2.0R
+2.5R
+3.0R
>= +3.5R
The distribution buckets are rounded for display purposes only.
Mean R and Standard Deviation are calculated from the actual realized R values rather than from the rounded distribution buckets.
EXPECTANCY
Mean R represents the average realized R-multiple produced by the completed trades in the historical sample.
It is displayed as the strategy's historical expectancy per trade.
A positive historical expectancy does not imply that future expectancy will remain positive.
STANDARD DEVIATION
Standard Deviation measures the dispersion of individual realized R outcomes around the historical Mean R.
It is included to provide additional context regarding the variability of strategy outcomes.
The calculation does not assume that future returns will follow a normal distribution.
SAMPLE SIZE
The strategy includes a visual sample-size classification.
LOW:
Fewer than 50 completed trades
PRELIM.:
50 to 99 completed trades
VALID:
100 or more completed trades
IMPORTANT:
The term VALID refers only to the strategy's predefined minimum sample-size threshold.
It does NOT mean that the strategy has been statistically validated, that its results are reliable in every market, or that future profitability is expected.
Sample size should always be interpreted together with timeframe, instrument, market regime, expectancy, drawdown, dispersion, and other statistical characteristics.
TIMEFRAME
This strategy is designed specifically for:
1-hour charts
The script validates the chart timeframe and is not intended to be used unchanged on other timeframes.
Testing the same logic on another timeframe may produce materially different results.
CHART TYPE
The strategy is intended for use on standard price candles.
Results obtained from synthetic or non-standard chart types may not represent executable market prices and should not be interpreted in the same way as results obtained from standard OHLC market data.
ORIGINAL PURPOSE OF THE SCRIPT
This script is not intended to reproduce a standard Ichimoku indicator.
Its purpose is to combine a specific five-condition decision framework with:
- confirmed Ichimoku structure
- pivot-based MACD momentum analysis
- explicit equity-based risk modeling
- fixed reward/risk targeting
- maximum holding-time rules
- gap-aware TRIM visualization
- realized R distribution
- expectancy analysis
- outcome dispersion
- exit-type classification
- sample-size monitoring
The strategy is primarily a research and backtesting tool for studying the historical behavior of this specific rules-based setup.
BACKTEST LIMITATIONS
Historical results are simulations and do not represent actual trading performance.
Real-world results can differ due to factors including:
- slippage
- bid/ask spread
- commissions
- liquidity
- market impact
- order type
- order priority
- partial fills
- trading halts
- gaps
- broker execution
- exchange rules
- data quality
- corporate actions
- symbol history
- market regime changes
Historical OHLC bars also do not always reveal the exact sequence in which prices moved inside each bar.
When multiple relevant price levels occur within the same historical bar, TradingView's broker emulator determines fills according to the information and execution assumptions available to the strategy.
For this reason, individual historical fills should not be interpreted as a reconstruction of actual tick-by-tick execution.
REPAINTING AND CONFIRMATION
Trade setups are based on confirmed bars.
The momentum component uses confirmed pivots. Because pivot detection requires bars to the right of the pivot, a pivot is recognized only after its confirmation period has elapsed.
This confirmation delay is part of the strategy logic and should be considered when interpreting signals.
INTERPRETING RESULTS
Historical performance should not be evaluated from a single symbol, isolated market period, or individual trade.
A more robust evaluation should consider:
- a sufficiently large trade sample
- different symbols
- different market environments
- trending and non-trending periods
- drawdown
- realized R distribution
- expectancy
- outcome dispersion
- transaction costs
- execution assumptions
Changing parameters can materially alter historical results and may introduce overfitting.
Parameters should therefore be selected based on a defined trading hypothesis rather than solely because they improve historical performance.
DISCLAIMER
This strategy is provided for educational, analytical, and research purposes only.
It is not financial advice.
It does not constitute an offer, solicitation, recommendation, or instruction to buy or sell any financial instrument.
Historical performance does not guarantee future results.
All trading and investment decisions, including position sizing and risk management, remain the sole responsibility of the user.
Strategi

GM VWAP Reversal - Candle ConfirmationGM VWAP Reversal - Candle Confirmation
A mean reversion indicator that combines VWAP deviation bands with a candle-close confirmation sequence. It looks for potential reversals following price extensions away from VWAP, using VWAP as the reference for a possible return toward the mean.
HOW SIGNALS WORK
SELL sequence:
1. A candle closes above the upper outer VWAP band, starting the leading move.
2. A later bearish candle becomes C1.
3. A later bearish candle closes below C1's close and becomes C2.
4. A subsequent candle closes below C2's close, confirming SELL if the entry-zone and optional ADX conditions are satisfied.
BUY follows the opposite sequence below the lower outer band, using bullish C1 and C2 candles and a subsequent close above C2's close.
The leading move may span multiple candles. Intervening candles are allowed, and the final confirmation candle does not require a specific body direction. Wick breaks alone do not trigger signals.
VWAP AND ENTRY ZONES
Default outer bands are set at 2 standard deviations from VWAP. At confirmation, SELL must remain at least 1 standard deviation above VWAP, and BUY at least 1 standard deviation below it. This prevents signals from appearing too close to the mean.
Available VWAP anchors:
- Session
- Week
- Month
Session is the default and follows the symbol's daily session boundary. The anchor should be longer than the chart timeframe. The default calculation source is Close; HLC3 is also available.
SIGNAL FILTERS
- All setup and signal decisions use confirmed candle closes.
- One signal is allowed per excursion. A close at or beyond VWAP rearms that side.
- A new VWAP anchor resets pending setups.
- Pending setups can expire or be cancelled when price reaches VWAP or closes beyond the locked setup extreme.
- The optional ADX filter blocks confirmation when ADX is above the selected threshold and rising. It is disabled by default.
- If the first qualifying entry close fails the entry-zone or ADX check, the setup is consumed rather than producing a delayed signal.
DISPLAY AND ALERTS
- Upper and lower VWAP zones
- BUY and SELL markers
- Optional Leading, C1 and C2 markers
- C2 closing-price reference line
- Optional setup invalidation reference
- Optional dashboard
- BUY, SELL and combined alerts
The dashed target line records VWAP at the moment of the signal. The live VWAP continues to update.
USAGE AND LIMITATIONS
The indicator requires a data feed with volume and waits for a configurable number of candles after each VWAP reset. VWAP and its bands update during an open candle; signal decisions wait for the candle to close.
Price can remain outside the bands during strong trends. A signal identifies a confirmed reversal setup under these rules, not a guaranteed return to VWAP.
This is an indicator, not an automated trading or backtesting strategy. Default settings are starting points for testing, not optimized performance claims. Penunjuk

Delta AgressionDELTA AGRESSION
Delta Agression is designed to highlight moments when buying or selling pressure becomes unusually strong.
The indicator estimates Delta from each candle's volume and where the candle closes inside its range. It then compares current activity with recent activity to find spikes, rising aggression, sudden shocks, and flips in control.
==================
● AGGRESSION SPIKE
Delta is unusually large.
Think:
Big aggression.
◆ EXTREME AGGRESSION
Delta is extremely large.
Think:
Very big aggression.
▲ / ▼ RISING AGGRESSION
Aggression has increased for 3 candles in a row.
Think:
Aggression is building.
■ AGGRESSION SHOCK
Delta suddenly changed much harder than normal.
Think:
Aggression suddenly accelerated.
✕ AGGRESSION FLIP
Delta suddenly changed hard AND control switched sides.
Think:
One side aggressively took control from the other side.
===============================================
SIMPLE SUMMARY
Spike = big aggression.
Extreme = very big aggression.
Rising = aggression is building.
Shock = aggression suddenly accelerates.
Flip = one side aggressively takes control from the other side.
IMPORTANT:
The Delta used by this indicator is an estimate based on candle price and volume. It is not true exchange Bid/Ask order-flow Delta.
SETTINGS & SIGNALS
DELTA LOOKBACK
Default: 20
Determines how many recent candles are used to calculate what a normal Delta size looks like.
20 means the current Delta is compared with roughly the last 20 candles.
Higher setting = smoother and harder to trigger.
Lower setting = more sensitive.
AGGRESSION SPIKE
Default: 2.0
Controls the ● Aggression Spike signal.
It looks for Delta that is unusually large compared with normal Delta.
2.0 means the current Delta must be about 2x normal.
Green ● below candle = bullish aggression.
Red ● above candle = bearish aggression.
EXTREME AGGRESSION
Default: 3.5
Controls the ◆ Extreme Aggression signal.
This looks for extremely large Delta readings.
3.5 means Delta must be about 3.5x normal.
Green ◆ below candle = extreme buying aggression.
Red ◆ above candle = extreme selling aggression.
3-BAR RISING AGGRESSION
Marker: ▲ / ▼
Looks for aggression increasing for 3 candles in a row.
Bullish example:
+500
+1,000
+2,000
Buying aggression is getting stronger each candle.
Bearish example:
-500
-1,000
-2,000
Selling aggression is getting stronger each candle.
Green ▲ below candle = buying aggression is building.
Red ▼ above candle = selling aggression is building.
SHOCK LOOKBACK
Default: 20
Determines what a normal change in Delta looks like.
The indicator compares the change in Delta from one candle to the next over the recent lookback period.
20 means it uses roughly the last 20 candles to determine what a normal Delta change looks like.
SHOCK THRESHOLD
Default: 2.0
Controls the ■ Aggression Shock signal.
A Shock happens when Delta suddenly changes much more than normal.
Example:
Previous Delta: +300
Current Delta: +3,500
That is a large sudden increase toward buyers.
2.0 means the Delta change must be about 2x larger than normal.
Green ■ below candle = bullish shock.
Red ■ above candle = bearish shock.
IMPORTANT:
A Shock does NOT have to cross from negative Delta to positive Delta.
Example:
+300 → +3,500
This can still be a Bull Shock because buying aggression suddenly became much stronger.
FLIP THRESHOLD
Default: 2.5
Controls the ✕ Aggression Flip signal.
A Flip happens when Delta changes sides AND the change is unusually powerful.
Bull Flip example:
Previous Delta: -2,000
Current Delta: +1,500
Sellers were in control.
Then buyers aggressively took control.
Green ✕ below candle = bullish flip.
Bear Flip example:
Previous Delta: +2,000
Current Delta: -1,500
Buyers were in control.
Then sellers aggressively took control.
Red ✕ above candle = bearish flip.
2.5 means the takeover must be about 2.5x stronger than a normal Delta change.
USE VOLUME FILTER
When ON, a signal must also have enough total candle volume to qualify.
This helps remove signals that happen during very low-volume candles.
ON = volume requirement is used.
OFF = volume does not affect whether the signal appears.
VOLUME AVERAGE LENGTH
Default: 20
Determines how many candles are used to calculate normal volume.
20 means the indicator uses roughly the last 20 candles to calculate average volume.
MINIMUM VOLUME VS AVERAGE
Default: 1.0
Determines how much volume the current candle needs before a signal is allowed.
1.0 = at least average volume.
1.5 = at least 1.5x average volume.
2.0 = at least 2x average volume.
Higher settings create fewer signals and require stronger volume.
Penunjuk

QRB - Quarterly Range BreakoutQRB — Quarterly Break Range is a market-structure indicator designed to help traders visualize how price interacts with the previous quarter’s range.
At the beginning of each new calendar quarter, QRB automatically identifies the completed previous quarter’s:
High
Low
50% midpoint
Those three levels are then projected across the current quarter, creating a simple structural map for price.
The indicator automatically updates when a new quarter begins, so there is no need to manually redraw the levels.
The Idea Behind QRB
The concept behind QRB comes from a simple observation:
Markets often react to important historical ranges.
Intraday traders commonly use concepts such as the Opening Range, previous-day high and low, session ranges, and other reference levels to understand where price is accepting, rejecting, or breaking away from prior value.
QRB applies that same thought process to a much larger timeframe.
Instead of asking:
“Where is price relative to today's opening range?”
QRB asks:
“Where is price relative to the previous quarter?”
The previous quarter becomes the reference range, while the current quarter shows how the market responds to that range.
This allows traders to study quarterly price behavior using only three objective levels.
Understanding the Three Levels
Previous Quarter High
The previous-quarter high represents the upper boundary of the completed quarterly range.
When price approaches this level, traders may watch for:
Rejection
Consolidation
Breakout attempts
Acceptance above the range
Retests after a breakout
A sustained move above the previous-quarter high may indicate that the market is beginning to expand beyond the prior quarter's range.
Previous Quarter Midpoint
The midpoint is calculated as:
(Previous Quarter High + Previous Quarter Low) ÷ 2
This represents the 50% level of the previous quarter's range.
The midpoint can be useful as a simple measure of where price is trading relative to the prior quarter.
Price holding above the midpoint places it in the upper half of the previous quarter's range.
Price holding below the midpoint places it in the lower half.
The midpoint may also act as an important area of balance, support, resistance, or transition.
Previous Quarter Low
The previous-quarter low represents the lower boundary of the completed quarterly range.
When price approaches this area, traders may watch for:
Support
Rejection
Consolidation
Breakdown attempts
Acceptance below the range
Retests following a breakdown
A sustained move below the previous-quarter low may indicate that the market is expanding beneath the previous quarter's range.
How to Use QRB
QRB is primarily designed as a market-structure framework, not a standalone buy or sell signal.
The three quarterly levels can help answer a few simple questions:
Where is price?
Above the previous quarter
Inside the previous quarter
Below the previous quarter
Which half of the prior range is price occupying?
Above the midpoint
Below the midpoint
How is price reacting to the boundaries?
Breaking
Rejecting
Retesting
Consolidating
Accepting beyond the range
That information can then be combined with a trader's existing approach to trend, momentum, price action, support and resistance, volume, or other forms of confirmation.
Example Market Behaviors
One possible bullish sequence could look like:
Previous-quarter high is tested
→ Price breaks above it
→ Price remains above the level
→ The level is retested
→ Buyers continue pushing price higher
A possible bearish sequence could look like:
Previous-quarter midpoint fails
→ Price moves into the lower half of the range
→ Previous-quarter low breaks
→ Price remains below the range
→ Selling pressure continues
Another possible scenario is simple rejection:
Price reaches the previous-quarter high
→ Fails to gain acceptance above it
→ Moves back inside the range
→ Rotates toward the midpoint
QRB does not attempt to predict which scenario will occur.
It simply provides the structural levels needed to observe what price actually does.
Why Quarterly Ranges?
Calendar quarters are natural market periods.
Each quarter contains roughly three months of price discovery and can represent a significant amount of accumulated positioning and market activity.
Rather than treating each daily candle independently, QRB allows traders to step back and see price within a broader structural framework.
The previous quarter essentially becomes a large reference range.
The current quarter then answers the question:
Will price remain inside that range, reject its boundaries, or expand beyond it?
That is the central idea behind QRB.
Best Use
QRB was designed primarily for higher-timeframe analysis, especially the Daily chart.
It may be useful across different markets, including:
Stocks
Forex
Futures
Indices
Cryptocurrencies
Because different markets behave differently, traders should evaluate the concept independently on the instruments they trade.
Customization
QRB allows users to customize the appearance of each level, including:
Previous Quarter High color
Previous Quarter High thickness
Midpoint color
Midpoint thickness
Previous Quarter Low color
Previous Quarter Low thickness
This allows the quarterly structure to remain visible without overwhelming the chart.
The Philosophy Behind QRB
QRB is intentionally simple.
There are no complicated calculations, predictive algorithms, or large collections of indicators.
The purpose is to create a clean structural map and allow price action to provide the information.
The core idea is:
Previous quarter = reference range
Current quarter = reaction to that range
From there, the trader observes whether price accepts, rejects, breaks, retests, or rotates around those levels.
"Sometimes three well-defined levels can tell you more about market structure than twenty indicators ever could."
Penunjuk

KAIROS Lite 1m (Baseline)KAIROS Lite | MNQ 1-Minute — Unoptimized Baseline
KAIROS Lite is a chart-overlay indicator built for MNQ on standard 1-minute candles. It combines VWAP context, confirmed higher-timeframe structure, liquidity sweeps, and volume-based confirmation to highlight potential continuation and reversal setups.
Important: This is an unoptimized baseline
This release is a development baseline—not an optimized or finalized trading system. Its purpose is to provide a starting point for observation, forward testing, and future improvements.
The 1-minute adaptation retains the underlying entry formulas and numerical lookbacks from the existing Lite engine. Those lookbacks now count 1-minute candles; they have not been automatically rescaled or tuned to establish an edge on this timeframe. No win-rate, profitability, or performance claims are being made.
How it works
The indicator uses separate continuation and reversal branches. Its reversal logic combines liquidity sweeps, changes in volume-based flow, and reclaim or structural confirmation. Supporting inputs include the Volume Flow Indicator (VFI), Volume Spread Analysis (VSA), and a secondary cumulative-volume-delta proxy.
The CVD component is a candle-volume approximation—not actual bid/ask delta or native footprint data.
An observation-only regime engine provides additional market context. In this baseline, regime classifications are not an additional entry filter.
LIVE versus confirmed signals
LIVE signals are provisional. They can appear while a candle is developing and may invalidate before it closes.
Confirmed signals are evaluated at candle close. Historical confirmed labels do not reconstruct every LIVE signal that appeared intrabar, so historical charts should not be treated as a complete record of real-time signal behavior.
This release candidate retains the baseline entry logic while improving LIVE-signal lifecycle handling and diagnostic reporting. These are operational changes, not performance optimization.
Intended use
Use this version for chart study, replay, and paper-trading evaluation. It is an indicator, not an automated strategy or a complete risk-management system. Signals are potential setups, not instructions to enter a trade.
Baseline first. Validation and optimization come later. Penunjuk

Vortex Trend Crossover [RC Tools]RC Tools — Vortex Trend Crossover
────────────────────────────────────────────────────────────────────
█ OVERVIEW
Most directional-movement tools measure how far price has moved from a fixed baseline. The Vortex Indicator, developed by Etienne Botes and Douglas Siepman, asks a more specific question: how far did today's price action "reach" away from where it just was, in each direction? That reach, summed over a window and compared between up and down, is what drives this tool's crossover signal.
█ WHAT IT DOES
Computes two oscillating lines, VI+ and VI-, from how far each bar's high and low reach past the prior bar's opposite extreme, and classifies each confirmed bar as Bullish or Bearish based on which line is currently dominant. Colours the chart background accordingly, plots both the smoothed and raw VI+/VI- lines in a dedicated pane against the 1.0 baseline, and shows a table with the live (intrabar) and confirmed vote side by side, plus how long price has been in the current state.
█ THE THEORY BEHIND IT
Most directional tools compare price to itself over time (a moving average) or measure the net displacement of directional movement (DMI). Vortex instead asks how far each bar reaches beyond where the market just was, using the opposite extreme of the prior bar as the reference point: today's high against yesterday's low for upward reach, today's low against yesterday's high for downward reach. Normalising both by the true range and summing over a window produces two lines, VI+ and VI-, that oscillate around a baseline of 1.0. When VI+ is meaningfully above VI-, upward reach has been dominating; when VI- takes over, downward reach has. The crossover between the two lines is the signal.
█ HOW IT IS CALCULATED
1. VM+ = |high − low | (today's high vs. yesterday's low — upward reach). VM− = |low − high | (today's low vs. yesterday's high — downward reach).
2. TR = true range for the bar.
3. Sum VM+, VM−, and TR separately over the VI Length window, then divide: VI+ = ΣVM+ / ΣTR, VI− = ΣVM− / ΣTR.
4. Optionally smooth VI+ and VI− (the raw sums are noisy bar-to-bar by construction).
5. When smoothed VI+ crosses above smoothed VI−, the state flips to Bullish. When it crosses below, the state flips to Bearish. Between crossovers, the classification holds.
Classification occurs ONLY on confirmed bar close — the plotted VI+/VI-, the background colour and the table all update together, so nothing here can disagree mid-bar or flip back and forth as the current bar forms.
█ SETTINGS & CONFIGURATION
• VI Length (default 14) — the summation window for VI+ and VI-
• Smoothing Length and Type (default 5-period EMA) — reduces the raw VI+/VI- sums' bar-to-bar noise before the crossover check
• Table visibility, position and colours are fully configurable; the main-chart background painting can be toggled off if you only want the statistics pane
█ HOW TO USE IT
Use it as a directional-pressure filter alongside your existing tools, not as a standalone entry signal. Because it's a crossover system, it tends to behave like other crossover tools — reliable in trending conditions, prone to whipsaw when the two lines sit close together in a range. The Live row can still change until the bar closes; only the Confirmed row is safe to treat as settled.
Works on any asset and timeframe with sufficient history for the VI Length window.
█ LIMITATIONS
• Vortex is a DIRECTIONAL-PRESSURE oscillator, not a magnitude or overbought/oversold measure. Any use of it as a precision reversal forecast is a misuse.
• Like any crossover-based system, it can whipsaw when VI+ and VI- sit close together in choppy, range-bound conditions.
• The summation window resets its frame of reference every VI Length bars; a short length reacts fast but is noisier, a long length is smoother but slower to reflect a genuine change.
• Smoothing trades responsiveness for fewer false crossovers — there is no setting that eliminates whipsaw entirely.
• This script does NOT repaint. All classification updates on confirmed bar close only.
█ DISCLAIMER
For educational and informational purposes only. Nothing here is financial advice. Past behaviour of any directional state does not indicate future results. Trade at your own risk.
Penunjuk

Price Action Support and resistanceShort description
A clean daily price-action indicator that identifies support/resistance-based Buy, Re-Buy, and Exit signals using repeated S/R reactions, candle confirmation, breakout/retests, and adaptive 10-day-low protection.
Full TradingView description
Price Action S/R – Buy, Re-Buy & Exit is a price-action indicator designed primarily for daily-chart swing and positional trading.
The goal is to keep the chart visually simple while allowing the underlying logic to evaluate repeated support/resistance interactions, candle confirmation, breakout/retest setups, exits, and re-entry opportunities.
Signals
B — Buy
A Buy can occur when a sufficiently established support/resistance setup produces one of the supported bullish confirmations, including:
• Support rejection
• Bullish engulfing at support
• Support reclaim
• Resistance breakout followed by a successful retest
By default, a support/resistance level requires at least 3 touches before it becomes eligible for a signal.
R-B — Re-Buy
After an Exit, the indicator remembers the original setup level for a limited period. If price makes a fresh reclaim of that level with bullish confirmation, an R-B signal can be generated.
This is intended to identify situations where an earlier position was protected by the exit logic but the original bullish setup subsequently recovers.
E — Exit
The indicator uses two stages of downside protection.
Before a qualifying resistance warning occurs, the protective level is based on the lowest low of the previous 10 completed candles at the time of entry. This level remains frozen.
A qualifying resistance warning does not automatically create an Exit. Instead, it activates rolling previous-10-day-low protection.
After that transition, a daily close below the rolling previous 10-day low can generate an E signal.
Clean chart design
Only three markers are displayed:
B = Buy
R-B = Re-Buy
E = Exit
Additional calculations remain hidden to avoid filling the chart with support/resistance labels and warning markers.
Hovering over a signal provides additional context such as the setup type, support/resistance touch count, candle type, daily volume, RVOL20, and signal price.
Support and resistance
Support and resistance are treated as zones rather than exact prices. ATR is used to provide tolerance around detected pivot levels.
Nearby pivot reactions can contribute to an existing level, while a minimum separation between reactions helps reduce repeated counting of nearby candles as independent touches.
Candle confirmation
The indicator recognizes price-action confirmations including:
• Bullish rejection
• Bearish rejection
• Bullish engulfing
• Bearish engulfing
• Support reclaim
• Failed breakout
• Breakout and retest
Volume information
Signal tooltips include the day's volume and RVOL20, which compares current volume with the 20-day average volume.
Volume is currently informational only. It is not a mandatory condition for generating a Buy signal.
Recommended use
The indicator was designed primarily around the 1-day timeframe for swing and positional analysis.
It should be used as one component of a broader analysis process rather than as a standalone prediction system. Market conditions, company fundamentals, liquidity, earnings, gaps, and risk tolerance can materially affect results.
Historical signals do not guarantee future performance.
This script is provided for educational and technical-analysis purposes only and is not financial advice.
Suggested TradingView tags
Use tags/categories around:
Support and Resistance, Price Action, Swing Trading, Breakout, Reversal, Volume, Relative Volume
Author's note
You can add this at the bottom:
Version 1.0
This is the first public release. The emphasis is intentionally on chart simplicity: B, R-B and E are displayed while the supporting calculations operate internally.
Future versions may refine support/resistance detection, confirmation quality, volume analysis and risk management based on testing and community feedback.
Code
Use the exact locked script we just finalized — the version titled:
Price Action S/R Master - B R-B E
I would only change its public-facing title:
//@version=6
indicator(
"Price Action S/R - Buy, Re-Buy & Exit ",
overlay=true,
max_labels_count=500)
Everything below that can remain exactly as in the locked version. Do not change the calculations before publishing V1.0.
What I would choose when publishing
For visibility, publish it as an open-source indicator if you're comfortable letting others inspect/copy the Pine code. If you want people to use it but don't want the source openly available, TradingView's available publication/access choices should be reviewed at publishing time.
For the chart screenshot, use a clean 1D chart showing at least one B → E → R-B sequence if you can find a good historical example. Keep the screenshot free of unrelated indicators so people immediately understand what your script does.
And don't market it with claims like “90% accurate,” “guaranteed profits,” “best buy/sell indicator,” etc. The strength of this script is that the rules can be explained transparently.
Before you click Publish
I would use this final package:
Title: Price Action S/R – Buy, Re-Buy & Exit
Visibility on chart: B / R-B / E
Timeframe: 1D primarily
Description: Use the full description above.
Screenshot: Clean daily chart demonstrating the signals.
Version: 1.0
Source: Open-source if you want this to be genuinely community-shared.
Disclaimer: Educational/technical-analysis purposes; not financial advice. Penunjuk