
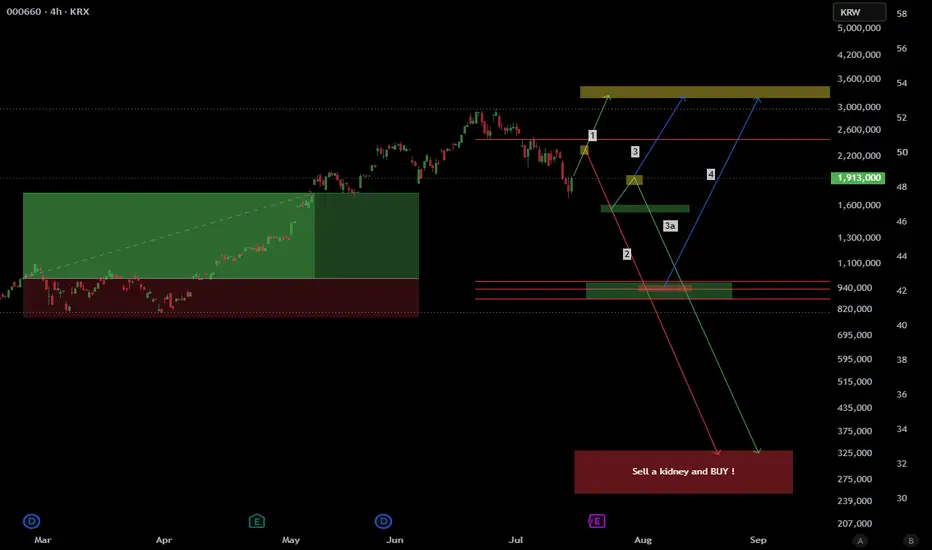
The rally that carried this chart for months finally cracked. Structure broke to the downside, price is trading below the level that used to hold everything up, and the map ahead has rarely been this clearly drawn.
Above, two things matter: a fresh supply zone left behind by the breakdown, and higher still, the weak high, untouched and holding the liquidity every uptrend eventually wants back. Below, a stacked demand cluster where the last major accumulation lives. And far beneath that, a zone we labeled honestly, because if price ever visits it, subtlety will not be required.
The paths:
Path 1: Buyers waste no time. The broken level gets reclaimed, supply above fails, and price runs directly at the weak high. The V-shaped answer, and the one that would embarrass the most people.
Path 2: No reclaim, no bounce, no mercy. Sellers press straight through every shelf on the chart and price freefalls toward the deep discount zone. The full unwind.
Path 3: The middle road. A relief bounce into the supply left by the breakdown, rejection at the scene of the crime, then a controlled descent into the demand cluster, where buyers get their audition. If they pass, the weak high is the prize.
Path 3a: Same rejection, worse outcome. Demand gets tested and fails, and the chart resolves into the zone at the bottom. The kidney scenario.
Path 4: Demand holds on the first touch, the base takes longer to build, but the destination is the same, the liquidity above the weak high gets collected on a delay.
Five roads, two destinations. The reaction at supply tells you which half of the chart is in play, and the reaction at demand tells you everything else.
EQC follows the reaction.
Hidden in plain sight. EQC.
Like, Follow, Boost, Join, Thank You!
Financial Disclaimer: This post is not financial advice. I am not your financial advisor, your crypto influencer, or your emergency hotline when volatility discovers your stop loss. Always do your own research and never trade solely because colorful arrows suggest a brighter future.
Above, two things matter: a fresh supply zone left behind by the breakdown, and higher still, the weak high, untouched and holding the liquidity every uptrend eventually wants back. Below, a stacked demand cluster where the last major accumulation lives. And far beneath that, a zone we labeled honestly, because if price ever visits it, subtlety will not be required.
The paths:
Path 1: Buyers waste no time. The broken level gets reclaimed, supply above fails, and price runs directly at the weak high. The V-shaped answer, and the one that would embarrass the most people.
Path 2: No reclaim, no bounce, no mercy. Sellers press straight through every shelf on the chart and price freefalls toward the deep discount zone. The full unwind.
Path 3: The middle road. A relief bounce into the supply left by the breakdown, rejection at the scene of the crime, then a controlled descent into the demand cluster, where buyers get their audition. If they pass, the weak high is the prize.
Path 3a: Same rejection, worse outcome. Demand gets tested and fails, and the chart resolves into the zone at the bottom. The kidney scenario.
Path 4: Demand holds on the first touch, the base takes longer to build, but the destination is the same, the liquidity above the weak high gets collected on a delay.
Five roads, two destinations. The reaction at supply tells you which half of the chart is in play, and the reaction at demand tells you everything else.
EQC follows the reaction.
Hidden in plain sight. EQC.
Like, Follow, Boost, Join, Thank You!
Financial Disclaimer: This post is not financial advice. I am not your financial advisor, your crypto influencer, or your emergency hotline when volatility discovers your stop loss. Always do your own research and never trade solely because colorful arrows suggest a brighter future.

Wyłączenie odpowiedzialności
Informacje i publikacje nie stanowią i nie powinny być traktowane jako porady finansowe, inwestycyjne, tradingowe ani jakiekolwiek inne rekomendacje dostarczane lub zatwierdzone przez TradingView. Więcej informacji znajduje się w Warunkach użytkowania.
Wyłączenie odpowiedzialności
Informacje i publikacje nie stanowią i nie powinny być traktowane jako porady finansowe, inwestycyjne, tradingowe ani jakiekolwiek inne rekomendacje dostarczane lub zatwierdzone przez TradingView. Więcej informacji znajduje się w Warunkach użytkowania.