
1. Price Level
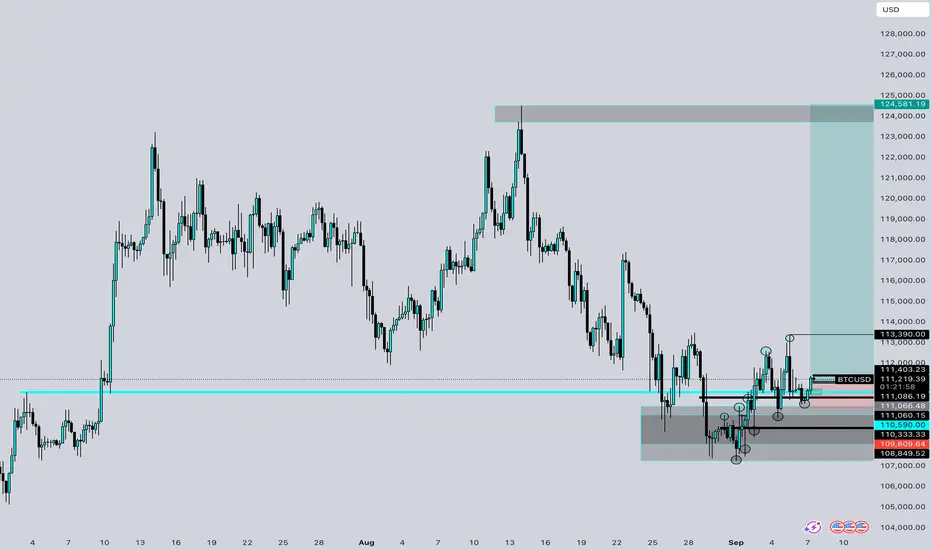
• BTCUSD is currently trading around 111,200.
• Recent move shows price bouncing from the 110,000 – 109,000 demand zone.
2. Support & Demand Zones
• Strong support zone marked around 108,800 – 110,000 (grey box).
Price has reacted multiple times here, showing accumulation and liquidity grabs.
• Intermediate support near 110,500 – 110,900.
3. Resistance & Target Zones
• First resistance / short-term target: 113,390.
• Major resistance / higher timeframe target: 124,500 – 125,000 (highlighted green box at the top).
4. Market Structure
• After a series of lower highs and lower lows, BTC found a base around 109k.
• Current structure shows a break of minor highs → potential start of a trend reversal.
• Price is consolidating above demand and building a higher low formation.
⸻
Buy Setup Analysis
• Entry Zone: Between 110,500 – 111,200 (current consolidation and demand retest).
• Stop Loss (SL): Below 108,800 (the low of demand zone and liquidity sweep).
• Take Profit (TP):
• TP1: 113,390 (first resistance).
• TP2: 118,000 (mid-structure target).
• TP3: 124,500 – 125,000 (major resistance zone).
• Risk-to-Reward (RR):
• If entered near 111,000 with SL at 108,800, and TP1 at 113,390 → ~1:1.
• If TP3 at 124,500 is achieved → ~5:1 RR.
• BTCUSD is currently trading around 111,200.
• Recent move shows price bouncing from the 110,000 – 109,000 demand zone.
2. Support & Demand Zones
• Strong support zone marked around 108,800 – 110,000 (grey box).
Price has reacted multiple times here, showing accumulation and liquidity grabs.
• Intermediate support near 110,500 – 110,900.
3. Resistance & Target Zones
• First resistance / short-term target: 113,390.
• Major resistance / higher timeframe target: 124,500 – 125,000 (highlighted green box at the top).
4. Market Structure
• After a series of lower highs and lower lows, BTC found a base around 109k.
• Current structure shows a break of minor highs → potential start of a trend reversal.
• Price is consolidating above demand and building a higher low formation.
⸻
Buy Setup Analysis
• Entry Zone: Between 110,500 – 111,200 (current consolidation and demand retest).
• Stop Loss (SL): Below 108,800 (the low of demand zone and liquidity sweep).
• Take Profit (TP):
• TP1: 113,390 (first resistance).
• TP2: 118,000 (mid-structure target).
• TP3: 124,500 – 125,000 (major resistance zone).
• Risk-to-Reward (RR):
• If entered near 111,000 with SL at 108,800, and TP1 at 113,390 → ~1:1.
• If TP3 at 124,500 is achieved → ~5:1 RR.

Wyłączenie odpowiedzialności
Informacje i publikacje nie stanowią i nie powinny być traktowane jako porady finansowe, inwestycyjne, tradingowe ani jakiekolwiek inne rekomendacje dostarczane lub zatwierdzone przez TradingView. Więcej informacji znajduje się w Warunkach użytkowania.
Wyłączenie odpowiedzialności
Informacje i publikacje nie stanowią i nie powinny być traktowane jako porady finansowe, inwestycyjne, tradingowe ani jakiekolwiek inne rekomendacje dostarczane lub zatwierdzone przez TradingView. Więcej informacji znajduje się w Warunkach użytkowania.