
Market Thesis:
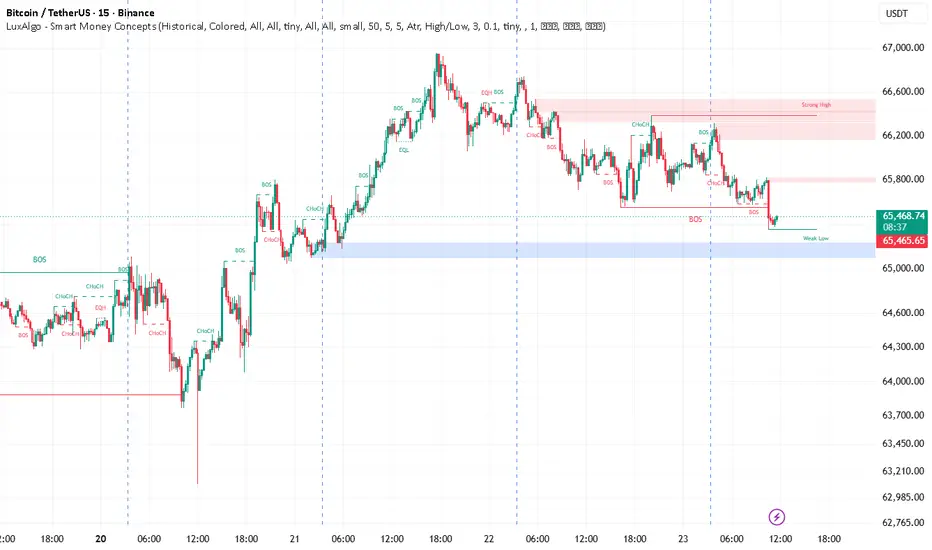
BTCUSDT has shifted into bearish intraday order flow following a visible bearish CHoCH and subsequent BOS below approximately 65,548. Price is now pressing toward the marked Weak Low at 65,348, with the blue LuxAlgo demand zone below acting as the next major reaction area.
Unless buyers reclaim the broken structure, rallies should be treated as potential redistribution opportunities rather than confirmed reversals.
Visible Confluences — 15-Minute Chart
Current price: approximately 65,438.
Latest bearish BOS level: approximately 65,548; this is now immediate resistance.
Marked Weak Low: approximately 65,348, representing vulnerable sell-side liquidity.
Blue LuxAlgo demand zone: 65,090–65,225.
Near-term red LuxAlgo supply zone: 65,780–65,820.
Major red LuxAlgo supply zone: 66,168–66,535.
Marked Strong High/protected structural level: approximately 66,387.
Multiple bearish BOS signals are visible after the rejection from the 66,200–66,500 region, confirming lower-high and lower-low development.
No explicitly marked FVG is visible on this chart; the analysis is therefore based on the displayed structure, liquidity labels and shaded LuxAlgo zones.
Trade Scenarios
Setup 1 — Primary Sell: Broken BOS Retest
Direction: Sell
Entry zone: 65,500–65,560
Required trigger: Retest rejection followed by a 1-minute, 3-minute or 5-minute bearish CHoCH, bearish engulfing candle, or strong downside displacement.
Stop loss: 65,650
TP1: 65,348
TP2: 65,225
TP3: 65,090
This is the most immediate continuation setup. The former BOS support should now function as resistance.
Setup 2 — Deeper Premium Sell
Direction: Sell
Entry zone: 65,780–65,820
Required trigger: Liquidity sweep into the red shaded zone, followed by an LTF bearish structural shift and rejection close beneath 65,780.
Stop loss: 65,930
TP1: 65,548
TP2: 65,348
TP3: 65,100
This setup offers stronger risk-to-reward but requires a deeper retracement against the current bearish order flow.
Setup 3 — Conditional Demand-Zone Buy
Direction: Buy
Entry zone: 65,090–65,225
Required trigger: Sweep of the 65,348 Weak Low, absorption inside the blue zone, and a confirmed LTF bullish CHoCH with momentum displacement.
Stop loss: 64,980
TP1: 65,348
TP2: 65,548
TP3: 65,800
This is a countertrend reaction setup until price decisively reclaims 65,548. Do not buy the zone blindly while bearish structure remains intact.
Refinement Tip
Treat the 15-minute chart as the higher-timeframe framework and refine execution on the 1-minute to 5-minute charts. For the best risk-to-reward, wait for a liquidity sweep, LTF CHoCH and a decisive momentum candle inside the identified zones before entering.
⚠️ Disclaimer
Trading financial markets involves significant risk, and no technical framework can guarantee an outcome. This analysis reflects the visible market structure and probability-based scenarios at the time shown. It is strictly educational and analytical—not individualized financial advice. Always define invalidation precisely, control position size and protect capital.
BTCUSDT has shifted into bearish intraday order flow following a visible bearish CHoCH and subsequent BOS below approximately 65,548. Price is now pressing toward the marked Weak Low at 65,348, with the blue LuxAlgo demand zone below acting as the next major reaction area.
Unless buyers reclaim the broken structure, rallies should be treated as potential redistribution opportunities rather than confirmed reversals.
Visible Confluences — 15-Minute Chart
Current price: approximately 65,438.
Latest bearish BOS level: approximately 65,548; this is now immediate resistance.
Marked Weak Low: approximately 65,348, representing vulnerable sell-side liquidity.
Blue LuxAlgo demand zone: 65,090–65,225.
Near-term red LuxAlgo supply zone: 65,780–65,820.
Major red LuxAlgo supply zone: 66,168–66,535.
Marked Strong High/protected structural level: approximately 66,387.
Multiple bearish BOS signals are visible after the rejection from the 66,200–66,500 region, confirming lower-high and lower-low development.
No explicitly marked FVG is visible on this chart; the analysis is therefore based on the displayed structure, liquidity labels and shaded LuxAlgo zones.
Trade Scenarios
Setup 1 — Primary Sell: Broken BOS Retest
Direction: Sell
Entry zone: 65,500–65,560
Required trigger: Retest rejection followed by a 1-minute, 3-minute or 5-minute bearish CHoCH, bearish engulfing candle, or strong downside displacement.
Stop loss: 65,650
TP1: 65,348
TP2: 65,225
TP3: 65,090
This is the most immediate continuation setup. The former BOS support should now function as resistance.
Setup 2 — Deeper Premium Sell
Direction: Sell
Entry zone: 65,780–65,820
Required trigger: Liquidity sweep into the red shaded zone, followed by an LTF bearish structural shift and rejection close beneath 65,780.
Stop loss: 65,930
TP1: 65,548
TP2: 65,348
TP3: 65,100
This setup offers stronger risk-to-reward but requires a deeper retracement against the current bearish order flow.
Setup 3 — Conditional Demand-Zone Buy
Direction: Buy
Entry zone: 65,090–65,225
Required trigger: Sweep of the 65,348 Weak Low, absorption inside the blue zone, and a confirmed LTF bullish CHoCH with momentum displacement.
Stop loss: 64,980
TP1: 65,348
TP2: 65,548
TP3: 65,800
This is a countertrend reaction setup until price decisively reclaims 65,548. Do not buy the zone blindly while bearish structure remains intact.
Refinement Tip
Treat the 15-minute chart as the higher-timeframe framework and refine execution on the 1-minute to 5-minute charts. For the best risk-to-reward, wait for a liquidity sweep, LTF CHoCH and a decisive momentum candle inside the identified zones before entering.
⚠️ Disclaimer
Trading financial markets involves significant risk, and no technical framework can guarantee an outcome. This analysis reflects the visible market structure and probability-based scenarios at the time shown. It is strictly educational and analytical—not individualized financial advice. Always define invalidation precisely, control position size and protect capital.

Wyłączenie odpowiedzialności
Informacje i publikacje nie stanowią i nie powinny być traktowane jako porady finansowe, inwestycyjne, tradingowe ani jakiekolwiek inne rekomendacje dostarczane lub zatwierdzone przez TradingView. Więcej informacji znajduje się w Warunkach użytkowania.
Wyłączenie odpowiedzialności
Informacje i publikacje nie stanowią i nie powinny być traktowane jako porady finansowe, inwestycyjne, tradingowe ani jakiekolwiek inne rekomendacje dostarczane lub zatwierdzone przez TradingView. Więcej informacji znajduje się w Warunkach użytkowania.