
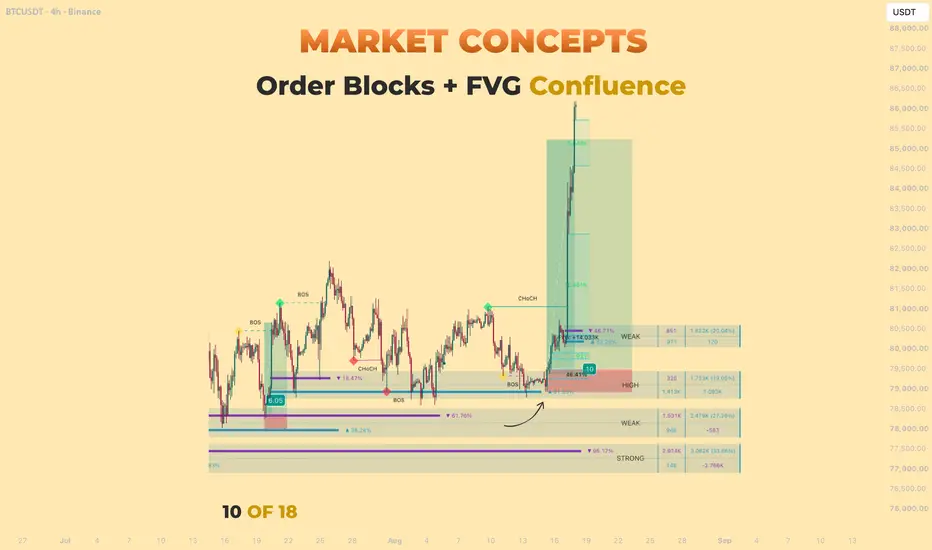
Lesson 10 - Stacking Imbalance Signals: Order Blocks and Fair Value Gaps Together
Difficulty: Advanced
One good signal is useful. Two signals overlapping in the same place is where real conviction lives. When an order block and a fair value gap sit on top of each other, you're looking at a level the market has flagged twice — for two different reasons.

🔵 WHY CONFLUENCE MATTERS
Every tool you learn on a chart gives you information about where price might react. On its own, any single signal has a certain hit rate — sometimes it works, sometimes it doesn't. That's just the nature of markets.
But when two independent signals point to the exact same area of price, something changes. You're no longer relying on one pattern to work. You're looking at a location that two different concepts, using two different logics, both agree is important. That agreement is what traders call confluence.
Confluence doesn't guarantee a trade will work. Nothing does. But it stacks the odds — turning a decent setup into a strong one, and a strong one into your highest-conviction plays.
🔵 TWO SIGNALS, TWO DIFFERENT REASONS
Order blocks and fair value gaps come from completely different ideas:
- An order block marks the last area where one side (buyers or sellers) took control before a strong move. It represents where meaningful positioning happened
- A fair value gap marks an imbalance — an area price moved through so fast that trading was skipped. It represents where the market left unfinished business
Both are useful on their own. But notice they're saying slightly different things: an OB says "this is where the last decision was made." An FVG says "this is where the market ran through too quickly." When both of those descriptions apply to the same price area, that area carries two different reasons to expect a reaction — one from positioning logic, one from imbalance logic.

And when price returns to that overlap area, the reaction often plays out exactly as both signals would independently predict — a clean move away in the direction of the original impulse.

🔵 HOW OB AND FVG STACK TOGETHER
The stacking usually looks like this: a strong directional move creates both a fresh order block at its origin AND a fair value gap inside the move itself.
The order block sits at the base of the move — the last opposite-colored candle before the impulse. The FVG sits inside the impulse itself — the imbalance created by the speed. Very often, these two zones overlap partially or completely.
When price returns later, it doesn't just retest an order block. It retests an area that IS an order block AND an FVG at the same time. Any reaction at that level has two independent explanations, which is exactly why these setups tend to hold cleanly.

🔵 WHAT A CONFLUENCE SETUP LOOKS LIKE ON THE CHART
Spotting the confluence in real time is a matter of scanning for the overlap:
- First, look for a strong directional move (up or down) with clear momentum
- At the origin of the move, mark the order block
- Inside the move, mark the fair value gap
- Check whether the two zones overlap — if they do, you have a confluence zone
The overlap area is what you actually watch on the retest. The rest of each individual zone (the parts that don't overlap) can still be relevant, but the overlap is the highest-probability spot.

Once you spot the setup, the retest itself is the moment to watch closely. If the level holds, the reaction is usually decisive — clean rejection candles, momentum shift, price moving away from the zone with real conviction.

🔵 TRADING THE CONFLUENCE RETEST
The workflow for trading a confluence zone follows the same logic as trading either signal on its own — but with a higher-conviction entry:
- Wait for price to pull back to the confluence area
- Watch for a reaction — rejection candle, momentum shift, structure holding
- Enter in the direction of the original move
- Stop-loss goes beyond the far edge of the combined zone (not just the OB or just the FVG — the whole confluence area)
- Target set by structure ahead
The key advantage: because the zone carries two forms of confluence, you can be more decisive on entry. Aggressive entries (right on first touch) become more viable, since the level has more weight behind it than a single-signal setup would.

And once the trade is running, the confluence typically resolves quickly — either the level holds and price moves cleanly toward target, or the level fails and you're out at a defined stop.

🔵 COMMON MISTAKES TO AVOID
- Forcing confluence where it doesn't exist — if the OB and FVG don't actually overlap, you don't have a confluence setup, you just have two nearby zones
- Treating confluence as a guarantee — even the strongest setup can fail; confluence stacks odds, not certainties
- Trading confluence in the wrong context — a bullish confluence zone in a strong downtrend is still fighting the trend
- Ignoring the timeframe — confluence on a 5-minute chart is much weaker than the same setup on a 4-hour or daily chart
🐳 PRO TIPS
- Confluence setups on higher timeframes (4H, daily) tend to be the cleanest, because both signals carry more weight to begin with
- Add a third layer of confluence when you can — a confluence zone that also aligns with a prior support/resistance level, a structural point, or a higher-timeframe zone is the strongest possible setup
- If you're new to combining signals, start by simply marking OBs and FVGs on your chart without trading them — train your eye to spot the overlaps first
- Not every quality OB or quality FVG will have confluence with the other — that's fine; they're still tradable on their own, just with less conviction
Confluence between OB and FVG is one of the more rewarding patterns to learn, because once you see it, you start filtering out weaker setups almost automatically.
Market Concepts — All Lessons
Lesson 01 — What Order Blocks Are
Lesson 02 — Zone Strength Isn't About Size
Lesson 03 — Entering Trades With Order Blocks
Lesson 04 — Old Order Blocks As New S/R
Lesson 05 — Breaker Blocks
Lesson 06 — HTF Blocks With LTF Entries
Lesson 07 — BOS vs Change of Character
Lesson 08 — Structure Quality: Strong vs Weak
Lesson 09 — Fair Value Gaps
Best Regards, BigBeluga 🐳
Difficulty: Advanced
One good signal is useful. Two signals overlapping in the same place is where real conviction lives. When an order block and a fair value gap sit on top of each other, you're looking at a level the market has flagged twice — for two different reasons.
🔵 WHY CONFLUENCE MATTERS
Every tool you learn on a chart gives you information about where price might react. On its own, any single signal has a certain hit rate — sometimes it works, sometimes it doesn't. That's just the nature of markets.
But when two independent signals point to the exact same area of price, something changes. You're no longer relying on one pattern to work. You're looking at a location that two different concepts, using two different logics, both agree is important. That agreement is what traders call confluence.
Confluence doesn't guarantee a trade will work. Nothing does. But it stacks the odds — turning a decent setup into a strong one, and a strong one into your highest-conviction plays.
🔵 TWO SIGNALS, TWO DIFFERENT REASONS
Order blocks and fair value gaps come from completely different ideas:
- An order block marks the last area where one side (buyers or sellers) took control before a strong move. It represents where meaningful positioning happened
- A fair value gap marks an imbalance — an area price moved through so fast that trading was skipped. It represents where the market left unfinished business
Both are useful on their own. But notice they're saying slightly different things: an OB says "this is where the last decision was made." An FVG says "this is where the market ran through too quickly." When both of those descriptions apply to the same price area, that area carries two different reasons to expect a reaction — one from positioning logic, one from imbalance logic.
And when price returns to that overlap area, the reaction often plays out exactly as both signals would independently predict — a clean move away in the direction of the original impulse.
🔵 HOW OB AND FVG STACK TOGETHER
The stacking usually looks like this: a strong directional move creates both a fresh order block at its origin AND a fair value gap inside the move itself.
The order block sits at the base of the move — the last opposite-colored candle before the impulse. The FVG sits inside the impulse itself — the imbalance created by the speed. Very often, these two zones overlap partially or completely.
When price returns later, it doesn't just retest an order block. It retests an area that IS an order block AND an FVG at the same time. Any reaction at that level has two independent explanations, which is exactly why these setups tend to hold cleanly.
🔵 WHAT A CONFLUENCE SETUP LOOKS LIKE ON THE CHART
Spotting the confluence in real time is a matter of scanning for the overlap:
- First, look for a strong directional move (up or down) with clear momentum
- At the origin of the move, mark the order block
- Inside the move, mark the fair value gap
- Check whether the two zones overlap — if they do, you have a confluence zone
The overlap area is what you actually watch on the retest. The rest of each individual zone (the parts that don't overlap) can still be relevant, but the overlap is the highest-probability spot.
Once you spot the setup, the retest itself is the moment to watch closely. If the level holds, the reaction is usually decisive — clean rejection candles, momentum shift, price moving away from the zone with real conviction.
🔵 TRADING THE CONFLUENCE RETEST
The workflow for trading a confluence zone follows the same logic as trading either signal on its own — but with a higher-conviction entry:
- Wait for price to pull back to the confluence area
- Watch for a reaction — rejection candle, momentum shift, structure holding
- Enter in the direction of the original move
- Stop-loss goes beyond the far edge of the combined zone (not just the OB or just the FVG — the whole confluence area)
- Target set by structure ahead
The key advantage: because the zone carries two forms of confluence, you can be more decisive on entry. Aggressive entries (right on first touch) become more viable, since the level has more weight behind it than a single-signal setup would.
And once the trade is running, the confluence typically resolves quickly — either the level holds and price moves cleanly toward target, or the level fails and you're out at a defined stop.
🔵 COMMON MISTAKES TO AVOID
- Forcing confluence where it doesn't exist — if the OB and FVG don't actually overlap, you don't have a confluence setup, you just have two nearby zones
- Treating confluence as a guarantee — even the strongest setup can fail; confluence stacks odds, not certainties
- Trading confluence in the wrong context — a bullish confluence zone in a strong downtrend is still fighting the trend
- Ignoring the timeframe — confluence on a 5-minute chart is much weaker than the same setup on a 4-hour or daily chart
🐳 PRO TIPS
- Confluence setups on higher timeframes (4H, daily) tend to be the cleanest, because both signals carry more weight to begin with
- Add a third layer of confluence when you can — a confluence zone that also aligns with a prior support/resistance level, a structural point, or a higher-timeframe zone is the strongest possible setup
- If you're new to combining signals, start by simply marking OBs and FVGs on your chart without trading them — train your eye to spot the overlaps first
- Not every quality OB or quality FVG will have confluence with the other — that's fine; they're still tradable on their own, just with less conviction
Confluence between OB and FVG is one of the more rewarding patterns to learn, because once you see it, you start filtering out weaker setups almost automatically.
Market Concepts — All Lessons
Lesson 01 — What Order Blocks Are
Lesson 02 — Zone Strength Isn't About Size
Lesson 03 — Entering Trades With Order Blocks
Lesson 04 — Old Order Blocks As New S/R
Lesson 05 — Breaker Blocks
Lesson 06 — HTF Blocks With LTF Entries
Lesson 07 — BOS vs Change of Character
Lesson 08 — Structure Quality: Strong vs Weak
Lesson 09 — Fair Value Gaps
Best Regards, BigBeluga 🐳

🔵Gain access to our powerful tools : bigbeluga.com/tv
🔵Join our free discord for updates : discord.com/invite/FuW63RKgdc
All scripts & content provided by BigBeluga are for informational & educational purposes only.
🔵Join our free discord for updates : discord.com/invite/FuW63RKgdc
All scripts & content provided by BigBeluga are for informational & educational purposes only.
Powiązane publikacje
Wyłączenie odpowiedzialności
Informacje i publikacje nie stanowią i nie powinny być traktowane jako porady finansowe, inwestycyjne, tradingowe ani jakiekolwiek inne rekomendacje dostarczane lub zatwierdzone przez TradingView. Więcej informacji znajduje się w Warunkach użytkowania.
🔵Gain access to our powerful tools : bigbeluga.com/tv
🔵Join our free discord for updates : discord.com/invite/FuW63RKgdc
All scripts & content provided by BigBeluga are for informational & educational purposes only.
🔵Join our free discord for updates : discord.com/invite/FuW63RKgdc
All scripts & content provided by BigBeluga are for informational & educational purposes only.
Powiązane publikacje
Wyłączenie odpowiedzialności
Informacje i publikacje nie stanowią i nie powinny być traktowane jako porady finansowe, inwestycyjne, tradingowe ani jakiekolwiek inne rekomendacje dostarczane lub zatwierdzone przez TradingView. Więcej informacji znajduje się w Warunkach użytkowania.