
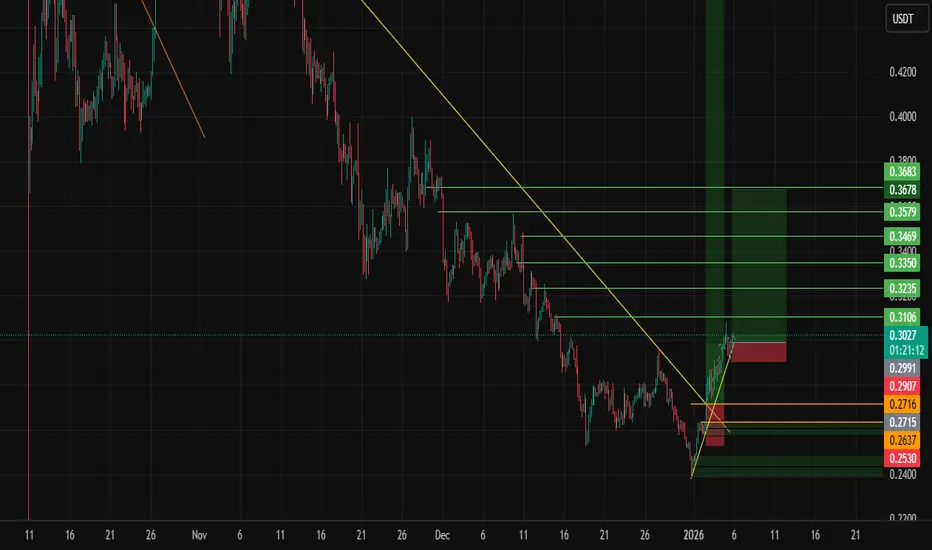
📢 Trade Setup – DIA/USDT
📈 Position: LONG
💰 Entry Zone:
0.3024– 0.2959
(Key demand & trendline retest area shown on chart)
🛑 Stop-Loss:
0.29
(Below structure low & invalidation zone)
🎯 Take-Profit Targets:
• TP1: 0.3106
• TP2: 0.3335
• TP3: 0.33350
• TP4: 0.3469
• TP5: 0.3579
• TP6: 0.3678
📊 Timeframe: 1H
⚙️ Market: Futures / Spot
⚖️ Risk–Reward: High R:R (step-by-step scaling)
🧠 Chart Analysis (Based on the Image):
DIA has broken the long-term descending trendline with strong bullish momentum.
Price formed a higher low after a sharp impulsive move, confirming trend reversal.
Current pullback is a healthy retest into the previous breakout zone.
Multiple green targets align with key resistance & liquidity levels marked on the chart.
Overall structure has shifted from bearish → bullish continuation.
📌 Trade Management Rules:
✔️ Take partial profit at each TP
✔️ After TP1 → move SL to Break Even
✔️ Trail SL below higher lows
✔️ Risk per trade: 1–2% MAX
✔️ Avoid over-leverage during pullback entries
💥 Suggested Leverage:
3× – 5× (maximum)
⚠️ Invalidation:
If price closes below 0.29 0, the bullish setup is invalid.
If you want next:
• Update after TP hits
• Short scenario if structure fails
📈 Position: LONG
💰 Entry Zone:
0.3024– 0.2959
(Key demand & trendline retest area shown on chart)
🛑 Stop-Loss:
0.29
(Below structure low & invalidation zone)
🎯 Take-Profit Targets:
• TP1: 0.3106
• TP2: 0.3335
• TP3: 0.33350
• TP4: 0.3469
• TP5: 0.3579
• TP6: 0.3678
📊 Timeframe: 1H
⚙️ Market: Futures / Spot
⚖️ Risk–Reward: High R:R (step-by-step scaling)
🧠 Chart Analysis (Based on the Image):
DIA has broken the long-term descending trendline with strong bullish momentum.
Price formed a higher low after a sharp impulsive move, confirming trend reversal.
Current pullback is a healthy retest into the previous breakout zone.
Multiple green targets align with key resistance & liquidity levels marked on the chart.
Overall structure has shifted from bearish → bullish continuation.
📌 Trade Management Rules:
✔️ Take partial profit at each TP
✔️ After TP1 → move SL to Break Even
✔️ Trail SL below higher lows
✔️ Risk per trade: 1–2% MAX
✔️ Avoid over-leverage during pullback entries
💥 Suggested Leverage:
3× – 5× (maximum)
⚠️ Invalidation:
If price closes below 0.29 0, the bullish setup is invalid.
If you want next:
• Update after TP hits
• Short scenario if structure fails

Wyłączenie odpowiedzialności
Informacje i publikacje nie stanowią i nie powinny być traktowane jako porady finansowe, inwestycyjne, tradingowe ani jakiekolwiek inne rekomendacje dostarczane lub zatwierdzone przez TradingView. Więcej informacji znajduje się w Warunkach użytkowania.
Wyłączenie odpowiedzialności
Informacje i publikacje nie stanowią i nie powinny być traktowane jako porady finansowe, inwestycyjne, tradingowe ani jakiekolwiek inne rekomendacje dostarczane lub zatwierdzone przez TradingView. Więcej informacji znajduje się w Warunkach użytkowania.