
🟦 PROFESSIONAL BREAKDOWN
🔎 1. Market Context
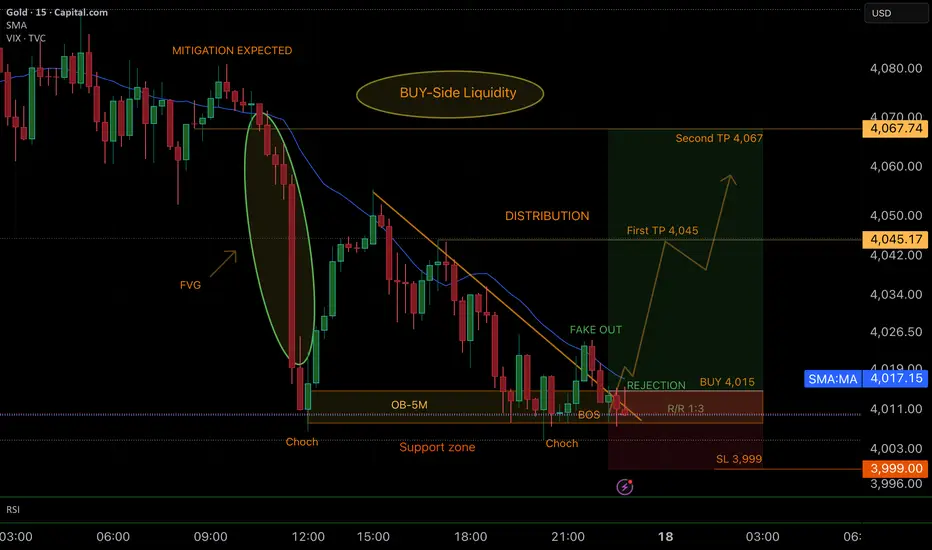
Price creates a strong bearish displacement, leaving a clean FVG unmitigated.
Then a significant ChoCH forms at a demand zone, signaling the first shift in market intention.
🧱 2. Institutional Accumulation Zone
Between the OB-5M and the support zone, we see:
• Consecutive rejections
• Order absorption
• Indecision candles
All of this reveals institutional buyers defending the level.
📉 3. Liquidity Sweep & Manipulation (Fake Out)
Price temporarily breaks below support, generating:
• Sell-side liquidity
• Immediate buy-side absorption
• Clean return into the range
This follows the classic SMC blueprint:
Liquidity → Mitigation → Expansion.
📈 4. Bullish Confirmation
A clean BOS confirms internal bullish structure.
The sequence becomes:
1. ChoCH
2. Liquidity sweep
3. OB mitigation
4. Bullish BOS
5. Expansion towards targets
Perfect institutional flow.
🎯 5. Entry Zone
📍 BUY 4,015
Confluences:
• 5M Order Block
• Strong support zone
• Fake out with absorption
• FVG mitigation
• Structural confirmation (BOS)
🛡️ 6. Stop Loss
📍 SL 3,990
Placed below the liquidity sweep — beyond this level, the idea is invalid.
🎯 7. Take Profits
• TP1: 4,045 → first distribution target.
• TP2: 4,067 → major buy-side liquidity target where institutions offload positions.
🧠 Professional Conclusion
This setup is built on:
✔ Liquidity engineering
✔ Clear structure
✔ Mitigation principles
✔ Institutional rejection
✔ Organic expansion
A high-probability bullish setup, fully aligned with institutional price behavior.
💬 Motivational Message…
“Great traders don’t chase the market — they anticipate it. Trust your process, respect your levels, and execute with confidence. Consistency is built candle by candle.”
[ GOOD LUCK TRADERS]
🔎 1. Market Context
Price creates a strong bearish displacement, leaving a clean FVG unmitigated.
Then a significant ChoCH forms at a demand zone, signaling the first shift in market intention.
🧱 2. Institutional Accumulation Zone
Between the OB-5M and the support zone, we see:
• Consecutive rejections
• Order absorption
• Indecision candles
All of this reveals institutional buyers defending the level.
📉 3. Liquidity Sweep & Manipulation (Fake Out)
Price temporarily breaks below support, generating:
• Sell-side liquidity
• Immediate buy-side absorption
• Clean return into the range
This follows the classic SMC blueprint:
Liquidity → Mitigation → Expansion.
📈 4. Bullish Confirmation
A clean BOS confirms internal bullish structure.
The sequence becomes:
1. ChoCH
2. Liquidity sweep
3. OB mitigation
4. Bullish BOS
5. Expansion towards targets
Perfect institutional flow.
🎯 5. Entry Zone
📍 BUY 4,015
Confluences:
• 5M Order Block
• Strong support zone
• Fake out with absorption
• FVG mitigation
• Structural confirmation (BOS)
🛡️ 6. Stop Loss
📍 SL 3,990
Placed below the liquidity sweep — beyond this level, the idea is invalid.
🎯 7. Take Profits
• TP1: 4,045 → first distribution target.
• TP2: 4,067 → major buy-side liquidity target where institutions offload positions.
🧠 Professional Conclusion
This setup is built on:
✔ Liquidity engineering
✔ Clear structure
✔ Mitigation principles
✔ Institutional rejection
✔ Organic expansion
A high-probability bullish setup, fully aligned with institutional price behavior.
💬 Motivational Message…
“Great traders don’t chase the market — they anticipate it. Trust your process, respect your levels, and execute with confidence. Consistency is built candle by candle.”
[ GOOD LUCK TRADERS]

Wyłączenie odpowiedzialności
Informacje i publikacje nie stanowią i nie powinny być traktowane jako porady finansowe, inwestycyjne, tradingowe ani jakiekolwiek inne rekomendacje dostarczane lub zatwierdzone przez TradingView. Więcej informacji znajduje się w Warunkach użytkowania.
Wyłączenie odpowiedzialności
Informacje i publikacje nie stanowią i nie powinny być traktowane jako porady finansowe, inwestycyjne, tradingowe ani jakiekolwiek inne rekomendacje dostarczane lub zatwierdzone przez TradingView. Więcej informacji znajduje się w Warunkach użytkowania.